
Welcome to ScapeCrunch
We are ScapeCrunch, the place where planted aquarium hobbyists come to build relationships and support each other. When you're tired of doom scrolling, you've found your home here.
Social Feed
Just curious how often you guys exchange or refill ypur CO2 tanks. Please include CO2 tank size, aquarium volume and method of injection (diffuser or reactor).
I have a 20lb CO2 tank on a 135G using a reactor. I normally go 3 months before I need to swap tanks.
I have a 20lb CO2 tank on a 135G using a reactor. I normally go 3 months before I need to swap tanks.
26 Replies
·
3372 views


Supporting
I Donated 2026
Rockstar
There are several threads discussing the new Aquael Hypermax 4500BT. I'm sure many would like some reports on it's performance over time. We have a thread discussing nano canister filters. We're all waiting for one of @Naturescapes_Rocco in depth write-ups discussing his filtration set-up. @Pepere and @*Ci* have unique set-ups as well, @Kwyet has used a matten filter, and we have several other members running sumps. That doesn't even include all those running sponge and HOB filters.
The idea is that we can consolidate a lot of filter information in one place making it easier to find rather than searching through so many threads. Maybe this won't work but I thought it was worth giving it a try. Perhaps it may be better listed as an article at some point.
I'm going to get things started by discussing factors I feel are most important to me when choosing a filter.
1) Filtration Performance: This goes without saying. The filter’s primary job is to keep our water clean and free of anything that harms the inhabitants. Of course, there are multiple factors that play into this. Some say flow is most critical, while others claim media volume is most important. Are there other factors? I still have limited experience, but my view, having done considerable reading, is that flow tends to be a bit overblown. You’ll see recommendations of anywhere from 4 to 10 times turnover rate with most leaning toward the higher end of that. I don’t think turnover rate is really the detail to be concerned about, at least with heavily planted tanks like are the norm here. I think the focus should be simply on ensuring flow achieves the goal of effectively moving water through the system to remove toxins/waste, delivering nutrients, and aiding gas (oxygen/CO2) transfer. If a turnover rate of 3 or 4 does that without dead spots in the tank, you should be good. After all, most of us here are plant focused and therefore, the fish we generally have are smaller community species that typically don’t care for high flow (there are, of course, exceptions).
I think there’s a simpler answer regarding media volume; more is better. Obviously, there must be a balance between internal volume and overall size of the filter. Real estate in and around our aquarium stands is precious. Filters like the Fluval FX6 and the newest Aquael Hypermax are huge. If you’re going for one of those, you’re likely putting it on a large tank with plenty of space underneath but again, it’s a matter of finding the right balance that provides the performance you need in a manageable size.
2) Reliability/Durability: This is where solid reviews come in handy and why getting feedback from users here is invaluable. Filtration performance becomes moot if the filter isn’t running, or worse yet, just flooded your house. Being able to easily source spare parts is also valuable, which is why sticking to the top well-known brands is often a safe route. It’s also why many aquarists place canister filters in protective containers, something else to consider when taking into account, size of filter. (this is something I should really do as I’ve had to clean up a few significant spills after filter maintenance and not getting the top secured in place properly )
)
3) Tie – Maintenance/Noise Level: These two factors are equally important to me. If the filter is a pain to maintain, I’m going to put it off, and that’s bad. It affects the performance. But equally important to me is how noisy it is. I tend to be sensitive to annoying little sounds regardless of where I am; at home, in the car, at work, you name it. If the aquarium is in a part of the house I spend a lot of time in, well then, it’s even more important.
I don’t know if Oase was first to do it, but the idea of the prefilter was, I think, a game changer for many. I imagine it was derived from people installing foam filters on the intake pipes. Having an easily removable section with foam filters that catch a lot of large particles before entering the primary filter chamber is a great idea, resulting in expanded intervals between main filter head removals for cleaning.
Another aspect of maintenance is ease of priming. This could also be an aspect of performance but I don’t think it is quite as important. I’m not sure there is a canister filter that is truly or consistently easy to prime. Some may start out that way, but over time, become less and less so. This is an area I’d really like to see product designers put more serious thought. My experience so far is with Oase and the Fluval 07 series. Hated the Fuval priming and I’m just so-so with the Oase. Let me know your experience with priming other brands.
As for noise, I don’t mind the slight hum of an impeller as long as it’s steady and consistent, much the same way some people, including myself when I was younger, like the smooth steady sound of a fan at night to help them sleep. It’s when the sound becomes inconsistent, I’m bothered. I also don’t care for the sound of splashing/trickling water while I’m focused on other things. Only when I’m camping near the banks of a creek or other body of water is this OK . This is one of the main reasons I’m not a fan of HOB filters. I’m also tweaking my CO2 reactor designs to minimize the bubble sounds of CO2 entering the reactor.
4) Cost: Let’s be clear, the cost doesn’t stop when you pay the retail price for the filter. There’s the cost of media and spare parts plus the cost of electricity. What’s the rated wattage of the filter. I see the Aquael filters claim to consume lower power and are therefore cheaper to run. What about special filter cartridges or foam. Is it easy to cut foam filters from inexpensive bulk material? How often are gasket replacements necessary, or are there common issues with parts failing over time. Of two Fluval 07 filters I’ve used, both needed replacement impeller shafts. Oase Biomaster filters seem to have an issue with the input/output head often needing replaced.
I admit cost isn’t a critical factor for me, but I know it is for many others, so this is another instance where finding the right balance is key, in this case, the balance between price and performance.
Share your thoughts. Do these factors seem to align with yours or do you think I’m way off base. Tell us what types and brands of filters you prefer and why.
The idea is that we can consolidate a lot of filter information in one place making it easier to find rather than searching through so many threads. Maybe this won't work but I thought it was worth giving it a try. Perhaps it may be better listed as an article at some point.
I'm going to get things started by discussing factors I feel are most important to me when choosing a filter.
1) Filtration Performance: This goes without saying. The filter’s primary job is to keep our water clean and free of anything that harms the inhabitants. Of course, there are multiple factors that play into this. Some say flow is most critical, while others claim media volume is most important. Are there other factors? I still have limited experience, but my view, having done considerable reading, is that flow tends to be a bit overblown. You’ll see recommendations of anywhere from 4 to 10 times turnover rate with most leaning toward the higher end of that. I don’t think turnover rate is really the detail to be concerned about, at least with heavily planted tanks like are the norm here. I think the focus should be simply on ensuring flow achieves the goal of effectively moving water through the system to remove toxins/waste, delivering nutrients, and aiding gas (oxygen/CO2) transfer. If a turnover rate of 3 or 4 does that without dead spots in the tank, you should be good. After all, most of us here are plant focused and therefore, the fish we generally have are smaller community species that typically don’t care for high flow (there are, of course, exceptions).
I think there’s a simpler answer regarding media volume; more is better. Obviously, there must be a balance between internal volume and overall size of the filter. Real estate in and around our aquarium stands is precious. Filters like the Fluval FX6 and the newest Aquael Hypermax are huge. If you’re going for one of those, you’re likely putting it on a large tank with plenty of space underneath but again, it’s a matter of finding the right balance that provides the performance you need in a manageable size.
2) Reliability/Durability: This is where solid reviews come in handy and why getting feedback from users here is invaluable. Filtration performance becomes moot if the filter isn’t running, or worse yet, just flooded your house. Being able to easily source spare parts is also valuable, which is why sticking to the top well-known brands is often a safe route. It’s also why many aquarists place canister filters in protective containers, something else to consider when taking into account, size of filter. (this is something I should really do as I’ve had to clean up a few significant spills after filter maintenance and not getting the top secured in place properly
)3) Tie – Maintenance/Noise Level: These two factors are equally important to me. If the filter is a pain to maintain, I’m going to put it off, and that’s bad. It affects the performance. But equally important to me is how noisy it is. I tend to be sensitive to annoying little sounds regardless of where I am; at home, in the car, at work, you name it. If the aquarium is in a part of the house I spend a lot of time in, well then, it’s even more important.
I don’t know if Oase was first to do it, but the idea of the prefilter was, I think, a game changer for many. I imagine it was derived from people installing foam filters on the intake pipes. Having an easily removable section with foam filters that catch a lot of large particles before entering the primary filter chamber is a great idea, resulting in expanded intervals between main filter head removals for cleaning.
Another aspect of maintenance is ease of priming. This could also be an aspect of performance but I don’t think it is quite as important. I’m not sure there is a canister filter that is truly or consistently easy to prime. Some may start out that way, but over time, become less and less so. This is an area I’d really like to see product designers put more serious thought. My experience so far is with Oase and the Fluval 07 series. Hated the Fuval priming and I’m just so-so with the Oase. Let me know your experience with priming other brands.
As for noise, I don’t mind the slight hum of an impeller as long as it’s steady and consistent, much the same way some people, including myself when I was younger, like the smooth steady sound of a fan at night to help them sleep. It’s when the sound becomes inconsistent, I’m bothered. I also don’t care for the sound of splashing/trickling water while I’m focused on other things. Only when I’m camping near the banks of a creek or other body of water is this OK
. This is one of the main reasons I’m not a fan of HOB filters. I’m also tweaking my CO2 reactor designs to minimize the bubble sounds of CO2 entering the reactor.4) Cost: Let’s be clear, the cost doesn’t stop when you pay the retail price for the filter. There’s the cost of media and spare parts plus the cost of electricity. What’s the rated wattage of the filter. I see the Aquael filters claim to consume lower power and are therefore cheaper to run. What about special filter cartridges or foam. Is it easy to cut foam filters from inexpensive bulk material? How often are gasket replacements necessary, or are there common issues with parts failing over time. Of two Fluval 07 filters I’ve used, both needed replacement impeller shafts. Oase Biomaster filters seem to have an issue with the input/output head often needing replaced.
I admit cost isn’t a critical factor for me, but I know it is for many others, so this is another instance where finding the right balance is key, in this case, the balance between price and performance.
Share your thoughts. Do these factors seem to align with yours or do you think I’m way off base. Tell us what types and brands of filters you prefer and why.
135 Replies
·
8824 views

Supporting
Trying a true journal format. Let me know if it's too much writing. My natural tendency is to bullet point everything.
The Mishap That Started It All
This whole project began at 6:30 a.m., courtesy of my Oase Biomaster Thermo 250 deciding to serenade me with impeller noise while I was trying to work from home. Biofilm on the impeller — nothing dramatic — but the sound was maddening, especially with an 8 a.m. call with our London office looming. So I did what any aquarist does under pressure: a lightning‑fast pre‑filter and impeller clean.That’s when the universe decided to intervene.
While disconnecting the hoses — the same routine I’ve done countless times — the lock failed. Suddenly a vacuum of water blasted across the floor of my upstairs alcove “office.” I yanked the intake and outflow from my 60U, stopping the torrent, but not before a solid gallon had soaked into the floorboards.
My wife woke up to the sound of chaos and the sight of me standing in a puddle. Understandably, she was not thrilled. The alcove has cathedral ceilings, so every noise echoes, and the massive 8‑foot cabinet we built with her dad years ago makes cleaning underneath nearly impossible. It’s not a space designed for aquariums, humidity, or early‑morning filter geysers.
As we cleaned, she admitted she hated having tanks and equipment out in the open upstairs. Fair enough. When we built the house, the plan was always for my “stuff” to live in the downstairs office while she had the rest of the house. But during COVID she needed privacy for patient calls, so I gave her the office and moved my stuff upstairs. Now her role has changed — two days in the hospital, one day from home — and the need for that arrangement is gone.
So I floated the idea: What if I moved everything back downstairs, consolidated the two smaller tanks into one larger, beautifully executed setup — something like the living room tank she actually likes? Less noise, less humidity upstairs, and I get a proper scaping space again.
To my mild shock, she was completely on board. From a mishap came opportunity.
Choosing the Tank
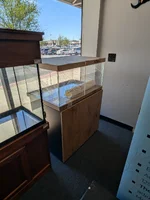
Once the idea settled, I had to pick the right aquarium. I landed on the AquaEl Ultrascaper 90 — the dimensions are perfect, and I’d been eyeing it ever since researching the Skylight Hyperspot and AquaEl’s filter lineup. The tank was designed with the scapers at AquaShow in Poland, and their sample layouts are right up there with ADA, ADG, and Green Aqua imo.Finding one in the U.S. was the next challenge. I reached out to the AquaEl rep, asked about the Hypermax for my living room tank, and inquired about Ultrascaper 90 availability. He pointed me to Fish Tanks Direct — and with a discount code in hand, I placed the order for the snow variant. My only quandy was to go for the cheaper one and get a Netlea AT5S to hang or try their newer attractive but inferior light option (RGB vs WBG). I chose to try their light as it looked interesting and the PAR on paper is more than enough.
Link for reference:https://fishtanksdirect.com/aquael-ultrascape-90-with-ultra-slim-snow-tank-light-cabinet/
Atlanta Weekend & Tank Comparisons
Right after ordering, we had a weekend trip to Atlanta for one of my wife’s appointments. On Friday we visited the botanical garden, grabbed food, and while she was at her appointment Saturday, I made the rounds to three local fish stores. The Aquarium was an option but a Saturday solo but spending roughly $100 to be around 10 million families sounded less enjoyable than exploring ATL suburbs and seeing the stores and their tanks.Premiere Aquatics had a beautiful setup UNS 90U and one for sale as well but at nearly $2,000 out the door it wasn't a great deal. Plus the tank is taller than I wanted, it wasn’t the right fit. I did pick up two gorgeous rose swords and a great piece of ghost wood.
I went to one store in Alpharetta but it was out of literally everything, not sure if they are doing poorly or just sell out fast and under order. I did buy a crinum there. Plus I liked driving from Premier to their.
Then I got lucky at Optimum Aquarium — they had an AquaEl Ultrascaper 90 in stock that had arrived that week, priced at a very respectable $1,000 (without the light). If the cabinet had been white, I would’ve bought it on the spot. They also had a wide range of tanks, which let me compare my choice to the Fluval Opti White 90 (a very reasonable $700) and several Aquatlantis rimless tanks I didn’t even know were available in the U.S. Their shallow 80 is especially cool — tank, stand, and light for $830, I would get a different color but I like the concept. They also had a bunch of healthy Dwarf Sag for $3 dollars so I bought a 4 bunches to use as I couldn't find dwarf chain swords easily online and heleiatium tenellum is a little too small.
My takeaways:
- Fluval Opti White 90: Nice tank but a bit small and too tall, the stand feels cheap and lightweight. Attractive for the price, but not my pick.
- Aquatlantis: Surprisingly impressive. I’d choose them over Fluval at similar price points.
- UNS 90U: The stands are unquestionably superior. The tank mitering is spectacular.
- AquaEl Ultrascaper 90:
- Stand: Best flat‑pack stand I’ve seen, though still a flat‑pack.
- Glass: Equal quality to UNS but no mitering.
- Dimensions: 90 × 60 × 45 — absolutely perfect.
- Incredible depth
- Lower height makes it ideal for seated viewing
- Easier to work in
- Better top‑down perspective



16 Replies
·
1043 views


Uh oh! Made the leap and purchased a UNS 60L aquarium today to replace my UNS 5N. It's going to go on the edge of my kitchen island, so keeping equipment minimal and attractive is going to be a priority here.
The aesthetic goal is something resembling an Iwagumi that can be viewed from 270 degrees. Biggest inspiration currently is this scape by @qball_aquatics in Sydney. I'm not a huge Iwagumi person and I normally like substantial hardscape, but something about the plant selection here scales so perfectly in this long shallow tank, so I'm simply going to copy it.
UNS 60L Dimensions: 24" x 8" x 8"
Tentative Equipment List
Filter: Oase Filtosmart 60
Inflow/outflow: ASG 10mm Stainless Steel Inflow/Outflow pipes
Light: Chihiros CII RGB or ONF Flat Nano - intentionally going for a short light for more of a spotlight effect with shadowing on the outer edges
CO2: Paintball setup, potentially mounted horizontally with brackets under the counter
Plants:
Glosso or HC carpet
Eleocharis parvula for height around the stones
Echinodorus 'Aflame" centerpiece plant
Livestock:
Blue dream neocaridina
Maybe chili rasboras
How does this setup sound? Very open to suggestions.
The aesthetic goal is something resembling an Iwagumi that can be viewed from 270 degrees. Biggest inspiration currently is this scape by @qball_aquatics in Sydney. I'm not a huge Iwagumi person and I normally like substantial hardscape, but something about the plant selection here scales so perfectly in this long shallow tank, so I'm simply going to copy it.
UNS 60L Dimensions: 24" x 8" x 8"
Tentative Equipment List
Filter: Oase Filtosmart 60
Inflow/outflow: ASG 10mm Stainless Steel Inflow/Outflow pipes
Light: Chihiros CII RGB or ONF Flat Nano - intentionally going for a short light for more of a spotlight effect with shadowing on the outer edges
CO2: Paintball setup, potentially mounted horizontally with brackets under the counter
Plants:
Glosso or HC carpet
Eleocharis parvula for height around the stones
Echinodorus 'Aflame" centerpiece plant
Livestock:
Blue dream neocaridina
Maybe chili rasboras
How does this setup sound? Very open to suggestions.
20 Replies
·
982 views

Staff member
I Donated 2026
Founding Member
Well, as this thread exists in a few places, I figured why not have it here also. Perhaps we can take up the baton and keep it active and bring some value to hobbyists.
For those of you that don't know, I got into thinking much more about my micros when I read this thread on another forum. It was started by our very own @GreggZ. It was spurred into existence because of our own @Burr740 and his work with micro fertilizers. Some really good discussion followed and a lot was learned.
I don't want to steal Gregg's thunder with this so I hope he posts his current thoughts on the subject and we can all take it from there.
All the best,
Art
For those of you that don't know, I got into thinking much more about my micros when I read this thread on another forum. It was started by our very own @GreggZ. It was spurred into existence because of our own @Burr740 and his work with micro fertilizers. Some really good discussion followed and a lot was learned.
I don't want to steal Gregg's thunder with this so I hope he posts his current thoughts on the subject and we can all take it from there.
All the best,
Art
85 Replies
·
14327 views
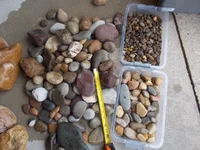
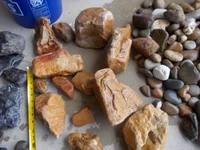
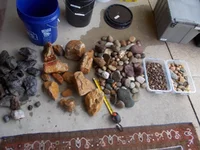
Got these for 10.00 a 5g bucket full I cant wont buy seriyu stone or others cost me 20 in rocks got 2 5g buckets for 22,00 for all in pics a steal for rock scapes with wood I'm going for. Its around 150lbs for 22.00 lol bye others! 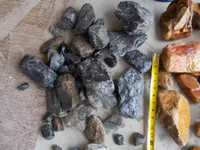
2 Replies
·
38 views
Staff member
I Donated 2026
Founding Member
Hello Welcome, chillguy
Welcome to ScapeCrunch, @chillguy!
We would love to get to know you. Please tell us about yourself. What tank do you have?
We would love to get to know you. Please tell us about yourself. What tank do you have?
0 Replies
·
8 views

Journal Farmer D. Singh's journal
Ive reorganized the order of my tanks so I can better keep track of them ie. Tank 2 moss tank is now tank 3. This helps in any confusion I had when tracking tanks they are in a sort of order now. Rather than taking time editing my old journal id rather create a new thread. Pics will be current (for the most part) as they are posted. I am not aquascaping. I am just farming.
52 Replies
·
2617 views

Supporting
I Donated 2026
Rockstar
Article Contributor
This is not a step by step tutorial, more for inspiration and general information!
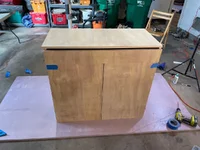
My very first DIY stand was a 100cm two-door home-depot plywood stand. It looks fine in pictures, but was NOT up to the insanely high, unhealthy standards of excellence that I hold myself to with everything:


No journal for this old tank.
The lesson here was: don’t use home depot plywood! It sucks. Find a real plywood dealer and spend the extra $.
My next stand was way more ambitious: a 150cm x 60cm stand, designed to hold up 2400+ lbs, made from quality baltic birch plywood. 3 doors, two interior weight-bearing vertical panels, adjustable leveling feet. It worked great, and can be seen in my two journals Many Lessons and Inert Sand Trials:
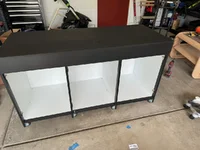
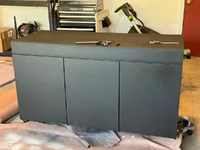
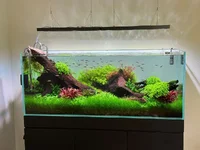
I did a WAY better job on this stand, and it now resides with @Kwyet ! Also, a spray finish really makes a big difference.
After that, the 90cm Experiment Tank stand. Two doors, and instead of a cumbersome middle panel, I used one hefty plywood column:


Scottish accent Fookin' crispay
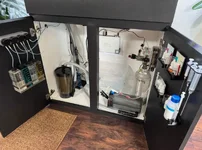
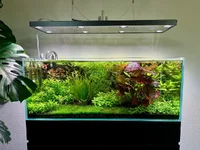
This tank also had a waterproof, sealed bottom “rim” so up to 2cm of water would have to fill the stand bottom before it overflows. Useful for emergencies or leaks, when combined with loud water leak alarms! This stand and tank is in my garage, soon to be sold to anyone in Colorado who wants it!
This stand is for my new 120cm tank! This stand is the culmination of seven years of stand-making. All of my mistakes, lessons, preferences, and skills were combined to make the stand of my dreams!
And of course, I had to move homes and got seriously injured, requiring surgery, while I was trying to finish it. Sorry for the lack of pictures!
I would not say this design is beginner friendly. It’s not expert, but likely intermediate difficulty. I have a Wen track saw and a Sawstop PCS Cabinet saw, which changes the entire process compared to someone working with more difficult tools. I also have a Graco Magnum X7 paint sprayer for a professional paint finish.
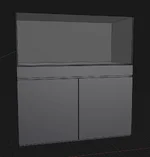
First, I started with mocking up the stand in Shapr3D, my modeling program:

My local lumber company had really good deals on 5x5’ sheets of ¾” baltic birch plywood.
IT IS CRITICAL for precision woodworking like this (no trim to cover up mistakes) to get exact measurements, particularly for the thickness of the plywood. For example, using a pair of digital calipers, this 3/4" plywood was 17.8mm thick (0.7 in a lot smaller than .75"), which is what I used in my modeling program to create the exact length of cuts to properly span 120cm long and 60cm deep.
I collected the exact measurements of each part needed, and threw it into Opticutter to determine how to best cut my 5x5’ plywood sheets:
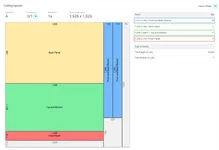
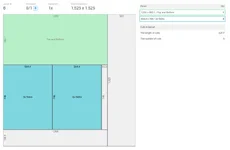

You don't need to study these sheets; the photos are just to show you how Opticutter works to save you from creating too much waste, and using the fewest cuts!
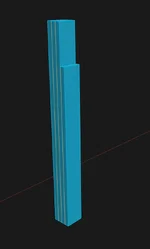
4-plywood-thick center column, with "notch" for the front brace to fit flush:
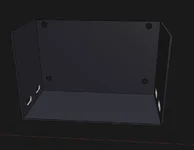
Top down first on a flat, even surface, then add sides and back:
Flip right-side-up, and add the bottom panel:
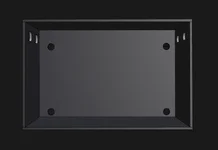
Add the rear brace, the front brace, and the center column. Make sure the front brace and column are flush with the front of the top/back panel edges.
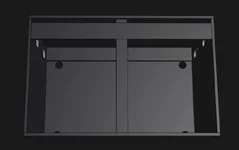
Add the front panel and bottom lip pieces:
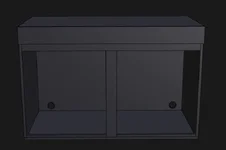
For the doors, create a notched finger pull (side view):

Door hinge stuff:
And it's done! Here's some of the few pictures I DID take of this process, sorry! I had a lot going on:
Gluing the 4-ply-thick center column:

To make the access holes in the back and side panels, I 3D printed some plastic guides for my router bit to follow, then roughly cut the inside out so the router had less material to work through:

Perfect routered holes:
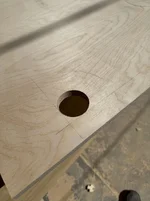
I learned to score the plywood with my box cutter first, so when it chipped from the rough jigsaw cut, it chipped ONLY to the scored lines:

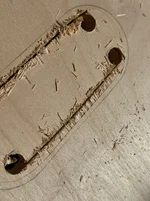
I removed the excess interior material with the jigsaw, then routered. I also used a roundover bit (in process on the left hole, right hole not rounded):
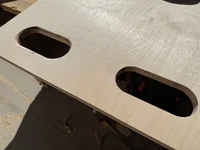
Any chips or imperfections could be fixed later with bondo wood filler and sanding.
Once I had my access holes cut out, I could assemble! I used clamps to hold the panels together and flush, used an Incra T-Rule (amazing device) to mark a line that was the middle of my plywood panel's core:

Then, I drilled countersink holes with this bit for the screw heads to sit below the level of the wood:
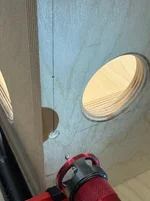
Screws:
Since the screws on the top, bottom, and rear of the stand would never be visible, I decided to skip the annoying "pocket screw and glue" scenario and just go with crazy robust torx-head 1.5” construction screws. I LOVED it. Definitely my preferred method, though they really do require pre-drilling AND drilling countersink heads. Still, way stronger than pocket screws my god.
Wood filling and Priming:
Bondo wood filler is amazing stuff. I used TONS of it, this was just the first pass:
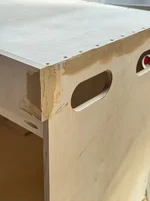
Apply, sand, apply more, sand more.
Then I primed with Sherwin Williams Gallery Series primer, and sprayed with a TrueAirless 515 tip in my Magnum X7:

Once the primer was dry, I sanded it, and sprayed again. Once dry, sanded again. Lots of sanding:

I wiped the tank down with tack cloth, then went for the finishing coat using a Graco FFLP 310 Tip and Sherwin-Williams Gallery Series Waterborne Topcoat in true black. Probably a matte or satin sheen, I can’t recall. Not cheap, good paint! Make sure to filter your paint through a find mesh before spraying.
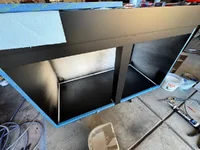
By far the best, most perfect finish I've ever had on a stand. BTW, the doors are fully adjustable up, down, left and right to get them nicely aligned. Blum hinges rock!
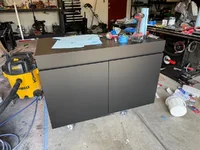
Once it was all put together, I got some help to move it into the new house. And installed the oversized Aquarium Mat.
I paid Tommy, the owner of Aqua Rocks Colorado, a delivery fee to have my custom 120x60x50cm tank delivered and installed on the stand. Once positioned evenly around all sides, I trimmed the aquarium mat with an Xacto knife, and was finished!
I'm tired today, but I'll upload more pics of this stand soon to this thread and to the 120cm Journal, too!
My very first DIY stand was a 100cm two-door home-depot plywood stand. It looks fine in pictures, but was NOT up to the insanely high, unhealthy standards of excellence that I hold myself to with everything:
No journal for this old tank.
The lesson here was: don’t use home depot plywood! It sucks. Find a real plywood dealer and spend the extra $.
My next stand was way more ambitious: a 150cm x 60cm stand, designed to hold up 2400+ lbs, made from quality baltic birch plywood. 3 doors, two interior weight-bearing vertical panels, adjustable leveling feet. It worked great, and can be seen in my two journals Many Lessons and Inert Sand Trials:
I did a WAY better job on this stand, and it now resides with @Kwyet ! Also, a spray finish really makes a big difference.
After that, the 90cm Experiment Tank stand. Two doors, and instead of a cumbersome middle panel, I used one hefty plywood column:
Scottish accent Fookin' crispay
This tank also had a waterproof, sealed bottom “rim” so up to 2cm of water would have to fill the stand bottom before it overflows. Useful for emergencies or leaks, when combined with loud water leak alarms! This stand and tank is in my garage, soon to be sold to anyone in Colorado who wants it!
The new 120cm stand:
This stand is for my new 120cm tank! This stand is the culmination of seven years of stand-making. All of my mistakes, lessons, preferences, and skills were combined to make the stand of my dreams!
And of course, I had to move homes and got seriously injured, requiring surgery, while I was trying to finish it. Sorry for the lack of pictures!
I would not say this design is beginner friendly. It’s not expert, but likely intermediate difficulty. I have a Wen track saw and a Sawstop PCS Cabinet saw, which changes the entire process compared to someone working with more difficult tools. I also have a Graco Magnum X7 paint sprayer for a professional paint finish.
First, I started with mocking up the stand in Shapr3D, my modeling program:
My local lumber company had really good deals on 5x5’ sheets of ¾” baltic birch plywood.
IT IS CRITICAL for precision woodworking like this (no trim to cover up mistakes) to get exact measurements, particularly for the thickness of the plywood. For example, using a pair of digital calipers, this 3/4" plywood was 17.8mm thick (0.7 in a lot smaller than .75"), which is what I used in my modeling program to create the exact length of cuts to properly span 120cm long and 60cm deep.
I collected the exact measurements of each part needed, and threw it into Opticutter to determine how to best cut my 5x5’ plywood sheets:
You don't need to study these sheets; the photos are just to show you how Opticutter works to save you from creating too much waste, and using the fewest cuts!
Steps I followed for this stand:
- Cut all panels using table/track saw.
- Make 4-ply support column. Make notch cut ~145mm from top of column to fit behind front brace. Glue and trim/clean.
- Cut out "access holes" in panels, including pocket holes for front and back brace, predrilled holes for front brace (in middle, and upper portion for future front panel) and predrilled holes for back panel. Use a router with roundover bit to create round, smooth holes for cord and tubing access, as well as handles for moving the stand around!
- Run the "standing height "of the side and back panels (and 4-ply center column) through table saw to make uniform height for all 4 parts. All of these 4 parts should be cut to the exactly same height.
- Trim door “finger-pull” with a router. Just a 45-degree "slice" off the door's corner to make a finger pull.
- To assemble: Flip top upside down, test fit sides and back, secure with screws. Make front edge flush, back can be trimmed down with router flush bit if necessary.
- Attach the bottom panel, Make front edge flush, as the back can be trimmed down.
- Add 4-ply column, ensure front edge flush.
- Add front and back "braces".
- Add front panel, and bottom "lips" that hold any spilled water in.
- Spray and sand stand, fill gaps with Bondo wood filler. Sand and repeat until corners, cracks and divots are smooth.
- Caulk the inner corners where water would be.
- Paint stand and doors.
- Attach doors.
- Add feet.
- Run electrical and LED strips.
- Cut foam mat to size.
4-plywood-thick center column, with "notch" for the front brace to fit flush:
Top down first on a flat, even surface, then add sides and back:
Flip right-side-up, and add the bottom panel:
Add the rear brace, the front brace, and the center column. Make sure the front brace and column are flush with the front of the top/back panel edges.
Add the front panel and bottom lip pieces:
For the doors, create a notched finger pull (side view):
Door hinge stuff:
And it's done! Here's some of the few pictures I DID take of this process, sorry! I had a lot going on:
Gluing the 4-ply-thick center column:
To make the access holes in the back and side panels, I 3D printed some plastic guides for my router bit to follow, then roughly cut the inside out so the router had less material to work through:
Perfect routered holes:
I learned to score the plywood with my box cutter first, so when it chipped from the rough jigsaw cut, it chipped ONLY to the scored lines:
I removed the excess interior material with the jigsaw, then routered. I also used a roundover bit (in process on the left hole, right hole not rounded):
Any chips or imperfections could be fixed later with bondo wood filler and sanding.
Once I had my access holes cut out, I could assemble! I used clamps to hold the panels together and flush, used an Incra T-Rule (amazing device) to mark a line that was the middle of my plywood panel's core:
Then, I drilled countersink holes with this bit for the screw heads to sit below the level of the wood:
Screws:
Since the screws on the top, bottom, and rear of the stand would never be visible, I decided to skip the annoying "pocket screw and glue" scenario and just go with crazy robust torx-head 1.5” construction screws. I LOVED it. Definitely my preferred method, though they really do require pre-drilling AND drilling countersink heads. Still, way stronger than pocket screws my god.
- SPAX #8, 1-1/2" Interior Flat Head Torx Wood Screws
- INCRA T-Ruler 6 inch for marking my ~8.9mm line (middle of the plywood core I was screwing into).
Wood filling and Priming:
Bondo wood filler is amazing stuff. I used TONS of it, this was just the first pass:
Apply, sand, apply more, sand more.
Then I primed with Sherwin Williams Gallery Series primer, and sprayed with a TrueAirless 515 tip in my Magnum X7:
Once the primer was dry, I sanded it, and sprayed again. Once dry, sanded again. Lots of sanding:
I wiped the tank down with tack cloth, then went for the finishing coat using a Graco FFLP 310 Tip and Sherwin-Williams Gallery Series Waterborne Topcoat in true black. Probably a matte or satin sheen, I can’t recall. Not cheap, good paint! Make sure to filter your paint through a find mesh before spraying.
By far the best, most perfect finish I've ever had on a stand. BTW, the doors are fully adjustable up, down, left and right to get them nicely aligned. Blum hinges rock!
Once it was all put together, I got some help to move it into the new house. And installed the oversized Aquarium Mat.
I paid Tommy, the owner of Aqua Rocks Colorado, a delivery fee to have my custom 120x60x50cm tank delivered and installed on the stand. Once positioned evenly around all sides, I trimmed the aquarium mat with an Xacto knife, and was finished!
I'm tired today, but I'll upload more pics of this stand soon to this thread and to the 120cm Journal, too!
Questions? Ask below! I love to help out.
7 Replies
·
413 views


Staff member
I Donated 2026
Founding Member
Hello Welcome, artandsoul
Welcome to ScapeCrunch, @artandsoul!
We would love to get to know you. Please tell us about yourself. What tank do you have?
We would love to get to know you. Please tell us about yourself. What tank do you have?
1 Replies
·
21 views

Supporting
I Donated 2026
Journal MrJG - UNS 90L
@Sb1415 Apologies I totally snagged the format of your journal post for this so thank you!
Many moons ago I was an active and contributing member on plantedtank.net, I think at one point I had around 14 scaped tanks going before burnout and life changes. Instead of weekends consisting of maintenance I transitioned to camping/boating and life has been great. I’ve always missed it. After downsizing and making a move to a new home I kept only a small 12x12 cube tank that started life as an amateur iwagumi layout, Seiryu and hairgrass only. I put it on the nightstand beside my bed and added some of my favorite Anubias and crypts from taken down tanks. Its been sitting there running for 5-6 years now, low light, top offs only w tap. Maintenance when it got out of control. Super old aquasoil now flattened out to a thick 4-5 inch thick layer in a perfect line front to back.
In Aug/Sept 25 had a bit of a health issue that kept me in bed for several weeks recovering while I looked at this sad little cube, mostly healthy but not truly thriving. No fertilizer being added for years, GDA covered anubias leaves that also were many years old and I thought to myself I should make this better… that was the tipping point. OK I’ll do a deep clean on the substrate, get some stems to throw in there, maybe get a carpet going. Tissue cultures/stems ordered and I got to work. No more top offs, 10% water changes instead. TDS ~900 when I started. Ultimately everything melted back and didn’t grow well. I’d been keeping the lighting so dim all these years to maintain just the crypts/epiphytes without it turning into a mess and I was ok with it again. That was the spark.
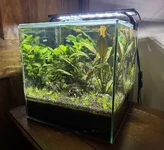
I decided I wanted to build out a new tank, most of my old hardware/tanks I had let go of in a bulk way so I was going to have to start new with everything sans some 5 gallon buckets of Amazonia that I’d placed in the basement of the new house.. Phoenix rising from the ashes? Most likely more like algae emerging from the depths. I still consider myself a beginner and maybe amateur at best so yeah…
So I got to work again reading, researching, what’s new, what has changed since I’ve been out of the loop for so long? Ooo dark start that sounds much better, in line CO2 diffusers cool! CO2 reactors, pretty awesome sounding, 2Hr aquarist read every article, and I’m back in baby!
Tank inspiration
None really hence no name, it fit right into a slot to occupy my mind from a not so great situation that I was in and I’m ok with that. Ultimately I’d like this to be a low-mid energy tank that can have minimal amounts of weekly maintenance while still looking the part. I’d prefer to keep it as simple as possible while still having some high tech bits. Get all the equipment out of the tank, co2, low-mid level lighting, minimal/simple fertilization. I got busy ordering equipment and started brainstorming layouts and what hardscape materials I could find. Instagram was my friend for a while, seems that everything that kept grabbing my attention were island style layouts with a very thin layer of sand surrounding. I’ve also always been partial to big chonky pieces of driftwood, I thought to go the manzanita route but wysiwyg pieces were fetching stupid prices. I ran across this ironwood in a listing and couldn’t let it go. The deep lines in the bark were just calling me so I quick snap ordered it before my brain could process dimensions, I knew it would fit but didn’t fully visualise how much it would ultimately limit the layout. I wanted to stay mostly inert with stone and eventually/begrudgingly ordered the tumbled lava stone with the intention of keeping it to a island/river layout style and mimicking some of my found instagram muse tanks. It will mostly likely end up more nature style although the start will be more Willy Wonka than anything. Thanks @Burr740 for that, I shopped like a kid in a candy store.
Equipment
Tank

Many moons ago I was an active and contributing member on plantedtank.net, I think at one point I had around 14 scaped tanks going before burnout and life changes. Instead of weekends consisting of maintenance I transitioned to camping/boating and life has been great. I’ve always missed it. After downsizing and making a move to a new home I kept only a small 12x12 cube tank that started life as an amateur iwagumi layout, Seiryu and hairgrass only. I put it on the nightstand beside my bed and added some of my favorite Anubias and crypts from taken down tanks. Its been sitting there running for 5-6 years now, low light, top offs only w tap. Maintenance when it got out of control. Super old aquasoil now flattened out to a thick 4-5 inch thick layer in a perfect line front to back.
In Aug/Sept 25 had a bit of a health issue that kept me in bed for several weeks recovering while I looked at this sad little cube, mostly healthy but not truly thriving. No fertilizer being added for years, GDA covered anubias leaves that also were many years old and I thought to myself I should make this better… that was the tipping point. OK I’ll do a deep clean on the substrate, get some stems to throw in there, maybe get a carpet going. Tissue cultures/stems ordered and I got to work. No more top offs, 10% water changes instead. TDS ~900 when I started. Ultimately everything melted back and didn’t grow well. I’d been keeping the lighting so dim all these years to maintain just the crypts/epiphytes without it turning into a mess and I was ok with it again. That was the spark.
I decided I wanted to build out a new tank, most of my old hardware/tanks I had let go of in a bulk way so I was going to have to start new with everything sans some 5 gallon buckets of Amazonia that I’d placed in the basement of the new house.. Phoenix rising from the ashes? Most likely more like algae emerging from the depths. I still consider myself a beginner and maybe amateur at best so yeah…
So I got to work again reading, researching, what’s new, what has changed since I’ve been out of the loop for so long? Ooo dark start that sounds much better, in line CO2 diffusers cool! CO2 reactors, pretty awesome sounding, 2Hr aquarist read every article, and I’m back in baby!
Tank inspiration
None really hence no name, it fit right into a slot to occupy my mind from a not so great situation that I was in and I’m ok with that. Ultimately I’d like this to be a low-mid energy tank that can have minimal amounts of weekly maintenance while still looking the part. I’d prefer to keep it as simple as possible while still having some high tech bits. Get all the equipment out of the tank, co2, low-mid level lighting, minimal/simple fertilization. I got busy ordering equipment and started brainstorming layouts and what hardscape materials I could find. Instagram was my friend for a while, seems that everything that kept grabbing my attention were island style layouts with a very thin layer of sand surrounding. I’ve also always been partial to big chonky pieces of driftwood, I thought to go the manzanita route but wysiwyg pieces were fetching stupid prices. I ran across this ironwood in a listing and couldn’t let it go. The deep lines in the bark were just calling me so I quick snap ordered it before my brain could process dimensions, I knew it would fit but didn’t fully visualise how much it would ultimately limit the layout. I wanted to stay mostly inert with stone and eventually/begrudgingly ordered the tumbled lava stone with the intention of keeping it to a island/river layout style and mimicking some of my found instagram muse tanks. It will mostly likely end up more nature style although the start will be more Willy Wonka than anything. Thanks @Burr740 for that, I shopped like a kid in a candy store.
Equipment
Tank
- UNS 90L
- 90 cm x 30 cm x 30 cm
- 79 liters or 21 gallons by volume, 62.5 liters or 16.5 gallons actual w hardscape
- Oase Thermo 200
- Replaced the charcoal media with more ceramic from Oase
- Replaced w Fzone stainless steel -Fzone glass Lily w skimmer ⅝”
- Replaced tubing with UNS pro tubing ⅝”
- Fzone Quick release ⅝” so Lily pipes can be cleaned without having to reprime filter
- Gla inline atomizer - replaced Fzone Co2 inline diffuser ⅝”
- GLA dual stage - replaced Fzone pro series dual stage regulator w/ 5lb tank
- Timed on 3 hours before lights on, off 1 hour before lights off
- Using distilled by gallon, remineralized with salty shrimp GH targeting GH around 4-5
- Hoping for 0-1 KH
- Dark start cycled with prime dechlorinated Tap and APT Start
- 80% old used ADA Amazonia v1, small bits sifted and bagged to create slight slope
- 2HR Feast topped to around 2 inches
- UNS Bora sand
- UNS Kona pebbles
- Fzone Bright 90 - 90CM
- Before hardscape made rough par map using photone with diffuser iPhone 15 Pro
- At 100% top 404, mid 219, base 127 PAR
- At 50% top 190, mid 110, base 62 PAR
- Will be starting tank with 45-50% lighting intensity
- Timed at 3pm-9pm photoperiod with 60 minute ramps
- Current Colorcast LED strip w/frosted background
- Timed scenes for dawn (orange 1 HR during pre-ramp) /daylight (green during ON cycle) /sunset (red 1 HR during post-ramp) /night (indigo 1 HR after lights out)
- Arizona Ironwood
- Black tumbled lava stone
- APT 1 and 3 dosed at recommended levels per calculator
- APT Jazz - in 3-4 months as Feast gives out
- Trying to keep it simple with fertilization to start
46 Replies
·
3635 views