
Welcome to ScapeCrunch
We are ScapeCrunch, the place where planted aquarium hobbyists come to build relationships and support each other. When you're tired of doom scrolling, you've found your home here.
Social Feed

Supporting
I Donated 2026
Rockstar
Article Contributor
This is not a step by step tutorial, more for inspiration and general information!
My very first DIY stand was a 100cm two-door home-depot plywood stand. It looks fine in pictures, but was NOT up to the insanely high, unhealthy standards of excellence that I hold myself to with everything:
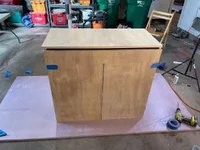


No journal for this old tank.
The lesson here was: don’t use home depot plywood! It sucks. Find a real plywood dealer and spend the extra $.
My next stand was way more ambitious: a 150cm x 60cm stand, designed to hold up 2400+ lbs, made from quality baltic birch plywood. 3 doors, two interior weight-bearing vertical panels, adjustable leveling feet. It worked great, and can be seen in my two journals Many Lessons and Inert Sand Trials:
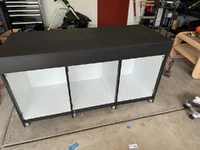
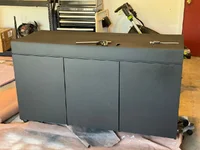
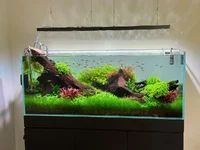
I did a WAY better job on this stand, and it now resides with @Kwyet ! Also, a spray finish really makes a big difference.
After that, the 90cm Experiment Tank stand. Two doors, and instead of a cumbersome middle panel, I used one hefty plywood column:


Scottish accent Fookin' crispay
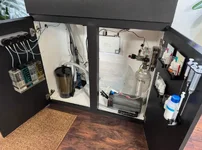
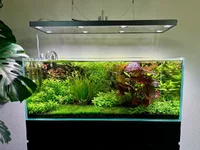
This tank also had a waterproof, sealed bottom “rim” so up to 2cm of water would have to fill the stand bottom before it overflows. Useful for emergencies or leaks, when combined with loud water leak alarms! This stand and tank is in my garage, soon to be sold to anyone in Colorado who wants it!
This stand is for my new 120cm tank! This stand is the culmination of seven years of stand-making. All of my mistakes, lessons, preferences, and skills were combined to make the stand of my dreams!
And of course, I had to move homes and got seriously injured, requiring surgery, while I was trying to finish it. Sorry for the lack of pictures!
I would not say this design is beginner friendly. It’s not expert, but likely intermediate difficulty. I have a Wen track saw and a Sawstop PCS Cabinet saw, which changes the entire process compared to someone working with more difficult tools. I also have a Graco Magnum X7 paint sprayer for a professional paint finish.
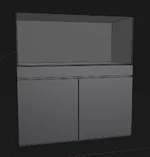
First, I started with mocking up the stand in Shapr3D, my modeling program:

My local lumber company had really good deals on 5x5’ sheets of ¾” baltic birch plywood.
IT IS CRITICAL for precision woodworking like this (no trim to cover up mistakes) to get exact measurements, particularly for the thickness of the plywood. For example, using a pair of digital calipers, this 3/4" plywood was 17.8mm thick (0.7 in a lot smaller than .75"), which is what I used in my modeling program to create the exact length of cuts to properly span 120cm long and 60cm deep.
I collected the exact measurements of each part needed, and threw it into Opticutter to determine how to best cut my 5x5’ plywood sheets:
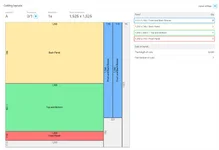
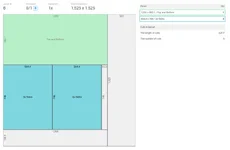

You don't need to study these sheets; the photos are just to show you how Opticutter works to save you from creating too much waste, and using the fewest cuts!
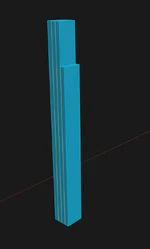
4-plywood-thick center column, with "notch" for the front brace to fit flush:
Top down first on a flat, even surface, then add sides and back:
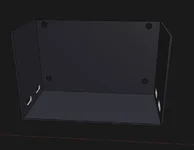
Flip right-side-up, and add the bottom panel:
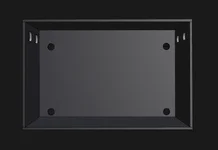
Add the rear brace, the front brace, and the center column. Make sure the front brace and column are flush with the front of the top/back panel edges.
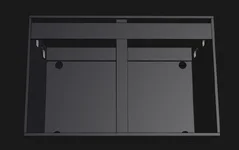
Add the front panel and bottom lip pieces:
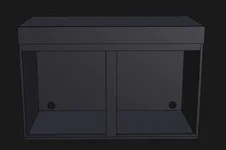
For the doors, create a notched finger pull (side view):

Door hinge stuff:
And it's done! Here's some of the few pictures I DID take of this process, sorry! I had a lot going on:
Gluing the 4-ply-thick center column:

To make the access holes in the back and side panels, I 3D printed some plastic guides for my router bit to follow, then roughly cut the inside out so the router had less material to work through:

Perfect routered holes:
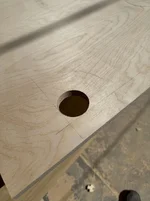
I learned to score the plywood with my box cutter first, so when it chipped from the rough jigsaw cut, it chipped ONLY to the scored lines:

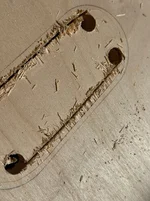
I removed the excess interior material with the jigsaw, then routered. I also used a roundover bit (in process on the left hole, right hole not rounded):
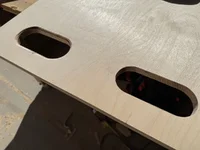
Any chips or imperfections could be fixed later with bondo wood filler and sanding.
Once I had my access holes cut out, I could assemble! I used clamps to hold the panels together and flush, used an Incra T-Rule (amazing device) to mark a line that was the middle of my plywood panel's core:

Then, I drilled countersink holes with this bit for the screw heads to sit below the level of the wood:
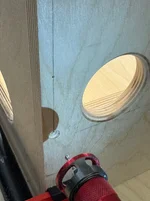
Screws:
Since the screws on the top, bottom, and rear of the stand would never be visible, I decided to skip the annoying "pocket screw and glue" scenario and just go with crazy robust torx-head 1.5” construction screws. I LOVED it. Definitely my preferred method, though they really do require pre-drilling AND drilling countersink heads. Still, way stronger than pocket screws my god.
Wood filling and Priming:
Bondo wood filler is amazing stuff. I used TONS of it, this was just the first pass:
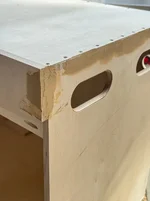
Apply, sand, apply more, sand more.
Then I primed with Sherwin Williams Gallery Series primer, and sprayed with a TrueAirless 515 tip in my Magnum X7:

Once the primer was dry, I sanded it, and sprayed again. Once dry, sanded again. Lots of sanding:

I wiped the tank down with tack cloth, then went for the finishing coat using a Graco FFLP 310 Tip and Sherwin-Williams Gallery Series Waterborne Topcoat in true black. Probably a matte or satin sheen, I can’t recall. Not cheap, good paint! Make sure to filter your paint through a find mesh before spraying.
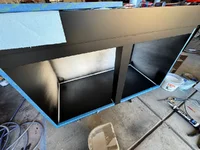
By far the best, most perfect finish I've ever had on a stand. BTW, the doors are fully adjustable up, down, left and right to get them nicely aligned. Blum hinges rock!
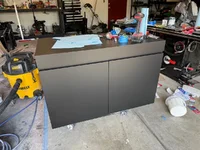
Once it was all put together, I got some help to move it into the new house. And installed the oversized Aquarium Mat.
I paid Tommy, the owner of Aqua Rocks Colorado, a delivery fee to have my custom 120x60x50cm tank delivered and installed on the stand. Once positioned evenly around all sides, I trimmed the aquarium mat with an Xacto knife, and was finished!
I'm tired today, but I'll upload more pics of this stand soon to this thread and to the 120cm Journal, too!
My very first DIY stand was a 100cm two-door home-depot plywood stand. It looks fine in pictures, but was NOT up to the insanely high, unhealthy standards of excellence that I hold myself to with everything:
No journal for this old tank.
The lesson here was: don’t use home depot plywood! It sucks. Find a real plywood dealer and spend the extra $.
My next stand was way more ambitious: a 150cm x 60cm stand, designed to hold up 2400+ lbs, made from quality baltic birch plywood. 3 doors, two interior weight-bearing vertical panels, adjustable leveling feet. It worked great, and can be seen in my two journals Many Lessons and Inert Sand Trials:
I did a WAY better job on this stand, and it now resides with @Kwyet ! Also, a spray finish really makes a big difference.
After that, the 90cm Experiment Tank stand. Two doors, and instead of a cumbersome middle panel, I used one hefty plywood column:
Scottish accent Fookin' crispay
This tank also had a waterproof, sealed bottom “rim” so up to 2cm of water would have to fill the stand bottom before it overflows. Useful for emergencies or leaks, when combined with loud water leak alarms! This stand and tank is in my garage, soon to be sold to anyone in Colorado who wants it!
The new 120cm stand:
This stand is for my new 120cm tank! This stand is the culmination of seven years of stand-making. All of my mistakes, lessons, preferences, and skills were combined to make the stand of my dreams!
And of course, I had to move homes and got seriously injured, requiring surgery, while I was trying to finish it. Sorry for the lack of pictures!
I would not say this design is beginner friendly. It’s not expert, but likely intermediate difficulty. I have a Wen track saw and a Sawstop PCS Cabinet saw, which changes the entire process compared to someone working with more difficult tools. I also have a Graco Magnum X7 paint sprayer for a professional paint finish.
First, I started with mocking up the stand in Shapr3D, my modeling program:
My local lumber company had really good deals on 5x5’ sheets of ¾” baltic birch plywood.
IT IS CRITICAL for precision woodworking like this (no trim to cover up mistakes) to get exact measurements, particularly for the thickness of the plywood. For example, using a pair of digital calipers, this 3/4" plywood was 17.8mm thick (0.7 in a lot smaller than .75"), which is what I used in my modeling program to create the exact length of cuts to properly span 120cm long and 60cm deep.
I collected the exact measurements of each part needed, and threw it into Opticutter to determine how to best cut my 5x5’ plywood sheets:
You don't need to study these sheets; the photos are just to show you how Opticutter works to save you from creating too much waste, and using the fewest cuts!
Steps I followed for this stand:
- Cut all panels using table/track saw.
- Make 4-ply support column. Make notch cut ~145mm from top of column to fit behind front brace. Glue and trim/clean.
- Cut out "access holes" in panels, including pocket holes for front and back brace, predrilled holes for front brace (in middle, and upper portion for future front panel) and predrilled holes for back panel. Use a router with roundover bit to create round, smooth holes for cord and tubing access, as well as handles for moving the stand around!
- Run the "standing height "of the side and back panels (and 4-ply center column) through table saw to make uniform height for all 4 parts. All of these 4 parts should be cut to the exactly same height.
- Trim door “finger-pull” with a router. Just a 45-degree "slice" off the door's corner to make a finger pull.
- To assemble: Flip top upside down, test fit sides and back, secure with screws. Make front edge flush, back can be trimmed down with router flush bit if necessary.
- Attach the bottom panel, Make front edge flush, as the back can be trimmed down.
- Add 4-ply column, ensure front edge flush.
- Add front and back "braces".
- Add front panel, and bottom "lips" that hold any spilled water in.
- Spray and sand stand, fill gaps with Bondo wood filler. Sand and repeat until corners, cracks and divots are smooth.
- Caulk the inner corners where water would be.
- Paint stand and doors.
- Attach doors.
- Add feet.
- Run electrical and LED strips.
- Cut foam mat to size.
4-plywood-thick center column, with "notch" for the front brace to fit flush:
Top down first on a flat, even surface, then add sides and back:
Flip right-side-up, and add the bottom panel:
Add the rear brace, the front brace, and the center column. Make sure the front brace and column are flush with the front of the top/back panel edges.
Add the front panel and bottom lip pieces:
For the doors, create a notched finger pull (side view):
Door hinge stuff:
And it's done! Here's some of the few pictures I DID take of this process, sorry! I had a lot going on:
Gluing the 4-ply-thick center column:
To make the access holes in the back and side panels, I 3D printed some plastic guides for my router bit to follow, then roughly cut the inside out so the router had less material to work through:
Perfect routered holes:
I learned to score the plywood with my box cutter first, so when it chipped from the rough jigsaw cut, it chipped ONLY to the scored lines:
I removed the excess interior material with the jigsaw, then routered. I also used a roundover bit (in process on the left hole, right hole not rounded):
Any chips or imperfections could be fixed later with bondo wood filler and sanding.
Once I had my access holes cut out, I could assemble! I used clamps to hold the panels together and flush, used an Incra T-Rule (amazing device) to mark a line that was the middle of my plywood panel's core:
Then, I drilled countersink holes with this bit for the screw heads to sit below the level of the wood:
Screws:
Since the screws on the top, bottom, and rear of the stand would never be visible, I decided to skip the annoying "pocket screw and glue" scenario and just go with crazy robust torx-head 1.5” construction screws. I LOVED it. Definitely my preferred method, though they really do require pre-drilling AND drilling countersink heads. Still, way stronger than pocket screws my god.
- SPAX #8, 1-1/2" Interior Flat Head Torx Wood Screws
- INCRA T-Ruler 6 inch for marking my ~8.9mm line (middle of the plywood core I was screwing into).
Wood filling and Priming:
Bondo wood filler is amazing stuff. I used TONS of it, this was just the first pass:
Apply, sand, apply more, sand more.
Then I primed with Sherwin Williams Gallery Series primer, and sprayed with a TrueAirless 515 tip in my Magnum X7:
Once the primer was dry, I sanded it, and sprayed again. Once dry, sanded again. Lots of sanding:
I wiped the tank down with tack cloth, then went for the finishing coat using a Graco FFLP 310 Tip and Sherwin-Williams Gallery Series Waterborne Topcoat in true black. Probably a matte or satin sheen, I can’t recall. Not cheap, good paint! Make sure to filter your paint through a find mesh before spraying.
By far the best, most perfect finish I've ever had on a stand. BTW, the doors are fully adjustable up, down, left and right to get them nicely aligned. Blum hinges rock!
Once it was all put together, I got some help to move it into the new house. And installed the oversized Aquarium Mat.
I paid Tommy, the owner of Aqua Rocks Colorado, a delivery fee to have my custom 120x60x50cm tank delivered and installed on the stand. Once positioned evenly around all sides, I trimmed the aquarium mat with an Xacto knife, and was finished!
I'm tired today, but I'll upload more pics of this stand soon to this thread and to the 120cm Journal, too!
Questions? Ask below! I love to help out.
13 Replies
·
1055 views


Rockstar
I am not as technically inclined as some members on here, but for those who are, answer me this. Could you not attach tubing to the end of this device where the sensor/probe is and run it into the aquarium in a similar fashion in which the drop checker works? Instead of waiting for a color change you could get an actual PPM reading? Please let me know if I am completely off base and why, or if this could possibly be a rudimentary way of getting more accurate co2 concentrations at a fraction of the cost of some high end equipment designed for submerged readings.
16 Replies
·
798 views

Supporting
I Donated 2026
Rockstar
I started my first tank as an adult about a year ago, and have posted updates on it in my other journal , the Beginner Scaper Journal. I had intended the other journal to be a journey for this new tank but there were so many variables and many questions about the other set up that i thought it would best to start this new journal.
I am going to hold on to my beginner/amateur flair to the post since I think this is such a great hobby and want newcomers to know that everyone started as an amateur
Tank Inspiration
Dennis Wong's planted tanks. If you guys don't know who this is, I have already served a good purpose by introducing you to the founder of the 2Hr aquarist. He has a scientific horticulturist approach to planted tank that resonates well to my scientific mind. He is one of the few that I have read and listened to who mentions the different schools of thoughts when it comes to managing planted tanks and does not stick with a single approach.
Anyways a long winded rambling to say that everyone should read through the 2hr aquarist website. His products are all called APT (Advanced planted tank), and i think that is what his company was called before. His current display tanks are all planted tanks, which are beautiful mostly without hardscape but with lush plant growth and do not follow the rules of Dutch scaping. To anyone who wants to understand his philosophy more, i would recommend in addition to the website watch some videos where he has been interviewed.
I wanted to re-create this type of tank, but obviously as a beginner/amateur. I am hoping to learn more about growing plants with my ultimate goal to advance to a next scape which might be more nature style where i can take the knowledge from growing plants and now incorporate hardscape to it.
Equipment
Tank
- Waterbox mini 25
Background
Fish List (Preliminary)
Photos
photo 1 - Day 11
Photo 2 - Day 20
Photo 3 - Day 21 - Current - Testing - Ammonia 0, Nitrate about 10 on API kit - Changed filter outlet location to get reduced current
Photo 4 - Day 21 - Side view
Thanks for reading so far!
There has been some good growth, some expected filamentous algae/diatmos and some melting, all expected hopefully this would not get too bad.
The Rotala blood red, Florida and Ludwigea arcuata are doing great. Both the florida and Arcuata seems to do much better on the aquasoil than on my prior intert substrate.
Blyxa melted a little but getting better, the Tulunadensis is struggling. The rest holding stable.
Interesting observation - The Rotala blood red, started putting out lot of roots and side shoots which i think is mainly because the plant was being pushed by the current to almost bend sideways and I believe it is thinking that it close the surface and doing its thing. With the changed filter outlet location I am hoping that it will be more erect and when i cut and replant there will be less roots. 2hr aquarist has written about this as well, but i think the bending sideways leading to rooting is not mentioned.
I am not liking the layout as much as i thought i would. Have been discussing with BurrAqua and have some suggestions but still thinking about this. Thoughts and suggestions welcome. Hopefully lot of people with (@Burr740 , @Dennis Wong @Art @techman81 @Pepere @Unexpected @Naturescapes_Rocco @Jeff Miotke @BenB @DutchMuch ) and without experience will follow and share this tank journey with me.
This is a great forum and i have tagged people that i am familiar with on the forum who have answered my questions and helped.
I am going to hold on to my beginner/amateur flair to the post since I think this is such a great hobby and want newcomers to know that everyone started as an amateur
Tank Inspiration
Dennis Wong's planted tanks. If you guys don't know who this is, I have already served a good purpose by introducing you to the founder of the 2Hr aquarist. He has a scientific horticulturist approach to planted tank that resonates well to my scientific mind. He is one of the few that I have read and listened to who mentions the different schools of thoughts when it comes to managing planted tanks and does not stick with a single approach.
Anyways a long winded rambling to say that everyone should read through the 2hr aquarist website. His products are all called APT (Advanced planted tank), and i think that is what his company was called before. His current display tanks are all planted tanks, which are beautiful mostly without hardscape but with lush plant growth and do not follow the rules of Dutch scaping. To anyone who wants to understand his philosophy more, i would recommend in addition to the website watch some videos where he has been interviewed.
I wanted to re-create this type of tank, but obviously as a beginner/amateur. I am hoping to learn more about growing plants with my ultimate goal to advance to a next scape which might be more nature style where i can take the knowledge from growing plants and now incorporate hardscape to it.
Equipment
Tank
- Waterbox mini 25
- 60 cm x 40 cm x 40 cm
- 90 liters or 24 gallons
- This is a big upgrade from my 29 gallon standard tank. The silicone work is flawless.
- It does come with a leveling mat.
- It is deeper and slightly taller than a 60P or UNS 60U. I thought it would be useful to have more depth.
- Background - Thanks to @Jeff Miotke suggestion
- Waterbox stand - Black
- The main contention is that it does not come with side holes like some of the other expensive stands do.
- It just comes with opening in the back, so getting the tubing out is messy.
- The door attachment is a soft close but it needs to be leveled which can be finicky
- I did add a magnetic holder for tools and will add some light as well at some point.
- It does come with leveling foot holders.
- It is nicely built other wise.
- I wish it came with a pull out like the Oase stands but guess would be very expensive.
- Overall Ok, but nothing to highly recommend about.
- Oase Biomaster 350 thermo
- Replaced the biological media with Seachem Matrix
- Replaced one of the foams with Seachem Matrix as well.
- Steel lily pipes from GLA with extension. I think many of liked this company. But I personally would not buy anything again from them. They had quality control issues with this. One of the holders were metal and other acrylic and they would not send me another metal one. These are not the cheapest especially and you also have to buy extension separately. These are made by a chinese company and not made by GLA.
- I used to have glass lily pipes but got tired of cleaning them.
- I read many people commenting that using a skimmer attached to the inflow or outflow might be a pain to adjust, so ended up getting the Oase Crystal skim
- Fzone Co2 inline diffuser
- These work great and this is the second one that i have gotten. Trouble free but might need to replace parts of it if it gets clogged. Important thing is that it can be opened to clean.
- I have a Fzone dual stage regulator
- Cheapest that i could find and works very well - highly recommend
- I use RO water and remineralize it with APT Sky to a GH of around 4. Use the calculator on APT webpage.
- My goals are to have a low KH, and GH of around 4 - 5.
- APT feast about 12 Liters
- You can read about my experience cycling it here using Dark Start (sort of)
- I did not want Aquasoil in the front of the tank and wanted a thin lining of gravel so used a gravel from Carribsea, and some smooth lava stones to separate them. More about this later but i don't really like the way it turned out.
- Chihiros WRGB II - 10th anniv edition - 60 cm.
Background
- Left - Rotala blood red
- Middle - Rotala Tulunadensis (From Burr Aqua)
- Right - Alteranthera Reineckii Rosaefolia
- Left - Blyxa Joponica
- Middle - Ludwigea Arcuata, Pogostemon Decannensis, Rotala Florida, Staurogyne Repens
- Right - Syngonathus Belem/Macrocaulon(From Burr Aqua)
- Left - Lobelia cardinalis mini
- Middle/Right - S.Repens and Montecarlo
- Still to come - Eleocharis Aricularis mini (in the place where the stones are)
- Clump of Hydrocortyle Tripartita to absorb nitrogen - Trust me you do not want this plant for any other reason, will take over your tank and get everything into a tangled mess.
Fish List (Preliminary)
- 4 Rasbora espei
- 2 Otos
- Will be adding more from my prior tank
- Lighting - 30% - 8 am - 3 pm
- Co2 - 40 ppm by Hanna co2 kit, 5 am - 3 pm
- Fertilizer - APT 1 - Still not settled on a routine but the recommended dose for daily dosing would be about 2.3 ml and i do about 2-3 ml every 3 days.
- Water changes 75% every 3 - 4 days, will make it weekly in the next couple of weeks
Photos
photo 1 - Day 11
Photo 2 - Day 20
Photo 3 - Day 21 - Current - Testing - Ammonia 0, Nitrate about 10 on API kit - Changed filter outlet location to get reduced current
Photo 4 - Day 21 - Side view
Thanks for reading so far!
There has been some good growth, some expected filamentous algae/diatmos and some melting, all expected hopefully this would not get too bad.
The Rotala blood red, Florida and Ludwigea arcuata are doing great. Both the florida and Arcuata seems to do much better on the aquasoil than on my prior intert substrate.
Blyxa melted a little but getting better, the Tulunadensis is struggling. The rest holding stable.
Interesting observation - The Rotala blood red, started putting out lot of roots and side shoots which i think is mainly because the plant was being pushed by the current to almost bend sideways and I believe it is thinking that it close the surface and doing its thing. With the changed filter outlet location I am hoping that it will be more erect and when i cut and replant there will be less roots. 2hr aquarist has written about this as well, but i think the bending sideways leading to rooting is not mentioned.
I am not liking the layout as much as i thought i would. Have been discussing with BurrAqua and have some suggestions but still thinking about this. Thoughts and suggestions welcome. Hopefully lot of people with (@Burr740 , @Dennis Wong @Art @techman81 @Pepere @Unexpected @Naturescapes_Rocco @Jeff Miotke @BenB @DutchMuch ) and without experience will follow and share this tank journey with me.
This is a great forum and i have tagged people that i am familiar with on the forum who have answered my questions and helped.


180 Replies
·
21397 views

Supporting
I Donated 2026
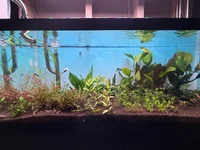
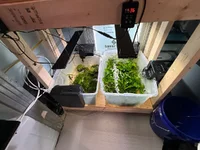
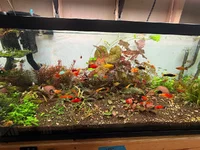
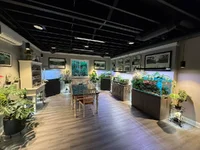
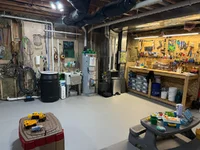
I took some time to take pics of fish room & tanks this morning and thought I’d share. In the “front room” I’m currently working to get the new 90P (left corner) set up (waiting on new tank). Next will be replacing the 29G (right corner) with a 90P, and then replacing the two 10Gs with a 120P for angels and rainbows. The existing 120P is horribly overgrown, primarily with plants from BurrAqua - but I am loving it and just can’t get myself to thin it out. The leopard Val, red blyxa, lotus, ferns, Buce, Anubias….. love it! The back room has evolved to special purpose tanks for clown killis, alien betta, 3 caridina tanks and several plant farm tanks & bins.
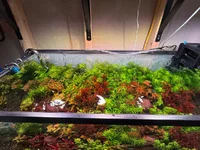
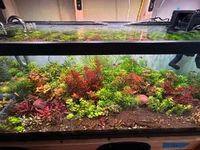
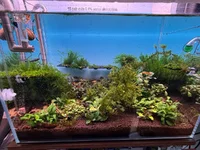
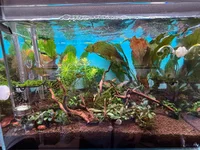
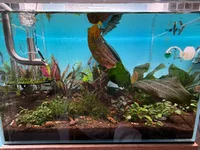
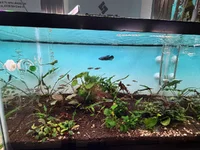
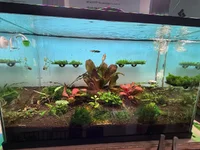
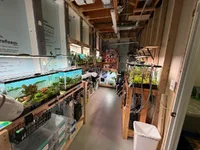
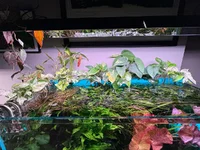
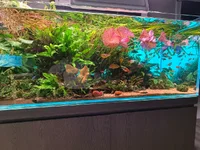
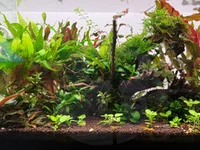
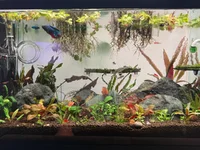
1 Replies
·
31 views


Supporting
I Donated 2026
AquaGirls
I have discovered that planting out aquascapes, especially when one doesn’t yet have a large enough ‘farm tank’, creates a bit of a hot dogs vs. buns problem. Order too many plants, now you need somewhere to put them.
Having recently planted two smaller tanks, I found myself, once again, with an excess of plants left over. I have four choices. Throw them out. Put them in my holding/quarantine tanks (that are already beyond capacity). Start a new tank (but I don’t want to move it later). Or try my hand at some little terrariums?
With the holidays coming up, I figured I would try the latter. I had the plants, and some extra jungle soil after making a friend a Shizuku for Christmas. I found some cute little terrariums with built-in LEDs on Amazon. At least this way I can use up the plants I have, and have decided I will gift these to my employees for the holidays. As they have the light integrated in the lid, which does have an adjustable vent, at least they won’t need to source their own light.
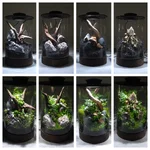
It was fun to play with some stones I haven't used in an aquascape. Jade Stone, Millenium Stone, Dragon Stone, and Dark Seiryu, and I knocked these four out over the weekend. Not complicated, but at least the plants now have a chance to do something other than wither away in their pots and TC cups. My Lindernia started blooming out of its holding tank this week, and I never realized what lovely little blue flowers they have when growing emersed. So a little of that found its way into the jar with the Millenium Stone. Hoping it makes it!
I am curious how many of you also dabble in growing some of our standard aquarium plants in emersed setups? I can totally see myself making more, maybe a Neo Glass Air next. Nobody warned me how much of a slippery slope this hobby was going to morph into when I started back up a year ago. Are there enough of us that would make it worthwhile to set up a ‘Planted Terrariums & Paludariums Discussion’ forum here to share our setups and experiences growing emersed? It’s still scaping, and growing plants, just with a little less water and maintenance. Or would that be outside the scope of this group?
Having recently planted two smaller tanks, I found myself, once again, with an excess of plants left over. I have four choices. Throw them out. Put them in my holding/quarantine tanks (that are already beyond capacity). Start a new tank (but I don’t want to move it later). Or try my hand at some little terrariums?
With the holidays coming up, I figured I would try the latter. I had the plants, and some extra jungle soil after making a friend a Shizuku for Christmas. I found some cute little terrariums with built-in LEDs on Amazon. At least this way I can use up the plants I have, and have decided I will gift these to my employees for the holidays. As they have the light integrated in the lid, which does have an adjustable vent, at least they won’t need to source their own light.
It was fun to play with some stones I haven't used in an aquascape. Jade Stone, Millenium Stone, Dragon Stone, and Dark Seiryu, and I knocked these four out over the weekend. Not complicated, but at least the plants now have a chance to do something other than wither away in their pots and TC cups. My Lindernia started blooming out of its holding tank this week, and I never realized what lovely little blue flowers they have when growing emersed. So a little of that found its way into the jar with the Millenium Stone. Hoping it makes it!
I am curious how many of you also dabble in growing some of our standard aquarium plants in emersed setups? I can totally see myself making more, maybe a Neo Glass Air next. Nobody warned me how much of a slippery slope this hobby was going to morph into when I started back up a year ago. Are there enough of us that would make it worthwhile to set up a ‘Planted Terrariums & Paludariums Discussion’ forum here to share our setups and experiences growing emersed? It’s still scaping, and growing plants, just with a little less water and maintenance. Or would that be outside the scope of this group?
17 Replies
·
157 views

Hey all,
Just wondering what your thoughts or experiences are with running some form of moon or dusk lighting.
With my tank only running 8hrs of light per day, I have recently added a 2-3% setting on my Chihiros WRGB II from 18:00 - 21:00.
It's running quite a blue light and is just so that I can still get some enjoyment from my fish when I am at home in the evening.
Does anyone else do this in planted tanks? Do you think it will create algae issues?
Cheers
Chimera
11 Replies
·
276 views

Staff member
I Donated 2026
Founding Member
Hello Welcome, Hydrohabitats
Welcome to ScapeCrunch, @Hydrohabitats!
We would love to get to know you. Please tell us about yourself. What tank do you have?
We would love to get to know you. Please tell us about yourself. What tank do you have?
0 Replies
·
18 views

Hey guys, needing some expert insight on my 90P build regarding the Yugang reactor. I’d like a sanity check on sizing.
System
What I measured

View attachment y2.mp4
System
- Display: 90 × 45 cm outside, 10 mm glass, so ~88 × 43 cm inside (~3,780 cm²), rimless, lidless.
- Sump: 20-gallon long (76 × 30 cm, ~2,280 cm²), 3 chambers, loose lid.
- About 220 L total water.
- Return enters below the surface; no deliberate surface agitation.
- BeanAnimal overflow, with the main draining underwater (no cascade).
- Currently cycling on tap water: KH 13, GH 12. The plan is RO remineralised to KH 3–4.
- Horizontal Yugang, 3" Sch40 PVC (ID 77.9 mm), 46 cm long.
- Outlet rotated to near the limit of what my plumbing allows, so the pocket is much smaller than half-full.
- CO₂ flow meter at about 9 mL/min. That’s slightly over what it dissolves, so it gives small occasional burps.
What I measured
- Plateau: pH 6.80 at KH 13 ~ 60 ppm (pH/KH estimate). Degassed baseline pH at 8.2.
- Overnight decay after CO₂ off: k ≈ 0.12/h (half-life ~5.7 h). That implies a CO₂ exchange rate of ~4–7 cm/h, i.e. a calm surface.
- Working the 1/17.7 rule backwards from my reactor area (~180–358 cm² depending on rotation), my effective loss area is ~1,100–2,200 cm², against ~6,060 cm² of real water surface (display + sump).
View attachment y2.mp4
33 Replies
·
993 views
Supporting
I Donated 2026
It’s time to take down the 20 gallon long tank that was my first “ high tech planted” aquarium and upgrade to a tank with on an appropriate size/depth.
I’ll order a Landen (90 x 50 x 50) tank on Amazon for this. Free overnight delivery. Preposterous!
I’ve studied the thread TRyan posted on 3/4” plywood stands and will be building a stand for this - thank you TRyan!
For filtration, I’ve been studying JayP’s thread. I had a biomaster thermo 350 on the 20L which I’m thinking of reusing. And I also have a netlea prefilter sitting around and an ARC small acrylic yugang reactor I can steal from a tank. I’m thinking of buying an Oase 800 or other pump and chaining these pieces together to provide a second filtration/carbonizing path? Not sure on the pump manufacturer & size?
I’ll be putting this together in the style of the ADA nature aquarium. Aquasoil in the back, some hardscape (rock, wood) in the midground and a decorative sand foreground. Very simple. Primarily a guppy, Endler, Cory, pleco, neocaridina tank.
Soliciting the scapecrunch community for feedback, advice, suggestions, etc.
Thank you as always. You all are the best!
30 Replies
·
1982 views

Journal Farmer D. Singh's journal
Ive reorganized the order of my tanks so I can better keep track of them ie. Tank 2 moss tank is now tank 3. This helps in any confusion I had when tracking tanks they are in a sort of order now. Rather than taking time editing my old journal id rather create a new thread. Pics will be current (for the most part) as they are posted. I am not aquascaping. I am just farming.
90 Replies
·
5806 views

I Donated 2026
Expert in Residence
MOTM Winner
Rockstar
Started a new tank with the idea of show casing Lagenandra meeboldii which I have not showcased before. Wanted to feature Hygrophila lower Hlaingbwe, but I removed it later as I think it would be too large for this tank.
New substrate, new filter, squeezed filter mulm from the other matured tank, then ran the tank one week day before planting. 100% water change after planting, then 100% water change every other day since then. Dosing 1ml APT3 after water change day, and remineralizing to 5dGH using APT Sky. Trying out the low water column dosing approach for the initial period.
Filter: Oase 250
Lights: Week aqua a430 80%
Substrate: APT Feast
Was going to Journal about startup issues, however, it seems like the tank has already stabilized, skipping diatoms and green dust phase.
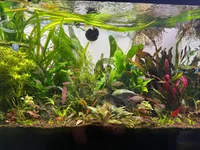
Freshly planted for a couple of days:
13/2/2026
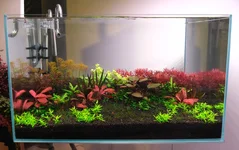
Replanted the tops for Myriophyllum roraima, Cut and replanted Rotala blood red to begin building up the bush form. Trimmed old leaves
Foreground seems a bit blocky for now, so I think I'lll move stuff round again. Probably when the BV grows out some more.
Pic on 23/2/2026
Readings at this stage:
Potassium: 2.3ppm
Ammonia: 0.1ppm
reduce water changes to 2 times a week.

New substrate, new filter, squeezed filter mulm from the other matured tank, then ran the tank one week day before planting. 100% water change after planting, then 100% water change every other day since then. Dosing 1ml APT3 after water change day, and remineralizing to 5dGH using APT Sky. Trying out the low water column dosing approach for the initial period.
Filter: Oase 250
Lights: Week aqua a430 80%
Substrate: APT Feast
Was going to Journal about startup issues, however, it seems like the tank has already stabilized, skipping diatoms and green dust phase.
Freshly planted for a couple of days:
13/2/2026
Replanted the tops for Myriophyllum roraima, Cut and replanted Rotala blood red to begin building up the bush form. Trimmed old leaves
Foreground seems a bit blocky for now, so I think I'lll move stuff round again. Probably when the BV grows out some more.
Pic on 23/2/2026
Readings at this stage:
Potassium: 2.3ppm
Ammonia: 0.1ppm
reduce water changes to 2 times a week.
101 Replies
·
10880 views