
Welcome to ScapeCrunch
We are ScapeCrunch, the place where planted aquarium hobbyists come to build relationships and support each other. When you're tired of doom scrolling, you've found your home here.
Social Feed

Staff member
I Donated 2026
Founding Member
There was a time when people thought of Crypt melt as an unknown disease. Some may still feel that way. It certainly remains on some of the older writings on the Internet.
I don’t believe Cryptocoryne melt is a disease. It is the plant’s response to a material change in its environment. The plant’s drops its leaves to generate new ones that are adapted to current circumstances. It’s a natural process.
What I’ve noticed is that whether the plants survives this process very much depends on the health of its root system and the amount of stored energy it has. In other words, how healthy it is to begin with.
Therefore, if you received a plant that is in bad shape and you ask it to generate all new leaves, it may not have the needed energy stores to do that. If its roots are not healthy enough to quickly pull that energy from the substrate, it’s got little chance of surviving.
I grow Crypts emersed and so spend a lot of time converting tissue culture plants and plants grown submersed. It’s a struggle mostly because of insufficient root systems and nutrient stores.
Moral of the story, when purchasing Crypts for your aquarium, make sure you ask how it has been grown and try to make sure it is strong and healthy before it ships to you. With tissue cultures ones, factor in that you will likely need to spend time treating it different so that it grows a root system prior to establishing it in your aquarium.
I would love to hear others experiences with this.
0 Replies
·
297 views

Staff member
I Donated 2026
Founding Member
Hello Welcome, mrsjxyd
Welcome to ScapeCrunch, @mrsjxyd!
We would love to get to know you. Please tell us about yourself. What tank do you have?
We would love to get to know you. Please tell us about yourself. What tank do you have?
1 Replies
·
7 views

Supporting
I Donated 2026
Rockstar
Article Contributor


Aquarium Plants
Tropica has made selecting plants easy for you. All Tropica plants are marked with patented symbols that inform you about the difficulty of the plants.
 shop.tropica.com
1 Replies
·
22 views

Supporting
I Donated 2026
Rockstar
Article Contributor
This is not a step by step tutorial, more for inspiration and general information!
My very first DIY stand was a 100cm two-door home-depot plywood stand. It looks fine in pictures, but was NOT up to the insanely high, unhealthy standards of excellence that I hold myself to with everything:
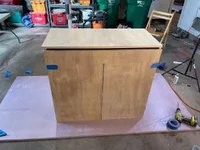


No journal for this old tank.
The lesson here was: don’t use home depot plywood! It sucks. Find a real plywood dealer and spend the extra $.
My next stand was way more ambitious: a 150cm x 60cm stand, designed to hold up 2400+ lbs, made from quality baltic birch plywood. 3 doors, two interior weight-bearing vertical panels, adjustable leveling feet. It worked great, and can be seen in my two journals Many Lessons and Inert Sand Trials:
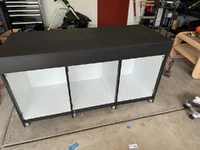
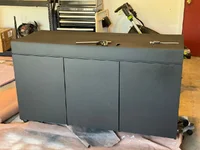
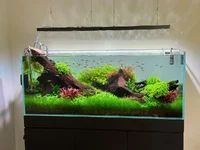
I did a WAY better job on this stand, and it now resides with @Kwyet ! Also, a spray finish really makes a big difference.
After that, the 90cm Experiment Tank stand. Two doors, and instead of a cumbersome middle panel, I used one hefty plywood column:


Scottish accent Fookin' crispay
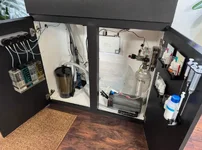
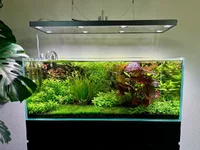
This tank also had a waterproof, sealed bottom “rim” so up to 2cm of water would have to fill the stand bottom before it overflows. Useful for emergencies or leaks, when combined with loud water leak alarms! This stand and tank is in my garage, soon to be sold to anyone in Colorado who wants it!
This stand is for my new 120cm tank! This stand is the culmination of seven years of stand-making. All of my mistakes, lessons, preferences, and skills were combined to make the stand of my dreams!
And of course, I had to move homes and got seriously injured, requiring surgery, while I was trying to finish it. Sorry for the lack of pictures!
I would not say this design is beginner friendly. It’s not expert, but likely intermediate difficulty. I have a Wen track saw and a Sawstop PCS Cabinet saw, which changes the entire process compared to someone working with more difficult tools. I also have a Graco Magnum X7 paint sprayer for a professional paint finish.
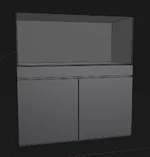
First, I started with mocking up the stand in Shapr3D, my modeling program:

My local lumber company had really good deals on 5x5’ sheets of ¾” baltic birch plywood.
IT IS CRITICAL for precision woodworking like this (no trim to cover up mistakes) to get exact measurements, particularly for the thickness of the plywood. For example, using a pair of digital calipers, this 3/4" plywood was 17.8mm thick (0.7 in a lot smaller than .75"), which is what I used in my modeling program to create the exact length of cuts to properly span 120cm long and 60cm deep.
I collected the exact measurements of each part needed, and threw it into Opticutter to determine how to best cut my 5x5’ plywood sheets:
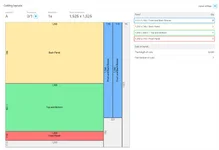
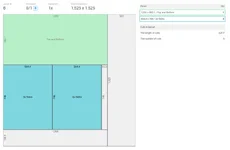

You don't need to study these sheets; the photos are just to show you how Opticutter works to save you from creating too much waste, and using the fewest cuts!
4-plywood-thick center column, with "notch" for the front brace to fit flush:
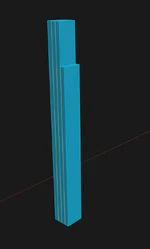
Top down first on a flat, even surface, then add sides and back:
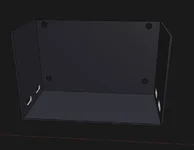
Flip right-side-up, and add the bottom panel:

Add the rear brace, the front brace, and the center column. Make sure the front brace and column are flush with the front of the top/back panel edges.
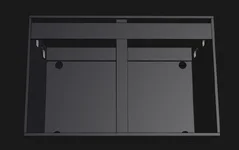
Add the front panel and bottom lip pieces:
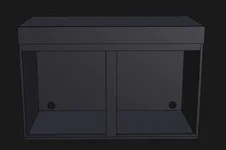
For the doors, create a notched finger pull (side view):

Door hinge stuff:
And it's done! Here's some of the few pictures I DID take of this process, sorry! I had a lot going on:
Gluing the 4-ply-thick center column:

To make the access holes in the back and side panels, I 3D printed some plastic guides for my router bit to follow, then roughly cut the inside out so the router had less material to work through:

Perfect routered holes:
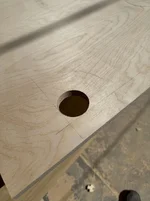
I learned to score the plywood with my box cutter first, so when it chipped from the rough jigsaw cut, it chipped ONLY to the scored lines:

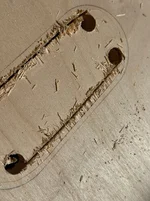
I removed the excess interior material with the jigsaw, then routered. I also used a roundover bit (in process on the left hole, right hole not rounded):
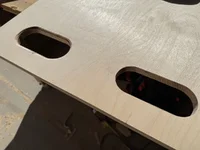
Any chips or imperfections could be fixed later with bondo wood filler and sanding.
Once I had my access holes cut out, I could assemble! I used clamps to hold the panels together and flush, used an Incra T-Rule (amazing device) to mark a line that was the middle of my plywood panel's core:

Then, I drilled countersink holes with this bit for the screw heads to sit below the level of the wood:
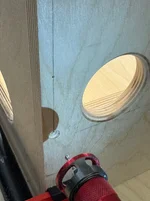
Screws:
Since the screws on the top, bottom, and rear of the stand would never be visible, I decided to skip the annoying "pocket screw and glue" scenario and just go with crazy robust torx-head 1.5” construction screws. I LOVED it. Definitely my preferred method, though they really do require pre-drilling AND drilling countersink heads. Still, way stronger than pocket screws my god.
Wood filling and Priming:
Bondo wood filler is amazing stuff. I used TONS of it, this was just the first pass:
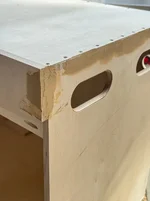
Apply, sand, apply more, sand more.
Then I primed with Sherwin Williams Gallery Series primer, and sprayed with a TrueAirless 515 tip in my Magnum X7:

Once the primer was dry, I sanded it, and sprayed again. Once dry, sanded again. Lots of sanding:

I wiped the tank down with tack cloth, then went for the finishing coat using a Graco FFLP 310 Tip and Sherwin-Williams Gallery Series Waterborne Topcoat in true black. Probably a matte or satin sheen, I can’t recall. Not cheap, good paint! Make sure to filter your paint through a find mesh before spraying.
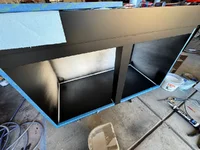
By far the best, most perfect finish I've ever had on a stand. BTW, the doors are fully adjustable up, down, left and right to get them nicely aligned. Blum hinges rock!
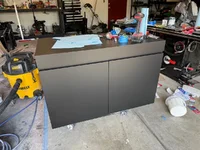
Once it was all put together, I got some help to move it into the new house. And installed the oversized Aquarium Mat.
I paid Tommy, the owner of Aqua Rocks Colorado, a delivery fee to have my custom 120x60x50cm tank delivered and installed on the stand. Once positioned evenly around all sides, I trimmed the aquarium mat with an Xacto knife, and was finished!
I'm tired today, but I'll upload more pics of this stand soon to this thread and to the 120cm Journal, too!
My very first DIY stand was a 100cm two-door home-depot plywood stand. It looks fine in pictures, but was NOT up to the insanely high, unhealthy standards of excellence that I hold myself to with everything:
No journal for this old tank.
The lesson here was: don’t use home depot plywood! It sucks. Find a real plywood dealer and spend the extra $.
My next stand was way more ambitious: a 150cm x 60cm stand, designed to hold up 2400+ lbs, made from quality baltic birch plywood. 3 doors, two interior weight-bearing vertical panels, adjustable leveling feet. It worked great, and can be seen in my two journals Many Lessons and Inert Sand Trials:
I did a WAY better job on this stand, and it now resides with @Kwyet ! Also, a spray finish really makes a big difference.
After that, the 90cm Experiment Tank stand. Two doors, and instead of a cumbersome middle panel, I used one hefty plywood column:
Scottish accent Fookin' crispay
This tank also had a waterproof, sealed bottom “rim” so up to 2cm of water would have to fill the stand bottom before it overflows. Useful for emergencies or leaks, when combined with loud water leak alarms! This stand and tank is in my garage, soon to be sold to anyone in Colorado who wants it!
The new 120cm stand:
This stand is for my new 120cm tank! This stand is the culmination of seven years of stand-making. All of my mistakes, lessons, preferences, and skills were combined to make the stand of my dreams!
And of course, I had to move homes and got seriously injured, requiring surgery, while I was trying to finish it. Sorry for the lack of pictures!
I would not say this design is beginner friendly. It’s not expert, but likely intermediate difficulty. I have a Wen track saw and a Sawstop PCS Cabinet saw, which changes the entire process compared to someone working with more difficult tools. I also have a Graco Magnum X7 paint sprayer for a professional paint finish.
First, I started with mocking up the stand in Shapr3D, my modeling program:
My local lumber company had really good deals on 5x5’ sheets of ¾” baltic birch plywood.
IT IS CRITICAL for precision woodworking like this (no trim to cover up mistakes) to get exact measurements, particularly for the thickness of the plywood. For example, using a pair of digital calipers, this 3/4" plywood was 17.8mm thick (0.7 in a lot smaller than .75"), which is what I used in my modeling program to create the exact length of cuts to properly span 120cm long and 60cm deep.
I collected the exact measurements of each part needed, and threw it into Opticutter to determine how to best cut my 5x5’ plywood sheets:
You don't need to study these sheets; the photos are just to show you how Opticutter works to save you from creating too much waste, and using the fewest cuts!
Steps I followed for this stand:
- Cut all panels using table/track saw.
- Make 4-ply support column. Make notch cut ~145mm from top of column to fit behind front brace. Glue and trim/clean.
- Cut out "access holes" in panels, including pocket holes for front and back brace, predrilled holes for front brace (in middle, and upper portion for future front panel) and predrilled holes for back panel. Use a router with roundover bit to create round, smooth holes for cord and tubing access, as well as handles for moving the stand around!
- Run the "standing height "of the side and back panels (and 4-ply center column) through table saw to make uniform height for all 4 parts. All of these 4 parts should be cut to the exactly same height.
- Trim door “finger-pull” with a router. Just a 45-degree "slice" off the door's corner to make a finger pull.
- To assemble: Flip top upside down, test fit sides and back, secure with screws. Make front edge flush, back can be trimmed down with router flush bit if necessary.
- Attach the bottom panel, Make front edge flush, as the back can be trimmed down.
- Add 4-ply column, ensure front edge flush.
- Add front and back "braces".
- Add front panel, and bottom "lips" that hold any spilled water in.
- Spray and sand stand, fill gaps with Bondo wood filler. Sand and repeat until corners, cracks and divots are smooth.
- Caulk the inner corners where water would be.
- Paint stand and doors.
- Attach doors.
- Add feet.
- Run electrical and LED strips.
- Cut foam mat to size.
4-plywood-thick center column, with "notch" for the front brace to fit flush:
Top down first on a flat, even surface, then add sides and back:
Flip right-side-up, and add the bottom panel:
Add the rear brace, the front brace, and the center column. Make sure the front brace and column are flush with the front of the top/back panel edges.
Add the front panel and bottom lip pieces:
For the doors, create a notched finger pull (side view):
Door hinge stuff:
And it's done! Here's some of the few pictures I DID take of this process, sorry! I had a lot going on:
Gluing the 4-ply-thick center column:
To make the access holes in the back and side panels, I 3D printed some plastic guides for my router bit to follow, then roughly cut the inside out so the router had less material to work through:
Perfect routered holes:
I learned to score the plywood with my box cutter first, so when it chipped from the rough jigsaw cut, it chipped ONLY to the scored lines:
I removed the excess interior material with the jigsaw, then routered. I also used a roundover bit (in process on the left hole, right hole not rounded):
Any chips or imperfections could be fixed later with bondo wood filler and sanding.
Once I had my access holes cut out, I could assemble! I used clamps to hold the panels together and flush, used an Incra T-Rule (amazing device) to mark a line that was the middle of my plywood panel's core:
Then, I drilled countersink holes with this bit for the screw heads to sit below the level of the wood:
Screws:
Since the screws on the top, bottom, and rear of the stand would never be visible, I decided to skip the annoying "pocket screw and glue" scenario and just go with crazy robust torx-head 1.5” construction screws. I LOVED it. Definitely my preferred method, though they really do require pre-drilling AND drilling countersink heads. Still, way stronger than pocket screws my god.
- SPAX #8, 1-1/2" Interior Flat Head Torx Wood Screws
- INCRA T-Ruler 6 inch for marking my ~8.9mm line (middle of the plywood core I was screwing into).
Wood filling and Priming:
Bondo wood filler is amazing stuff. I used TONS of it, this was just the first pass:
Apply, sand, apply more, sand more.
Then I primed with Sherwin Williams Gallery Series primer, and sprayed with a TrueAirless 515 tip in my Magnum X7:
Once the primer was dry, I sanded it, and sprayed again. Once dry, sanded again. Lots of sanding:
I wiped the tank down with tack cloth, then went for the finishing coat using a Graco FFLP 310 Tip and Sherwin-Williams Gallery Series Waterborne Topcoat in true black. Probably a matte or satin sheen, I can’t recall. Not cheap, good paint! Make sure to filter your paint through a find mesh before spraying.
By far the best, most perfect finish I've ever had on a stand. BTW, the doors are fully adjustable up, down, left and right to get them nicely aligned. Blum hinges rock!
Once it was all put together, I got some help to move it into the new house. And installed the oversized Aquarium Mat.
I paid Tommy, the owner of Aqua Rocks Colorado, a delivery fee to have my custom 120x60x50cm tank delivered and installed on the stand. Once positioned evenly around all sides, I trimmed the aquarium mat with an Xacto knife, and was finished!
I'm tired today, but I'll upload more pics of this stand soon to this thread and to the 120cm Journal, too!
Questions? Ask below! I love to help out.
14 Replies
·
1085 views


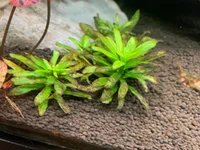
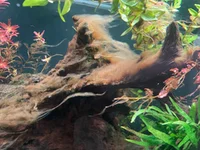
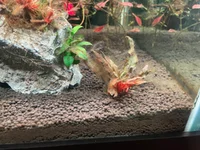
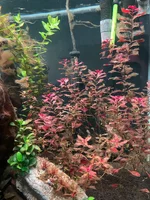
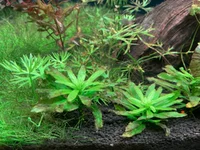
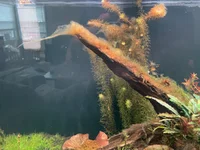
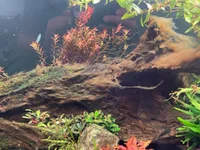
I'm really hoping to get some advice on a persistent brown algae problem in my tank. I believe it's diatoms, but I'm honestly not sure what's causing it or why it keeps coming back.
I'm a dad with two kids under two, so my free time is limited. I love this hobby, but it's becoming frustrating when no matter how much effort I put into maintaining my tank, this brown gunk returns week after week.
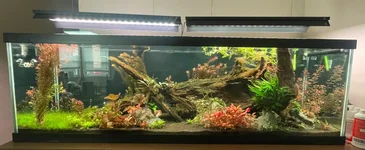
My setup:
For transparency, the photos show 10 days without a water change, which isn't typical for me. However, even after 7 days, the amount of brown buildup seems excessive.
I understand diatoms are common in newer tanks, but mine has been running for nearly six months. I'm really trying to identify the root cause rather than continuously cleaning up the symptoms.
At this point, I'm spending more time fighting algae than enjoying the tank, and with my limited free time, I really need to find a sustainable solution.
Has anyone experienced something similar or have suggestions on what I should investigate?
I genuinely appreciate anyone taking the time to help. Thank you!
I'm a dad with two kids under two, so my free time is limited. I love this hobby, but it's becoming frustrating when no matter how much effort I put into maintaining my tank, this brown gunk returns week after week.
My setup:
- Tank: 125-gallon, heavily planted, running since May 2026
- Substrate: Fluval Stratum aquasoil
- Filtration: Two Fluval FX6 canister filters
- Water changes: 50% every Saturday
- CO₂: Injected and stable
- Fertilization: Joe Harvey Macro/Micro, following recommended dosing
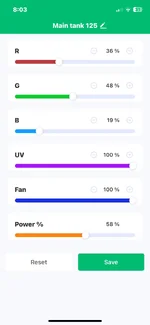
- Lighting: Two Week Aqua 900L fixtures, 7-hour photoperiod at relatively moderate intensity
For transparency, the photos show 10 days without a water change, which isn't typical for me. However, even after 7 days, the amount of brown buildup seems excessive.
I understand diatoms are common in newer tanks, but mine has been running for nearly six months. I'm really trying to identify the root cause rather than continuously cleaning up the symptoms.
At this point, I'm spending more time fighting algae than enjoying the tank, and with my limited free time, I really need to find a sustainable solution.
Has anyone experienced something similar or have suggestions on what I should investigate?
I genuinely appreciate anyone taking the time to help. Thank you!
4 Replies
·
72 views

Hi guys,
I've ordered a 120p and it arrived next day. The delivery guy was alone, I was in office and only my mother was at home. Instead to cancel the delivery for that day, the guy, he smuggled the package with the aquarium inside from the truck to my house (caught him thanks to the security camera), breaking left side both short and long panels.
I immediately contacted the shop explaining what happened and with the video attached. They'll give me a full new aquarium for free (unavailable till mid November...).
Here's the idea, the tank cost is 450€, what if I contact a glassmaker, ask them to tear down (or disassemble myself), give it to glassmaker, cut the glass at measures and the reassemble it?
Or trash and forget...
The tank is a 120x50x50cm, i plan to obtain 90x45x45, 100x45x45 or similar.
The glass is 12mm.
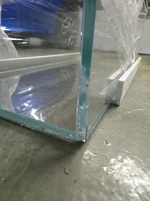
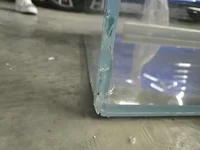
I've ordered a 120p and it arrived next day. The delivery guy was alone, I was in office and only my mother was at home. Instead to cancel the delivery for that day, the guy, he smuggled the package with the aquarium inside from the truck to my house (caught him thanks to the security camera), breaking left side both short and long panels.
I immediately contacted the shop explaining what happened and with the video attached. They'll give me a full new aquarium for free (unavailable till mid November...).
Here's the idea, the tank cost is 450€, what if I contact a glassmaker, ask them to tear down (or disassemble myself), give it to glassmaker, cut the glass at measures and the reassemble it?
Or trash and forget...
The tank is a 120x50x50cm, i plan to obtain 90x45x45, 100x45x45 or similar.
The glass is 12mm.
1 Replies
·
39 views


Supporting
Expert in Residence
Rockstar
Article Contributor
Inspired by the thread on CO2 controllers, and @Art experiment with modified pH probe / drop checker, I came up with what is to the best of my knowledge a new approach for our hobby.
I am not strong on the chemistry of CO2 in water, so it would be great if others chime in and comment if this approach makes sense.
Use the principle of Henry's law and fill the space under a closed aquarium lid with the correct concentration of CO2, using an affordable 65 USD sensor or similar with solenoid to release CO2 above the water. Control CO2 partial pressure so that the tank water will reach equilibrium with this gas pocket at about 30 ppm in the water. This would allow for very stable CO2 in the tank, and a big saver in CO2 as we don't rely on the outgassing via surface agitation to achieve stability. Besides that, it will be only weakly dependent on water chemistry (this may need to be tested and/or confirmed/quantified by chemists, as the chemistry and temperature do have some influence on CO2 solubility?).

Notes:
Attached file: Datasheet explaining the principle and use of a dedicated dissolved CO2 meter (for most in the hobby too expensive, but similar scientific principles applied as in above ideas).

I am not strong on the chemistry of CO2 in water, so it would be great if others chime in and comment if this approach makes sense.
Use the principle of Henry's law and fill the space under a closed aquarium lid with the correct concentration of CO2, using an affordable 65 USD sensor or similar with solenoid to release CO2 above the water. Control CO2 partial pressure so that the tank water will reach equilibrium with this gas pocket at about 30 ppm in the water. This would allow for very stable CO2 in the tank, and a big saver in CO2 as we don't rely on the outgassing via surface agitation to achieve stability. Besides that, it will be only weakly dependent on water chemistry (this may need to be tested and/or confirmed/quantified by chemists, as the chemistry and temperature do have some influence on CO2 solubility?).
Notes:
- My first thoughts/estimations are that one can reach 30 ppm in the tank water very fast, and have probably more than 90% savings on CO2 consumption. As we now measure CO2 in the gas pocket, independent of water chemistry, it would (hopefully) also be the first time that we can forget water chemistry as a major factor, complications with pH probes and using pH as a proxy, and indeed know the real water CO2 ppm more accurately and with less risks of misinterpretations of measurements.
- We don't need a precision expensive CO2 regulator anymore, no diffuser or reactor, no pH probe or drop checker. Just a sensor with electronics that switches a solenoid on and off. It would probably be good to have a simple air pump added, so that O2 and other gasses can exchange, but this would give very low CO2 losses.
Attached file: Datasheet explaining the principle and use of a dedicated dissolved CO2 meter (for most in the hobby too expensive, but similar scientific principles applied as in above ideas).
40 Replies
·
6555 views

Supporting
I Donated 2026
AquaGirls
I have discovered that planting out aquascapes, especially when one doesn’t yet have a large enough ‘farm tank’, creates a bit of a hot dogs vs. buns problem. Order too many plants, now you need somewhere to put them.
Having recently planted two smaller tanks, I found myself, once again, with an excess of plants left over. I have four choices. Throw them out. Put them in my holding/quarantine tanks (that are already beyond capacity). Start a new tank (but I don’t want to move it later). Or try my hand at some little terrariums?
With the holidays coming up, I figured I would try the latter. I had the plants, and some extra jungle soil after making a friend a Shizuku for Christmas. I found some cute little terrariums with built-in LEDs on Amazon. At least this way I can use up the plants I have, and have decided I will gift these to my employees for the holidays. As they have the light integrated in the lid, which does have an adjustable vent, at least they won’t need to source their own light.
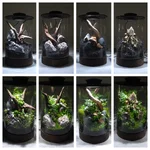
It was fun to play with some stones I haven't used in an aquascape. Jade Stone, Millenium Stone, Dragon Stone, and Dark Seiryu, and I knocked these four out over the weekend. Not complicated, but at least the plants now have a chance to do something other than wither away in their pots and TC cups. My Lindernia started blooming out of its holding tank this week, and I never realized what lovely little blue flowers they have when growing emersed. So a little of that found its way into the jar with the Millenium Stone. Hoping it makes it!
I am curious how many of you also dabble in growing some of our standard aquarium plants in emersed setups? I can totally see myself making more, maybe a Neo Glass Air next. Nobody warned me how much of a slippery slope this hobby was going to morph into when I started back up a year ago. Are there enough of us that would make it worthwhile to set up a ‘Planted Terrariums & Paludariums Discussion’ forum here to share our setups and experiences growing emersed? It’s still scaping, and growing plants, just with a little less water and maintenance. Or would that be outside the scope of this group?
Having recently planted two smaller tanks, I found myself, once again, with an excess of plants left over. I have four choices. Throw them out. Put them in my holding/quarantine tanks (that are already beyond capacity). Start a new tank (but I don’t want to move it later). Or try my hand at some little terrariums?
With the holidays coming up, I figured I would try the latter. I had the plants, and some extra jungle soil after making a friend a Shizuku for Christmas. I found some cute little terrariums with built-in LEDs on Amazon. At least this way I can use up the plants I have, and have decided I will gift these to my employees for the holidays. As they have the light integrated in the lid, which does have an adjustable vent, at least they won’t need to source their own light.
It was fun to play with some stones I haven't used in an aquascape. Jade Stone, Millenium Stone, Dragon Stone, and Dark Seiryu, and I knocked these four out over the weekend. Not complicated, but at least the plants now have a chance to do something other than wither away in their pots and TC cups. My Lindernia started blooming out of its holding tank this week, and I never realized what lovely little blue flowers they have when growing emersed. So a little of that found its way into the jar with the Millenium Stone. Hoping it makes it!
I am curious how many of you also dabble in growing some of our standard aquarium plants in emersed setups? I can totally see myself making more, maybe a Neo Glass Air next. Nobody warned me how much of a slippery slope this hobby was going to morph into when I started back up a year ago. Are there enough of us that would make it worthwhile to set up a ‘Planted Terrariums & Paludariums Discussion’ forum here to share our setups and experiences growing emersed? It’s still scaping, and growing plants, just with a little less water and maintenance. Or would that be outside the scope of this group?
19 Replies
·
242 views

Santa came early this year with a new 75g tank. I've never owned a 4' tank ever been stuck on the normal 30" wide 29g and 20g's forever. I wanted the uns 90u 36x22x22 but 750.00 is nuts to me I don't have that much in all tanks and equip I own so went cheap route.
Saw the 75g at PetSmart the imagitarium brand for 150 on sale. Those cheapos have bad reviews on leaking and I believe it as I actually picked up a free leaky 75g imagitarium at petco last week and sold it for snake terrarium for 40.00. Went to petco they also have the 50% off sale on marineland and aqueon. The tank was 159.00 out the door. Got lucky the manager said take this set of new glass tops for free, were a return they cant sell it.I assume the made in USA marineland is a better tank than the other cheapos and I actually don't mind the black silicone.
Went to Lowes today for some wood 4- 2x4x8 and 2- 2x4x10 and sheet if 1/2 osb for top and bottom shelf and for extra strength. When I get done I'm sure it would hold a 300g tank. Will wrap the tank in either bead board wood paneling or 1/4" plywood with some nice moulding on corners. Def gotta make a lip to hide the bottom plastic rim as well so its not so ugly. probably build a hood to why not hide some rims! Just gotta build or find a pair of doors on something else I can steal and use for this stand. I don't plan on getting it setup for few weeks but want stand base 1/2 done now so I can try some diff dry scapes with wood and rocks in it. This will be replacing my 20long I was scaping in other journal its now a plant farm full of ludwigia and plants for sale.
Still not sure on the name on this tank, Whipple landing is where I took some pics I want to copy for the tank. Its feed by the great pee dee river here so name may change later.

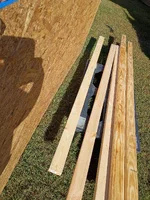
22 Replies
·
597 views
Supporting
I Donated 2026
AquaGirls
As Art was gracious enough to provide us a place to chat about all things emersed-grown here on the new Planted Paludariums and Terrariums sub-forum, I thought we could kick things off with a place to post our Shizuku's! I know @JayP , @BranchScape, @Noahspapa at least have a Shizuku or more. I started this year in New Jersey by attending the ADA Class at Aquashella. My poor Shizuku had a bumpy ride home courtesy of Jersey TSA, but was reassembled the morning after I got home, September 14th. So this was technically its second incarnation.
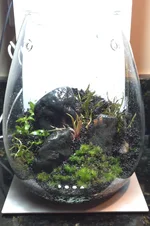
I didn't realize how much it had grown already. It has had a few modifications since then. At the class I chose to use Jagure stone, but there wasn't any more driftwood that was small enough to fit, so I skipped it, but I added a couple of nubbins of Mopani a couple of weeks later. Plants at the class were Riccardia, Staurogyne repens, Cryptocoryne axelrodi, what I think is Star Moss (they were handing out small pieces, so I didn't see the label), and Eriocaulon quinquangulare. As I was buying some Bolbitis difformis for another project, I added a small one to this to mostly see how well it would grow, as I have heard this plant prefers an emersed setup, and most terrestrial ferns get quite large. Also had a smidge of Bucephalandra Lamandau mini purple from the Manten Stone scape that found it's way in here as well.
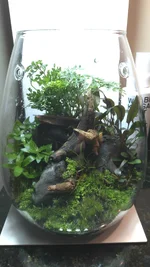
Top down view:
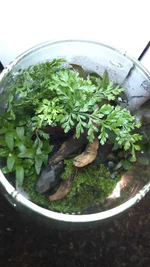
I am going to have pull the Eriocaulon forward, as I realize from this view that the wood and the Bolbitis is creating a bit too much shadow. But I can fix that.
A friend and enabler has been fascinated with my foray back into aquariums, and now this, so I decided to make her a Shizuku of her own as a Christmas present. I planted it a couple of weeks ago, so it has time to root and stabilize before I gift it. I stuck to easy plants for this one. Mostly anubias, a little buce, and the bolbitis, as I want it to succeed for her.
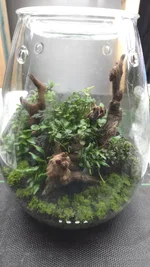
Right now it's on my grow rack, and doing well, but she will also receive the DOOA light stand and magnetic light. I figure she can get RO water refills here, too. The very small-leaved plant on the far right is the buce 'Petite Galaxy', and seems to be doing great, both submerged in my Manten tank, and emersed in the Shizuku. Definitely a new personal favorite for finer detail.
Anyhoo, would love to see others post their Shizuku pots here! Perhaps we can inspire a few others?
I didn't realize how much it had grown already. It has had a few modifications since then. At the class I chose to use Jagure stone, but there wasn't any more driftwood that was small enough to fit, so I skipped it, but I added a couple of nubbins of Mopani a couple of weeks later. Plants at the class were Riccardia, Staurogyne repens, Cryptocoryne axelrodi, what I think is Star Moss (they were handing out small pieces, so I didn't see the label), and Eriocaulon quinquangulare. As I was buying some Bolbitis difformis for another project, I added a small one to this to mostly see how well it would grow, as I have heard this plant prefers an emersed setup, and most terrestrial ferns get quite large. Also had a smidge of Bucephalandra Lamandau mini purple from the Manten Stone scape that found it's way in here as well.
Top down view:
I am going to have pull the Eriocaulon forward, as I realize from this view that the wood and the Bolbitis is creating a bit too much shadow. But I can fix that.
A friend and enabler has been fascinated with my foray back into aquariums, and now this, so I decided to make her a Shizuku of her own as a Christmas present. I planted it a couple of weeks ago, so it has time to root and stabilize before I gift it. I stuck to easy plants for this one. Mostly anubias, a little buce, and the bolbitis, as I want it to succeed for her.
Right now it's on my grow rack, and doing well, but she will also receive the DOOA light stand and magnetic light. I figure she can get RO water refills here, too. The very small-leaved plant on the far right is the buce 'Petite Galaxy', and seems to be doing great, both submerged in my Manten tank, and emersed in the Shizuku. Definitely a new personal favorite for finer detail.
Anyhoo, would love to see others post their Shizuku pots here! Perhaps we can inspire a few others?
3 Replies
·
63 views

About me:
I've been keeping planted aquariums and shrimp breeding tanks for almost a decade and for the majority of that time aquariums were my primary hobby. In 2021 I had ~30 tanks running simultaneously containing almost 200 types of plants that I had collected over a 5 year period and more than a dozen types of shrimp. In this time, it was harder for me to not setup new tanks than it was to grow any aquatic plant sent my way. Below are some of the tanks I've kept over the years.


At the end of 2021 I moved from Texas to Massachusetts and gave away all of my plants, tanks, and shrimp to friends I had made over the years. It took some time to find a permanent place to live so I didn't have any tanks until I was unexpectedly given an ADA 120P in summer of 2023.
The early days of the 120P:
I went through the typical tank start growing pains with a diatoms phase, green hair algae, and every other issue one would expect from a new tank. Even with the new tank difficulties, it only took me 2 months to get to a healthy tank again. For the next 1.5 years, everything went smoothly and the tank went through many iterations.

Setup on June 28th

Diatoms outbreak on July 19th

Green hair algae outbreak by August 18th

Everything was cleaned up and growing great by September 1st
The start of the disaster:
In February 2025, I started running into issues. BBA started growing in small tufts on the substrate and green hair algae started attacking the old growth on the plants. I'd run into this issue in the past and was usually able to fix it pretty quickly by dialing in the CO2, cleaning the substrate, cleaning filters, and replanting only the most healthy tops of the plants. Even after doing this multiple times, I haven't had any luck fixing the algae. It always comes back


The start of the algae

Multiple trim and replant cycles along with some new plants

Relatively clean after a trim and replant cycle

10 days later
Where I am today:
I'm getting so frustrated by the persistent issues that I'm about ready to shut down this tank. As a last ditch effort, I purchased a pack of healthy plants from Burr740 to see if healthy plants can help me get through the algae phase and get back into a good place.

The tank as of January 2nd 2026. The healthiest plants in the tank were received earlier this week from Burr740.

Really poor color on my plants with a lot of green algae on the lower leaves. The nice looking bacopa is from Burr740. The original stems of Bacopa have barely grown in the last month. If I pull them up, there are very few roots.

Another example of the old growth issues. The Limnophila mini vietnam also has not grown at all in the last month. Lots of algae grows on the substrate as well.

Another comparison of Burr's Ludwigia sp. red vs mine. Very slow growth and poor rooting.

Really weak older growth on Rotala sp. singapore and poor coloration compared to Burr's plants. This plant has always been very easy for me to keep and this is part of why I'm thinking there is something big that I'm missing. Didiplis diandra is another easy plant that keeps melting at the base and its making very little progress because of this.
Below is the key information about the tank.
Tank size: ADA 120P (120 cm x 45 cm x 45 cm)
Lighting: 3x NiloCG Prizms ran at the lowest setting for each channel. Lights are on for 7 hours a day. I want to increase the lighting, but any time I do the algae gets significantly worse
Filtration: Oase Biomaster 600 and a SunSun HW-303B. There's a spraybar on the bottom left that points along the length of the tank at substrate level and the other output is on the top right corner of the tank pushing the opposite direction.
CO2: Vertical reactor on the SunSun filter and a Sera reactor on the Oase. CO2 comes on 4 hours before lights on and turns off 1 hr before lights off. Drop checker is yellow when lights turn on. The pH drop is ~1.4-1.5 at lights on (5.8 at lights on and 7.3 when water is fully degassed). Plants start pearling within 10 minutes of the lights coming on.
Substrate: A mix of ADA aquasoil, Fluval stratum, and Controsoil. A bag of Controsoil was added ~2 months ago to try and give the plants a boost. The remaining substrate is from when I setup the tank and is almost certainly not providing much nutrition or buffering capacity.
Water change schedule: Weekly 70-80% water changes with tap water coming from the MWRA (water report here). KH is ~2. GH is less than 1(3.7 PPM Ca, 0.7 PPM Mg based on the report). Water is treated with sodium carbonate at the water treatment plant to increase the pH to ~9.2, but the pH rapidly decreases after the water comes out of the tap. One potential issue is the tap water is extremely cold. It comes out at ~50F and I add a mix of water from the tap along with heated water. The temperature drops to ~60F for 2-3 hours whenever I water change. I don't keep any livestock so I'm not sure if this is a problem. This was not something I needed to consider back in Texas.
Remineralization: I add 22 PPM calcium and 6 PPM magnesium at water change
Fertilization: 20N-6P-26K is added immediately after water change. A second dose at 10N-3P-13K is added halfway through the week. Micros are Burr740's most recent recipe dosed at 0.15 PPM Fe 3x per week.
Temperature: Tank is heated to 73F during the winter. During the more mild parts of the year I remove the heater and go with whatever the ambient temperature is.
It looks like I'm doing everything right on paper and based on my past experience keeping tanks, but there is clearly some major issue ongoing. Right now I'm thinking its inconsistency in the CO2 that I'm just not seeing (I just started the CO2 2 hours earlier last week because I was noticing the drop checker wasn't always yellow at lights on), not enough light, or too cold of water during water changes. I want to keep some records through this journal to keep myself engaged with the tank and to make sure I'm being consistent with everything. I'm also hoping some additional eyes can help me see where I'm going wrong because I really, really miss having a nice looking tank.
I've been keeping planted aquariums and shrimp breeding tanks for almost a decade and for the majority of that time aquariums were my primary hobby. In 2021 I had ~30 tanks running simultaneously containing almost 200 types of plants that I had collected over a 5 year period and more than a dozen types of shrimp. In this time, it was harder for me to not setup new tanks than it was to grow any aquatic plant sent my way. Below are some of the tanks I've kept over the years.
At the end of 2021 I moved from Texas to Massachusetts and gave away all of my plants, tanks, and shrimp to friends I had made over the years. It took some time to find a permanent place to live so I didn't have any tanks until I was unexpectedly given an ADA 120P in summer of 2023.
The early days of the 120P:
I went through the typical tank start growing pains with a diatoms phase, green hair algae, and every other issue one would expect from a new tank. Even with the new tank difficulties, it only took me 2 months to get to a healthy tank again. For the next 1.5 years, everything went smoothly and the tank went through many iterations.
Setup on June 28th
Diatoms outbreak on July 19th
Green hair algae outbreak by August 18th
Everything was cleaned up and growing great by September 1st
The start of the disaster:
In February 2025, I started running into issues. BBA started growing in small tufts on the substrate and green hair algae started attacking the old growth on the plants. I'd run into this issue in the past and was usually able to fix it pretty quickly by dialing in the CO2, cleaning the substrate, cleaning filters, and replanting only the most healthy tops of the plants. Even after doing this multiple times, I haven't had any luck fixing the algae. It always comes back
The start of the algae
Multiple trim and replant cycles along with some new plants
Relatively clean after a trim and replant cycle
10 days later
Where I am today:
I'm getting so frustrated by the persistent issues that I'm about ready to shut down this tank. As a last ditch effort, I purchased a pack of healthy plants from Burr740 to see if healthy plants can help me get through the algae phase and get back into a good place.
The tank as of January 2nd 2026. The healthiest plants in the tank were received earlier this week from Burr740.
Really poor color on my plants with a lot of green algae on the lower leaves. The nice looking bacopa is from Burr740. The original stems of Bacopa have barely grown in the last month. If I pull them up, there are very few roots.
Another example of the old growth issues. The Limnophila mini vietnam also has not grown at all in the last month. Lots of algae grows on the substrate as well.
Another comparison of Burr's Ludwigia sp. red vs mine. Very slow growth and poor rooting.
Really weak older growth on Rotala sp. singapore and poor coloration compared to Burr's plants. This plant has always been very easy for me to keep and this is part of why I'm thinking there is something big that I'm missing. Didiplis diandra is another easy plant that keeps melting at the base and its making very little progress because of this.
Below is the key information about the tank.
Tank size: ADA 120P (120 cm x 45 cm x 45 cm)
Lighting: 3x NiloCG Prizms ran at the lowest setting for each channel. Lights are on for 7 hours a day. I want to increase the lighting, but any time I do the algae gets significantly worse
Filtration: Oase Biomaster 600 and a SunSun HW-303B. There's a spraybar on the bottom left that points along the length of the tank at substrate level and the other output is on the top right corner of the tank pushing the opposite direction.
CO2: Vertical reactor on the SunSun filter and a Sera reactor on the Oase. CO2 comes on 4 hours before lights on and turns off 1 hr before lights off. Drop checker is yellow when lights turn on. The pH drop is ~1.4-1.5 at lights on (5.8 at lights on and 7.3 when water is fully degassed). Plants start pearling within 10 minutes of the lights coming on.
Substrate: A mix of ADA aquasoil, Fluval stratum, and Controsoil. A bag of Controsoil was added ~2 months ago to try and give the plants a boost. The remaining substrate is from when I setup the tank and is almost certainly not providing much nutrition or buffering capacity.
Water change schedule: Weekly 70-80% water changes with tap water coming from the MWRA (water report here). KH is ~2. GH is less than 1(3.7 PPM Ca, 0.7 PPM Mg based on the report). Water is treated with sodium carbonate at the water treatment plant to increase the pH to ~9.2, but the pH rapidly decreases after the water comes out of the tap. One potential issue is the tap water is extremely cold. It comes out at ~50F and I add a mix of water from the tap along with heated water. The temperature drops to ~60F for 2-3 hours whenever I water change. I don't keep any livestock so I'm not sure if this is a problem. This was not something I needed to consider back in Texas.
Remineralization: I add 22 PPM calcium and 6 PPM magnesium at water change
Fertilization: 20N-6P-26K is added immediately after water change. A second dose at 10N-3P-13K is added halfway through the week. Micros are Burr740's most recent recipe dosed at 0.15 PPM Fe 3x per week.
Temperature: Tank is heated to 73F during the winter. During the more mild parts of the year I remove the heater and go with whatever the ambient temperature is.
It looks like I'm doing everything right on paper and based on my past experience keeping tanks, but there is clearly some major issue ongoing. Right now I'm thinking its inconsistency in the CO2 that I'm just not seeing (I just started the CO2 2 hours earlier last week because I was noticing the drop checker wasn't always yellow at lights on), not enough light, or too cold of water during water changes. I want to keep some records through this journal to keep myself engaged with the tank and to make sure I'm being consistent with everything. I'm also hoping some additional eyes can help me see where I'm going wrong because I really, really miss having a nice looking tank.
123 Replies
·
13942 views