
Welcome to ScapeCrunch
We are ScapeCrunch, the place where planted aquarium hobbyists come to build relationships and support each other. When you're tired of doom scrolling, you've found your home here.
Social Feed

Supporting
I Donated 2026
Rockstar
Article Contributor
This thread is for the general discussion of the Article Dialing in CO2. Please add to the discussion here.
0 Replies
·
332 views

I Donated 2026
I wanted to share my experience so far with a cheap flow meter from Aliexpress.
I am generally a “you get what you pay for” aquarist, but I have taken a gamble due to circumstances. It is still early days, but it feels like it may have paid off.
Looking to add a flow meter to help tune my CO2 in a newly set up 130L tank, I searched far and wide for the different options. They were few and far between, most were for far larger flows than I needed and those that were appropriate were ridiculously expensive to get to Australia. So I went searching on the various Chinese discount sites and came across the LZB-3WB flow meters. They are cheap… real cheap. Less than $30 Australian landed, which made me nervous, but felt it was worth a shot at that price.
Not knowing what flow ranges I would need I ordered a 6-60ml/minute model.
After installing it, it was clearly too high of a range for my tank, but it did allow for some visibility while adjusting CO2. It was certainly better than a bubble counter.
Here is a picture of it action:

As you can see, the reading is below the scale of the meter, but with a marker I could at least set a starting point as I adjusted my CO2 higher. Also the adjustment valve was useless, a tiny turn would shut the flow off or open it to max out the meter.
I ordered the below as a replacement:

2.5-25ml/minute seems like a good range for my tank.
As a bonus the valve is better than most standard regulator needle valves. I can adjust the flow in increments of about 1ml/minute.
Below is the valve in action:

They have been in service for 2 months total now, 1 month each, so still an early review. It has been a solid upgrade though and was an easy install. They come with big 8mm barbed fittings but they can be unscrewed to reveal 1/8 female threads that standard needle valves for aquariums fit. I have also got some 1/8 to push fit fittings that I am yet to install as I am heading away on holiday for 2 weeks soon and don’t want to make any changes for the house-sitters to potentially have to fix!
Pros: adjusting my CO2 was made so much easier by being able to see exactly how much of an increase I was making with each adjustment. Monitoring that the valve isn’t drifting has been easy also, a quick check of the meter tells me it is steady.
Cons: I doubt that the reading is accurate. This means little to me, as I am not using it for a calculation or comparison between tanks. As long as the reading is consistent, even if it is wrong, I am fine with that. Also, the max pressure is listed as 40psi. I am unsure if that is a failure or accuracy maximum. Again, it doesn’t affect me as I run a low regulator pressure due to using a reactor. If I were using a diffuser that needed a high pressure, it may make me nervous.
As always, with any cheap gear, your mileage may vary. But, I thought it was worth sharing as it may help those with limited access to flow meters of appropriate sizes. So far it is proving to be the second best $25 I have spent on this tank, second only to the super red bristlenose I have in the tank.
I am generally a “you get what you pay for” aquarist, but I have taken a gamble due to circumstances. It is still early days, but it feels like it may have paid off.
Looking to add a flow meter to help tune my CO2 in a newly set up 130L tank, I searched far and wide for the different options. They were few and far between, most were for far larger flows than I needed and those that were appropriate were ridiculously expensive to get to Australia. So I went searching on the various Chinese discount sites and came across the LZB-3WB flow meters. They are cheap… real cheap. Less than $30 Australian landed, which made me nervous, but felt it was worth a shot at that price.
Not knowing what flow ranges I would need I ordered a 6-60ml/minute model.
After installing it, it was clearly too high of a range for my tank, but it did allow for some visibility while adjusting CO2. It was certainly better than a bubble counter.
Here is a picture of it action:
As you can see, the reading is below the scale of the meter, but with a marker I could at least set a starting point as I adjusted my CO2 higher. Also the adjustment valve was useless, a tiny turn would shut the flow off or open it to max out the meter.
I ordered the below as a replacement:
2.5-25ml/minute seems like a good range for my tank.
As a bonus the valve is better than most standard regulator needle valves. I can adjust the flow in increments of about 1ml/minute.
Below is the valve in action:
They have been in service for 2 months total now, 1 month each, so still an early review. It has been a solid upgrade though and was an easy install. They come with big 8mm barbed fittings but they can be unscrewed to reveal 1/8 female threads that standard needle valves for aquariums fit. I have also got some 1/8 to push fit fittings that I am yet to install as I am heading away on holiday for 2 weeks soon and don’t want to make any changes for the house-sitters to potentially have to fix!
Pros: adjusting my CO2 was made so much easier by being able to see exactly how much of an increase I was making with each adjustment. Monitoring that the valve isn’t drifting has been easy also, a quick check of the meter tells me it is steady.
Cons: I doubt that the reading is accurate. This means little to me, as I am not using it for a calculation or comparison between tanks. As long as the reading is consistent, even if it is wrong, I am fine with that. Also, the max pressure is listed as 40psi. I am unsure if that is a failure or accuracy maximum. Again, it doesn’t affect me as I run a low regulator pressure due to using a reactor. If I were using a diffuser that needed a high pressure, it may make me nervous.
As always, with any cheap gear, your mileage may vary. But, I thought it was worth sharing as it may help those with limited access to flow meters of appropriate sizes. So far it is proving to be the second best $25 I have spent on this tank, second only to the super red bristlenose I have in the tank.
41 Replies
·
3296 views


Santa came early this year with a new 75g tank. I've never owned a 4' tank ever been stuck on the normal 30" wide 29g and 20g's forever. I wanted the uns 90u 36x22x22 but 750.00 is nuts to me I don't have that much in all tanks and equip I own so went cheap route.
Saw the 75g at PetSmart the imagitarium brand for 150 on sale. Those cheapos have bad reviews on leaking and I believe it as I actually picked up a free leaky 75g imagitarium at petco last week and sold it for snake terrarium for 40.00. Went to petco they also have the 50% off sale on marineland and aqueon. The tank was 159.00 out the door. Got lucky the manager said take this set of new glass tops for free, were a return they cant sell it.I assume the made in USA marineland is a better tank than the other cheapos and I actually don't mind the black silicone.
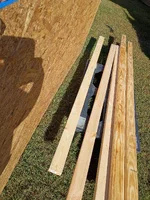
Went to Lowes today for some wood 4- 2x4x8 and 2- 2x4x10 and sheet if 1/2 osb for top and bottom shelf and for extra strength. When I get done I'm sure it would hold a 300g tank. Will wrap the tank in either bead board wood paneling or 1/4" plywood with some nice moulding on corners. Def gotta make a lip to hide the bottom plastic rim as well so its not so ugly. probably build a hood to why not hide some rims! Just gotta build or find a pair of doors on something else I can steal and use for this stand. I don't plan on getting it setup for few weeks but want stand base 1/2 done now so I can try some diff dry scapes with wood and rocks in it. This will be replacing my 20long I was scaping in other journal its now a plant farm full of ludwigia and plants for sale.
Still not sure on the name on this tank, Whipple landing is where I took some pics I want to copy for the tank. Its feed by the great pee dee river here so name may change later.
Saw the 75g at PetSmart the imagitarium brand for 150 on sale. Those cheapos have bad reviews on leaking and I believe it as I actually picked up a free leaky 75g imagitarium at petco last week and sold it for snake terrarium for 40.00. Went to petco they also have the 50% off sale on marineland and aqueon. The tank was 159.00 out the door. Got lucky the manager said take this set of new glass tops for free, were a return they cant sell it.I assume the made in USA marineland is a better tank than the other cheapos and I actually don't mind the black silicone.
Went to Lowes today for some wood 4- 2x4x8 and 2- 2x4x10 and sheet if 1/2 osb for top and bottom shelf and for extra strength. When I get done I'm sure it would hold a 300g tank. Will wrap the tank in either bead board wood paneling or 1/4" plywood with some nice moulding on corners. Def gotta make a lip to hide the bottom plastic rim as well so its not so ugly. probably build a hood to why not hide some rims! Just gotta build or find a pair of doors on something else I can steal and use for this stand. I don't plan on getting it setup for few weeks but want stand base 1/2 done now so I can try some diff dry scapes with wood and rocks in it. This will be replacing my 20long I was scaping in other journal its now a plant farm full of ludwigia and plants for sale.
Still not sure on the name on this tank, Whipple landing is where I took some pics I want to copy for the tank. Its feed by the great pee dee river here so name may change later.

32 Replies
·
1085 views

Staff member
I Donated 2026
Founding Member
As we all know, AI bots are all the rage now. As is usually the case, when new technology surfaces, people find nefarious ways to use it. I feel very negative saying that because I am an optimist by nature. Unfortunately, it's something to manage.
AI bots have found ways to function more like people and this is allowing them to bypass the SPAM measures that most forums have. You may have seen some new members that are posting very robotic replies to old threads. Sometimes it's very difficult to know whether it is a robot or not because some people use AI to clean up their writing before making posts, especially if English isn't their first language.
We have updated our sign-on Captcha to ask a question rather than simply require a click to prove you are not a robot. We also moderate a new member's first post as a backup measure. However, like I said, it's sometimes tough to tell. In such case, we usually send an email asking them to tell us about their tank(s) to see if that helps us spot a bot.
The risk is that if we allow that first post to go through, the AI member would be free to SPAM in the future instead of the current seemingly innocuous replies.
Anyway, no system is perfect. If you notice a post from a new member that seems to have that AI robot quality, please report it so we can check on it. We would really appreciate it.
Thanks,
Art
AI bots have found ways to function more like people and this is allowing them to bypass the SPAM measures that most forums have. You may have seen some new members that are posting very robotic replies to old threads. Sometimes it's very difficult to know whether it is a robot or not because some people use AI to clean up their writing before making posts, especially if English isn't their first language.
We have updated our sign-on Captcha to ask a question rather than simply require a click to prove you are not a robot. We also moderate a new member's first post as a backup measure. However, like I said, it's sometimes tough to tell. In such case, we usually send an email asking them to tell us about their tank(s) to see if that helps us spot a bot.
The risk is that if we allow that first post to go through, the AI member would be free to SPAM in the future instead of the current seemingly innocuous replies.
Anyway, no system is perfect. If you notice a post from a new member that seems to have that AI robot quality, please report it so we can check on it. We would really appreciate it.
Thanks,
Art
3 Replies
·
146 views

Rockstar
Is this what would be best for an ADA 60p? About 17 gal.
I think so based on this post. HERE
I need stuff for my Christmas list. This is a good idea. If you have a link to one, please post that also.

I think so based on this post. HERE
I need stuff for my Christmas list. This is a good idea. If you have a link to one, please post that also.
3 Replies
·
50 views

I Donated 2026
Expert in Residence
MOTM Winner
Rockstar
His study answers many questions and is filled with data for folks to pour over.
21 Replies
·
630 views

Supporting
I Donated 2026
Rockstar
Journal Kwyet’s 60G Hillstream Tank
Sometime in Nov 2024, I bought a 60G Aqueon tank at the 50% off sale. I already had a 75 gallon stand and tank, but I wanted a shorter tank so I could look in over the top. The 75 gallon was relegated to the garage in case I want it again, and I painted the stand black. I also put black vinyl on the back.
My goal was to make a hillstream environment, based on the long-running tank of Rachel O’Leary. I had looked at other options like the river manifolds, but I liked Rachel’s better. I set it up with an fx6 filter, a horizontal spray bar on the left side, and 2nd modified spray bar situated vertically behind a corner Matten filter on the back right side. Glass strips were attached with silicone to hold it. I cut the Matten filter horizontally a few inches from the tank floor so the top part could be easily removed for cleaning. I also cut a small vertical groove from the inside so it wouldn’t constrict the holes so much on the curve.
This was how it looked on Dec 20, 2024:

My goal was to make a hillstream environment, based on the long-running tank of Rachel O’Leary. I had looked at other options like the river manifolds, but I liked Rachel’s better. I set it up with an fx6 filter, a horizontal spray bar on the left side, and 2nd modified spray bar situated vertically behind a corner Matten filter on the back right side. Glass strips were attached with silicone to hold it. I cut the Matten filter horizontally a few inches from the tank floor so the top part could be easily removed for cleaning. I also cut a small vertical groove from the inside so it wouldn’t constrict the holes so much on the curve.
This was how it looked on Dec 20, 2024:
53 Replies
·
6431 views

Journal High-Tech 90P Build
Hi guys!
I'm new here, but not entirely new to planted tanks though I've been out of the hobby for the better part of the last decade between kids and moving a couple of times - but finally in a spot where I can do something again. I'm mostly going to be making things up as I go along, but plan on a lot of automation (I want to integrate everything into home assistant) and a lot of DIY as I love the challenge of building things out myself.
The starting point:
I picked up a 90P rimless, low-iron tank on a great deal.
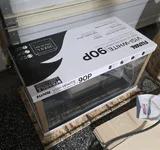
I have a rough idea in my head for a stand to be built from plywood - just have a couple other house projects to finish off before starting that built.
Wife says I can only have one aquarium, so for this tank, I want to go all out with a sump to allow for auto top off, and auto water changes, auto fertilizer dosing etc. etc. I have half a plan in my mind.
I've also started on the light fixture which I've modeled up in CAD, and plan on making out of an 8020 extrusion, and some 3D printed bits.
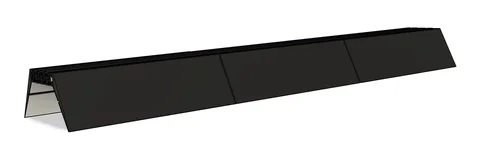
I'm using bridgelux gen 3 thrive CW (3000k) and WW (5000k) LED strips which have super high CRI at 98+ along with some specific XPE2 wavelengths that I'll solder onto some starboards. Far Red (730nm), Red (654nm), Cyan (495nm), Blue (455nm), Visible UV (415nm). Each segment of the white channels will be on its own driver so I can adjust left to right brightness in thirds, and each colour channel on its own driver so I can vary each channel on a time-based approach.
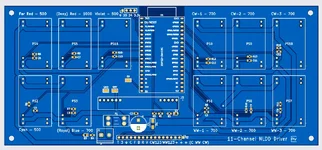
These will be run from a custom PCB board with Meanwell N-LDD drivers, and will run ESPHome on an ESP32 so it can link up with my Home Assistant installation.
That's it for now, this will probably be a very slow build so be warned if you follow along!
I'm new here, but not entirely new to planted tanks though I've been out of the hobby for the better part of the last decade between kids and moving a couple of times - but finally in a spot where I can do something again. I'm mostly going to be making things up as I go along, but plan on a lot of automation (I want to integrate everything into home assistant) and a lot of DIY as I love the challenge of building things out myself.
The starting point:
I picked up a 90P rimless, low-iron tank on a great deal.
I have a rough idea in my head for a stand to be built from plywood - just have a couple other house projects to finish off before starting that built.
Wife says I can only have one aquarium, so for this tank, I want to go all out with a sump to allow for auto top off, and auto water changes, auto fertilizer dosing etc. etc. I have half a plan in my mind.
I've also started on the light fixture which I've modeled up in CAD, and plan on making out of an 8020 extrusion, and some 3D printed bits.
I'm using bridgelux gen 3 thrive CW (3000k) and WW (5000k) LED strips which have super high CRI at 98+ along with some specific XPE2 wavelengths that I'll solder onto some starboards. Far Red (730nm), Red (654nm), Cyan (495nm), Blue (455nm), Visible UV (415nm). Each segment of the white channels will be on its own driver so I can adjust left to right brightness in thirds, and each colour channel on its own driver so I can vary each channel on a time-based approach.
These will be run from a custom PCB board with Meanwell N-LDD drivers, and will run ESPHome on an ESP32 so it can link up with my Home Assistant installation.
That's it for now, this will probably be a very slow build so be warned if you follow along!
97 Replies
·
7531 views

Staff member
I Donated 2026
Founding Member
Well, as this thread exists in a few places, I figured why not have it here also. Perhaps we can take up the baton and keep it active and bring some value to hobbyists.
For those of you that don't know, I got into thinking much more about my micros when I read this thread on another forum. It was started by our very own @GreggZ. It was spurred into existence because of our own @Burr740 and his work with micro fertilizers. Some really good discussion followed and a lot was learned.
I don't want to steal Gregg's thunder with this so I hope he posts his current thoughts on the subject and we can all take it from there.
All the best,
Art
For those of you that don't know, I got into thinking much more about my micros when I read this thread on another forum. It was started by our very own @GreggZ. It was spurred into existence because of our own @Burr740 and his work with micro fertilizers. Some really good discussion followed and a lot was learned.
I don't want to steal Gregg's thunder with this so I hope he posts his current thoughts on the subject and we can all take it from there.
All the best,
Art
108 Replies
·
17920 views

Supporting
I Donated 2026
AquaGirls
Journal UNS 150U - Nature Aquarium
The adventure begins...again. After a substantial absence from the hobby, I dunked my toe back in last fall with a small 60F shrimp tank, a Chihiros WRGB slim, and a Chihiros CO2 (citric/baking soda) system. A lot has changed since I started this hobby in the 90s, and it's been about 20 years since I tore my last tank down. 'Aquascaping' per se wasn't as much a thing back then. I didn't know anyone running CO2, and LED lights didn't really exist. The 60F was fun, and the shrimp seem happy, but I have been itching to get to building something with more elbow room.
I did happen to find a pic of my old 75 gallon bowfront tank a few weeks ago that was taken just before I tore it down prior to a big move. It ran great for 7 years. Was a simple low tech setup, with one hunk of driftwood, no rocks, plain gravel (no soil) a lot of simple plants (the sword plants did great), and some peaceful fish. Algae wasn't an issue, filtration was pretty subpar by current standards, but the tank did well despite that, and algae wasn't really an issue. Aesthetically blah by today's standards, and certainly not my goal for this build, but I remember being proud of how well this tank ran back then, and wasn't too demanding. Important as my life was very hectic back then.

So, the tech plan so far for the new 150U:
I ordered the tank and stand from UNS, and to my amazement, despite the worst mid-January winter storm we had in some years here, it was delivered on time by the freight company. I do not recommend trying to move a 5ft wide 400+lb tank and stand across snow and ice, down a slope, into to basement. Very thankful to have a tractor with forks, but still was a bit stressful getting this into the house. Miraculously we got it in the house in one piece, and I seriously questioned ever getting a tank larger than this in the future!

It did require disassembly outside the basement door to actually get it into the house around a berm of snow, along with some extra muscle from a few friends. (This was originally meant to be a 120P, until I realized the hardscape plan I had wouldn't quite fit. What's a another foot in length? )

Just getting the tank through the snow and ice was enough, and the base cabinet and tank just sort of landed in the room, and stayed there for a few days while devising a strategy for the next step. After recruiting a tall and strong friend, and sourcing some of those giant suction cup handles you use for moving shower glass walls, a few days later the tank was finally hoisted up onto the base.
As there is a dropped ceiling in the basement my plan was to hang the lights directly above the tank from the ceiling, rather than using a light stand. A few tiles were removed to investigate the structure above, and with some 2x4 extra bracing for the anchors, as none of the joists were in quite the right spot, two Chihiros Vivid 3 lights were installed directly above the tank. At this point I discovered that none of the electrical circuits in the basement were GFCI protected, so obviously that was immediately remedied. Too much gear and too much water to mess around with unprotected circuits.

With the ceiling open, I decided to run the lighting cables over the top of the wall to the left of the tank, and down into the mechanicals room there. The advantage being that the power cords are hidden from view after going through the ceiling tiles, and it's two less large power sources cluttering up the cabinet under the tank. Had to add an outlet in that closet, but I like how it turned out.
With the tank in position and leveled, and the lights finally installed, the next big issue is water. The well water here is liquid limestone. That was the initial mistake I made with the shrimp tank. Sure, neocaridina like hard water, but not THAT hard, and I quickly had to shift to remineralized distilled. I knew before even getting serious about planning this tank that the only reasonable option, for any future tanks here, is RO. The well water might be fine for Malawi Cichlids, but that's not my plan for this tank, but it will be great to have flexibility going forward. It's a big glass box, at just over 140 gallons, and it won't be the only one here (I hope), so the water part I want to get right from the start, and to make it easy to do water changes. The basement is a walkout, so draining water during water changes will be easy, and I would like to make filling it just as easy. I sourced two 70 gallon storage tanks for the RO water from Northern Tool, and ordered a Vectra S2 pump which will help with transfering water between tanks, as well as pumping it out through a hose to the aquarium(s) during water changes. Forgot to take a pic when I was done, but the pvc is all glued up now. I will finish installing the RO unit this weekend.

So, aquarium set up, lights in, and RO system with storage in progress. Next up? The exciting part. Hardscape! I have been hoarding Manzanita, Hakkai stone, and substrate for several months, so I'm excited to move on to the next step! Tank so far pictured below (although I have already removed the privacy film on the back in favor of adding the ARC RGB light screen in part due to the stair rail being visible and distracting. First screen was damaged in transit, so waiting on a replacement).

I did happen to find a pic of my old 75 gallon bowfront tank a few weeks ago that was taken just before I tore it down prior to a big move. It ran great for 7 years. Was a simple low tech setup, with one hunk of driftwood, no rocks, plain gravel (no soil) a lot of simple plants (the sword plants did great), and some peaceful fish. Algae wasn't an issue, filtration was pretty subpar by current standards, but the tank did well despite that, and algae wasn't really an issue. Aesthetically blah by today's standards, and certainly not my goal for this build, but I remember being proud of how well this tank ran back then, and wasn't too demanding. Important as my life was very hectic back then.
So, the tech plan so far for the new 150U:
| UNS 150U Tank & Stand |
| Chihiros Vivid 3 x2 |
| Chihirios Vivid 3 Shades x2 |
| GLA PRO-DS-1 Dual Stage CO2 System (Modular) |
| Chihiros Auto Dosing System (4 doser) |
| Chihiros Dosing Flow Adapter |
| Oase Biomaster 2 Thermo 600 |
| Oase Biomaster 2 Thermo 850 |
| ARC RBG Backlight Screen |
| ARC Stainless Yugang CO2 Reactor (Large) |
I ordered the tank and stand from UNS, and to my amazement, despite the worst mid-January winter storm we had in some years here, it was delivered on time by the freight company. I do not recommend trying to move a 5ft wide 400+lb tank and stand across snow and ice, down a slope, into to basement. Very thankful to have a tractor with forks, but still was a bit stressful getting this into the house. Miraculously we got it in the house in one piece, and I seriously questioned ever getting a tank larger than this in the future!
It did require disassembly outside the basement door to actually get it into the house around a berm of snow, along with some extra muscle from a few friends. (This was originally meant to be a 120P, until I realized the hardscape plan I had wouldn't quite fit. What's a another foot in length?
)Just getting the tank through the snow and ice was enough, and the base cabinet and tank just sort of landed in the room, and stayed there for a few days while devising a strategy for the next step. After recruiting a tall and strong friend, and sourcing some of those giant suction cup handles you use for moving shower glass walls, a few days later the tank was finally hoisted up onto the base.
As there is a dropped ceiling in the basement my plan was to hang the lights directly above the tank from the ceiling, rather than using a light stand. A few tiles were removed to investigate the structure above, and with some 2x4 extra bracing for the anchors, as none of the joists were in quite the right spot, two Chihiros Vivid 3 lights were installed directly above the tank. At this point I discovered that none of the electrical circuits in the basement were GFCI protected, so obviously that was immediately remedied. Too much gear and too much water to mess around with unprotected circuits.
With the ceiling open, I decided to run the lighting cables over the top of the wall to the left of the tank, and down into the mechanicals room there. The advantage being that the power cords are hidden from view after going through the ceiling tiles, and it's two less large power sources cluttering up the cabinet under the tank. Had to add an outlet in that closet, but I like how it turned out.
With the tank in position and leveled, and the lights finally installed, the next big issue is water. The well water here is liquid limestone. That was the initial mistake I made with the shrimp tank. Sure, neocaridina like hard water, but not THAT hard, and I quickly had to shift to remineralized distilled. I knew before even getting serious about planning this tank that the only reasonable option, for any future tanks here, is RO. The well water might be fine for Malawi Cichlids, but that's not my plan for this tank, but it will be great to have flexibility going forward. It's a big glass box, at just over 140 gallons, and it won't be the only one here (I hope), so the water part I want to get right from the start, and to make it easy to do water changes. The basement is a walkout, so draining water during water changes will be easy, and I would like to make filling it just as easy. I sourced two 70 gallon storage tanks for the RO water from Northern Tool, and ordered a Vectra S2 pump which will help with transfering water between tanks, as well as pumping it out through a hose to the aquarium(s) during water changes. Forgot to take a pic when I was done, but the pvc is all glued up now. I will finish installing the RO unit this weekend.
So, aquarium set up, lights in, and RO system with storage in progress. Next up? The exciting part. Hardscape! I have been hoarding Manzanita, Hakkai stone, and substrate for several months, so I'm excited to move on to the next step! Tank so far pictured below (although I have already removed the privacy film on the back in favor of adding the ARC RGB light screen in part due to the stair rail being visible and distracting. First screen was damaged in transit, so waiting on a replacement).

119 Replies
·
11249 views


Journal Farmer D. Singh's journal
Ive reorganized the order of my tanks so I can better keep track of them ie. Tank 2 moss tank is now tank 3. This helps in any confusion I had when tracking tanks they are in a sort of order now. Rather than taking time editing my old journal id rather create a new thread. Pics will be current (for the most part) as they are posted. I am not aquascaping. I am just farming.
92 Replies
·
6221 views