Welcome to ScapeCrunch
We are ScapeCrunch, the place where planted aquarium hobbyists come to build relationships and support each other. When you're tired of doom scrolling, you've found your home here.
Social Feed
This is an article written by @Zeus. that he generously posted here on ScapeCrunch. Thanks @Zeus.!
Why do we need a stable Carbon Dioxide (CO2) level?
A stable Carbon Dioxide (CO2) level or concentration is key to successfully growing plants in a CO2 injected tank. The CO2 concentration needs to be stable throughout the photoperiod, usually anything from 6 to 8 hours long, and consistent from one day to the next. If the CO2 level is not stable during this period, plants will have to constantly adapt and may not grow as well. A fluctuating CO2 concentration may also give algae an advantage and it could start to become a problem.
Stabilising CO2 during the photoperiod can be tricky and time consuming, and can sometimes take weeks of trial and error, especially for folk new to CO2 injection. Also key to success is good water flow. This is often overlooked but is essential to distribute CO2 evenly throughout the tank. CO2 travels 10,000 times slower in water than in air, so without good flow CO2 concentration will not be the same throughout the tank. Plants waving gently in the flow is a good indicator that it is adequate. Good surface agitation is also essential. This ensures adequate levels of gas exchange and helps to keep the tank water oxygenated.
What level of CO2 to aim for?
Many folk aim for a CO2 concentration of 30ppm. This is regarded as the upper safe limit for livestock. A lower CO2 concentration than 30ppm CO2 can also greatly benefit plants and is perhaps kinder to livestock, so don’t feel the need to hit the 30ppm mark. When tank water has 30ppm of CO2, the pH will be approximately 1.0 unit lower than it was before CO2 was injected. To find a tank’s CO2 level or baseline before injection starts, take a clean glass of tank water and leave it at room temp for 24 hrs after which take a pH reading. This will be the baseline or degassed pH of your tank water. For example, if the pH is 7.2 after fully degassing, and your target CO2 concentration is 30ppm then the target pH will be 6.2.
Watch your fish when Injecting CO2
It is best to adjust CO2 levels before adding any livestock to avoid accidentally stressing fish and other aquatic critters. If this is not possible it is essential to keep a close eye on your fish and shrimp etc when first injecting CO2 especially if you are new to the concept. Watch for any signs of abnormal behaviour. If the fish come to the surface and start gasping for air or show any other signs of distress, stop CO2 injection immediately. If this happens a large water change will be necessary as a temporary fix to reduce CO2 concentration and hopefully introduce more oxygen. Next check your equipment and don’t start CO2 injection again until you are confident the cause has been eliminated. If you are unable to get to the bottom of the problem seek advice or guidance, never be afraid to ask.
Injecting CO2
After starting to inject CO2 the pH of the tank water will drop quickly at first, then slowly until it reaches equilibrium with CO2 uptake by plants and CO2 loss from the water surface. If the injection rate is too high, you will overshoot your target CO2/pH which could be fatal to the tanks inhabitants so small steps at first are essential to avoid this. If the injection rate is too low, your tank water may take many hours to reach the target CO2 concentration and may not hold that concentration and remain stable once the lights come on. It’s often a case of trial and error, taking the greatest care to get it right especially when livestock is present.
Drop Checker (DC)
A drop Checker (DC) is a great tool for checking the concentration of CO2 in tank water. A working DC is filled with an indicator solution, usually a reagent in deionised water calibrated to a value of 4dkH. This solution changes colour according to the concentration of CO2. The colour will change from blue when tank water is fully degassed of CO2, to lime green when tank water has reached a CO2 concentration of 30ppm. DC’s can often change colour slowly; the rate varies with design and can take unto 2hrs. A DC can be used by itself to gauge CO2 concentration, however for the purposes of establishing a stable CO2 concentration it’s easier to use the combination of a pH profile and a DC
For further information on measurement using a drop checker, see Clive’s excellent article linked below
CO2 Measurement Using A Drop Checker
Time it takes to get your target CO2 level
The time it takes to reach a CO2 concentration of 30ppm varies with tank size and injection method. About 2hrs is normal for a 50 litre tank, but bigger tanks can take 4 to 5 hours plus.
Doing a pH profile
Doing a pH profile is a great way to achieve a stable CO2 concentration and is relatively simple to do, ‘if’ a little time consuming. Firstly, decide on your target CO2 level. Then find the baseline or degassed pH of your tank water as outlined above under the heading - What level of CO2 to aim for. Set the injection rate, or Bubbles Per Second (BPS) using a bubble counter, to a suitable level for your tanks size and CO2 setup. Take the pH of the tank water as CO2 injection starts or just before.
Thereafter, take a pH reading every 30 mins and note it down. As the pH change slows down start to take the pH a little more often. If the pH drops more than 1.0 unit reduce the injection rate (BPS). If it is taking too long to get the desired pH drop increase the BPS. Once the target pH is reached, turn the lights on, then keep taking the pH every 30 mins, repeating the BPS adjustment to keep the pH as stable as possible. After 4 to 5 hours of lights on turn the CO2 off and call it a day.
Next day take the pH as CO2 comes on and thereafter every 30 mins and note the time. As the target pH is reached turn the lights on and again note the time. Some fine tuning will probably still be needed to get a stable pH (I personally call it stable when there is less than 0.1 pH drift from lights on till CO2 off). So it’s a case of ‘rinse repeat’; check the pH and adjust BPS if required to suit, until you have a stable pH from lights on and all the way through to lights off. Then the hard work is over. DO NOT adjust your BPS rate again to try and get the pH to drop faster, it is not possible. The time it takes is the time it takes. You will have already got this time noted down. It may be 2hrs it may be 4 to 5hrs with bigger tanks. The length of time a pH drop takes is always worth a final check. You will already have a rough idea from the previous days pH profiling but some further fine tuning may be required.
The whole process can take days or even weeks to perfect, especially if you need to increase the water flow to ensure adequate CO2 distribution throughout the tank, or to increase surface agitation and therefore gas exchange. Other commitments, such as work and household chores, can interfere with the process so make sure you have at least a few days free to start with, any distraction may prove fatal to fish and other aquarium livestock, again another reason why it’s best to dial CO2 in before adding livestock.
If in doubt ask
Finally, there’s no such thing as a stupid question, especially where CO2 injection and the health of fish and other livestock is concerned. So if in doubt always ask. There are many experienced and knowledgeable members who will be only too happy to help.
@Zeus.
Dialing in the CO2 injection Rate and CO2 Profiles
Why do we need a stable Carbon Dioxide (CO2) level?
A stable Carbon Dioxide (CO2) level or concentration is key to successfully growing plants in a CO2 injected tank. The CO2 concentration needs to be stable throughout the photoperiod, usually anything from 6 to 8 hours long, and consistent from one day to the next. If the CO2 level is not stable during this period, plants will have to constantly adapt and may not grow as well. A fluctuating CO2 concentration may also give algae an advantage and it could start to become a problem.
Stabilising CO2 during the photoperiod can be tricky and time consuming, and can sometimes take weeks of trial and error, especially for folk new to CO2 injection. Also key to success is good water flow. This is often overlooked but is essential to distribute CO2 evenly throughout the tank. CO2 travels 10,000 times slower in water than in air, so without good flow CO2 concentration will not be the same throughout the tank. Plants waving gently in the flow is a good indicator that it is adequate. Good surface agitation is also essential. This ensures adequate levels of gas exchange and helps to keep the tank water oxygenated.
What level of CO2 to aim for?
Many folk aim for a CO2 concentration of 30ppm. This is regarded as the upper safe limit for livestock. A lower CO2 concentration than 30ppm CO2 can also greatly benefit plants and is perhaps kinder to livestock, so don’t feel the need to hit the 30ppm mark. When tank water has 30ppm of CO2, the pH will be approximately 1.0 unit lower than it was before CO2 was injected. To find a tank’s CO2 level or baseline before injection starts, take a clean glass of tank water and leave it at room temp for 24 hrs after which take a pH reading. This will be the baseline or degassed pH of your tank water. For example, if the pH is 7.2 after fully degassing, and your target CO2 concentration is 30ppm then the target pH will be 6.2.
Watch your fish when Injecting CO2
It is best to adjust CO2 levels before adding any livestock to avoid accidentally stressing fish and other aquatic critters. If this is not possible it is essential to keep a close eye on your fish and shrimp etc when first injecting CO2 especially if you are new to the concept. Watch for any signs of abnormal behaviour. If the fish come to the surface and start gasping for air or show any other signs of distress, stop CO2 injection immediately. If this happens a large water change will be necessary as a temporary fix to reduce CO2 concentration and hopefully introduce more oxygen. Next check your equipment and don’t start CO2 injection again until you are confident the cause has been eliminated. If you are unable to get to the bottom of the problem seek advice or guidance, never be afraid to ask.
Injecting CO2
After starting to inject CO2 the pH of the tank water will drop quickly at first, then slowly until it reaches equilibrium with CO2 uptake by plants and CO2 loss from the water surface. If the injection rate is too high, you will overshoot your target CO2/pH which could be fatal to the tanks inhabitants so small steps at first are essential to avoid this. If the injection rate is too low, your tank water may take many hours to reach the target CO2 concentration and may not hold that concentration and remain stable once the lights come on. It’s often a case of trial and error, taking the greatest care to get it right especially when livestock is present.
Drop Checker (DC)
A drop Checker (DC) is a great tool for checking the concentration of CO2 in tank water. A working DC is filled with an indicator solution, usually a reagent in deionised water calibrated to a value of 4dkH. This solution changes colour according to the concentration of CO2. The colour will change from blue when tank water is fully degassed of CO2, to lime green when tank water has reached a CO2 concentration of 30ppm. DC’s can often change colour slowly; the rate varies with design and can take unto 2hrs. A DC can be used by itself to gauge CO2 concentration, however for the purposes of establishing a stable CO2 concentration it’s easier to use the combination of a pH profile and a DC
For further information on measurement using a drop checker, see Clive’s excellent article linked below
CO2 Measurement Using A Drop Checker
Time it takes to get your target CO2 level
The time it takes to reach a CO2 concentration of 30ppm varies with tank size and injection method. About 2hrs is normal for a 50 litre tank, but bigger tanks can take 4 to 5 hours plus.
Doing a pH profile
Doing a pH profile is a great way to achieve a stable CO2 concentration and is relatively simple to do, ‘if’ a little time consuming. Firstly, decide on your target CO2 level. Then find the baseline or degassed pH of your tank water as outlined above under the heading - What level of CO2 to aim for. Set the injection rate, or Bubbles Per Second (BPS) using a bubble counter, to a suitable level for your tanks size and CO2 setup. Take the pH of the tank water as CO2 injection starts or just before.
Thereafter, take a pH reading every 30 mins and note it down. As the pH change slows down start to take the pH a little more often. If the pH drops more than 1.0 unit reduce the injection rate (BPS). If it is taking too long to get the desired pH drop increase the BPS. Once the target pH is reached, turn the lights on, then keep taking the pH every 30 mins, repeating the BPS adjustment to keep the pH as stable as possible. After 4 to 5 hours of lights on turn the CO2 off and call it a day.
Next day take the pH as CO2 comes on and thereafter every 30 mins and note the time. As the target pH is reached turn the lights on and again note the time. Some fine tuning will probably still be needed to get a stable pH (I personally call it stable when there is less than 0.1 pH drift from lights on till CO2 off). So it’s a case of ‘rinse repeat’; check the pH and adjust BPS if required to suit, until you have a stable pH from lights on and all the way through to lights off. Then the hard work is over. DO NOT adjust your BPS rate again to try and get the pH to drop faster, it is not possible. The time it takes is the time it takes. You will have already got this time noted down. It may be 2hrs it may be 4 to 5hrs with bigger tanks. The length of time a pH drop takes is always worth a final check. You will already have a rough idea from the previous days pH profiling but some further fine tuning may be required.
The whole process can take days or even weeks to perfect, especially if you need to increase the water flow to ensure adequate CO2 distribution throughout the tank, or to increase surface agitation and therefore gas exchange. Other commitments, such as work and household chores, can interfere with the process so make sure you have at least a few days free to start with, any distraction may prove fatal to fish and other aquarium livestock, again another reason why it’s best to dial CO2 in before adding livestock.
If in doubt ask
Finally, there’s no such thing as a stupid question, especially where CO2 injection and the health of fish and other livestock is concerned. So if in doubt always ask. There are many experienced and knowledgeable members who will be only too happy to help.
@Zeus.
0 replies
·
685 views
replies
Legacy View


I'm on the hunt for a stand mounted light stand for my 120p + Hyperspot L. I've found a few options, but nothing spectacular. I figured I'd ask for info/ideas before I consider startting down the DIY route with some conduit type pipe. Ultimately, I can't bring myself to mount the light from the celling only for the cord to dangle down, but based on what I'm [not] finding, I might give in. I could in theory 3d print something to maybe obscure the cord, so that may be my ultimate fall back if this turns out to be a dead end.
WeekAqua - Mounts behind the tank, which would not be my first choice, but I would be willing to settle on it. I'm not finding anyone with it in stock and it's $300 landed from Alibaba.

ADA Solar - More the look I'm going for, but they're not intended to be used with a single light for a 120p, so I'd need 2, which is noted as discontinued (and $600 for a light stand sounds nuts)

ADA Solar Stand Option 2 - $729 + shipping just seems outrageous, even if it were in stock!

Liti Light Stand - Definitely the closest to the look I had in my mind. Seeing this made me wonder if a single 10 foot 1/2 tube of aluminum conduit could be bent in the same fashion of the multiple pieces of this stand (bending inspiration video here).

WeekAqua - Mounts behind the tank, which would not be my first choice, but I would be willing to settle on it. I'm not finding anyone with it in stock and it's $300 landed from Alibaba.
ADA Solar - More the look I'm going for, but they're not intended to be used with a single light for a 120p, so I'd need 2, which is noted as discontinued (and $600 for a light stand sounds nuts)
ADA Solar Stand Option 2 - $729 + shipping just seems outrageous, even if it were in stock!
Liti Light Stand - Definitely the closest to the look I had in my mind. Seeing this made me wonder if a single 10 foot 1/2 tube of aluminum conduit could be bent in the same fashion of the multiple pieces of this stand (bending inspiration video here).
0 replies
·
8 views
replies
Legacy View
Journal Mini Yugang - My experience
This journal documents my thought process and design decisions for building mini yugang reactors for tanks below 20 gallons/60P.
If this is your first time learning about a yugang reactor, head over to this article:
Yugang CO2 Reactor - A Guide
One of the challenges with the yugang reactor is that they are tough to build for smaller tanks due to material availability. But that issue was solved in this thread below:
Yugang Reactors for Smaller Tanks
After reading the thread above, I thought that the PC cooling reservoir would be a great idea for three reasons:

Challenges with the mini yugang and how to resolve them:

I hope the reader will find my experience helpful in designing their own mini yugang. Thank you for reading.
If this is your first time learning about a yugang reactor, head over to this article:
Yugang CO2 Reactor - A Guide
One of the challenges with the yugang reactor is that they are tough to build for smaller tanks due to material availability. But that issue was solved in this thread below:
Yugang Reactors for Smaller Tanks
After reading the thread above, I thought that the PC cooling reservoir would be a great idea for three reasons:
- You will be able to disassemble it for cleanup
- It’s see-through, so you can adjust flow as required, as the flow will decrease over time from filter clog-up. This is sort of important for mini yugangs as significant flow reductions could lead to a slower rate of pH drop. This is discussed in detail later in the journal.
- Its outflow is off-centre and the cylinder is rotatable as shown in the photo below, thus you can increase or decrease pH drop based on your tank size. This feature is particularly important as the PC cooling reservoirs come in fixed sizes, so the only real way to adjust pH drop is by rotating the cylinder to increase or decrease CO2 absorption.
Challenges with the mini yugang and how to resolve them:
- Low volume: I have used a 310 mm PC cooling reservoir, with a usable diameter of 40mm. This means that during operation at full capacity the volume of water in the reactor is pretty low; about 185ml. This is a little problematic as the low mass flow rate requirement of the mini yugang coupled with the low volume means that only a small amount of water gets injected with CO2 at any point in time. This leads to the pH drop being very slow for a tank size of 20 gallons. I had designed my yugang for a pH drop of 1.4 and it takes me about 5-6 hours to achieve this. The way to resolve this issue would be by using a reactor with a great length (to be able to afford larger mass flow rates) and a larger volume, but this would mean that you would have a tough time running the reactor in overflow mode as the CO2 gas pocket would have to be very small due to the bigger reactor size. The other solution is to start injecting early like I do. So to conclude, the “rate of pH drop” is dependent on reactor volume, mass flow rate and the size of the fish tank. So keep this in mind if you’re trying to use a mini yugang for tanks bigger than 20 gallons.
- Usually small volumes of air being purged into the reactor isn’t an issue as yugang points out in his article but if the filter is purging out massive bubbles of air frequently then this most certainly will affect reactor operation. If you own one of the older biomasters one of the issues you’d encounter is the filter purging air into the reactor. This happens in two cases; if you don’t have a bypass or if the tee joint at the bypass is oriented incorrectly. This is why my suggestion would be to install a bypass, as it just gives you more control over the situation. So, what is then the correct tee joint orientation? If you look at the photo below, you’ll see how the bull head of the tee joint is pointing upwards against gravity and that the bypass is connected to the bull head while the reactor inflow is connected to the parallel down-flow. This is key because the bypass being connected to the upwards facing bull head ensures that any bubbles being purged from the filter is not entering the reactor; this happens as bubbles have an affinity to move upwards. In this case, the filter purges air and the bubbles shoot straight into the bypass and out into the tank without entering the reactor and disrupting reactor performance.
I hope the reader will find my experience helpful in designing their own mini yugang. Thank you for reading.
0 replies
·
13 views
replies
Legacy View

I have this pH tester. You're supposed to keep the probe wet in a specific preservative solution between uses. I have the correct solution. The problem is that it dries out so quickly. I go months between using it, and it dries out. Does anyone have an idea on how to keep it wet? I'm going to put a small piece of sponge in the bottom of the cap and see if that helps.
3 replies
·
35 views
Started a new tank with the idea of show casing Lagenandra meeboldii which I have not showcased before. Wanted to feature Hygrophila lower Hlaingbwe, but I removed it later as I think it would be too large for this tank.
New substrate, new filter, squeezed filter mulm from the other matured tank, then ran the tank one week day before planting. 100% water change after planting, then 100% water change every other day since then. Dosing 1ml APT3 after water change day, and remineralizing to 5dGH using APT Sky. Trying out the low water column dosing approach for the initial period.
Filter: Oase 250
Lights: Week aqua a430 80%
Substrate: APT Feast
Was going to Journal about startup issues, however, it seems like the tank has already stabilized, skipping diatoms and green dust phase.
Freshly planted for a couple of days:
13/2/2026

Replanted the tops for Myriophyllum roraima, Cut and replanted Rotala blood red to begin building up the bush form. Trimmed old leaves
Foreground seems a bit blocky for now, so I think I'lll move stuff round again. Probably when the BV grows out some more.
Pic on 23/2/2026
Readings at this stage:
Potassium: 2.3ppm
Ammonia: 0.1ppm
reduce water changes to 2 times a week.

New substrate, new filter, squeezed filter mulm from the other matured tank, then ran the tank one week day before planting. 100% water change after planting, then 100% water change every other day since then. Dosing 1ml APT3 after water change day, and remineralizing to 5dGH using APT Sky. Trying out the low water column dosing approach for the initial period.
Filter: Oase 250
Lights: Week aqua a430 80%
Substrate: APT Feast
Was going to Journal about startup issues, however, it seems like the tank has already stabilized, skipping diatoms and green dust phase.
Freshly planted for a couple of days:
13/2/2026
Replanted the tops for Myriophyllum roraima, Cut and replanted Rotala blood red to begin building up the bush form. Trimmed old leaves
Foreground seems a bit blocky for now, so I think I'lll move stuff round again. Probably when the BV grows out some more.
Pic on 23/2/2026
Readings at this stage:
Potassium: 2.3ppm
Ammonia: 0.1ppm
reduce water changes to 2 times a week.
73 replies
·
4874 views

Hi all
My Cambomba sometimes develops these roots from the nodes.
Rotala H'ra does it too, but not as aggressively as the Cambomba.
Any ideas why this happens?
My Cambomba sometimes develops these roots from the nodes.
Rotala H'ra does it too, but not as aggressively as the Cambomba.
Any ideas why this happens?

10 replies
·
130 views
Tin Foil Hat Garlic in aquascapes
This Garlic-centric tank concept popped out on Facebook, wondered what you think about it.
0 replies
·
26 views
replies
Legacy View
I want to buy a dozen marbeled hatchetfish for my 75 gallon, and everywhere I look they are sold out.
I know a large proportion are wild caught, I would guess after the rainy season with its explosion of breeding.
So is there a season they are more likely on the market?
I know a large proportion are wild caught, I would guess after the rainy season with its explosion of breeding.
So is there a season they are more likely on the market?
14 replies
·
1102 views
Journal Farmer D. Singh's journal
Ive reorganized the order of my tanks so I can better keep track of them ie. Tank 2 moss tank is now tank 3. This helps in any confusion I had when tracking tanks they are in a sort of order now. Rather than taking time editing my old journal id rather create a new thread. Pics will be current (for the most part) as they are posted. I am not aquascaping. I am just farming.
17 replies
·
793 views
This is the future home for the announcements when someone obtains an achievement badge. Let the games begin!
1978 replies
·
47195 views
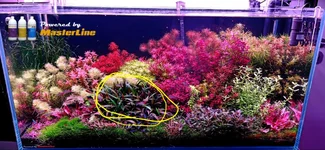
Hi all,
First time posting! I was browsing FB and saw someone posted a picture of their tank. Was wondering if anyone could help me ID the plant middle left? Crypt?
Thank you for your help!
First time posting! I was browsing FB and saw someone posted a picture of their tank. Was wondering if anyone could help me ID the plant middle left? Crypt?
Thank you for your help!

4 replies
·
87 views