
Welcome to ScapeCrunch
We are ScapeCrunch, the place where planted aquarium hobbyists come to build relationships and support each other. When you're tired of doom scrolling, you've found your home here.
Social Feed

Supporting
I Donated 2026
Rockstar
I started my first tank as an adult about a year ago, and have posted updates on it in my other journal , the Beginner Scaper Journal. I had intended the other journal to be a journey for this new tank but there were so many variables and many questions about the other set up that i thought it would best to start this new journal.
I am going to hold on to my beginner/amateur flair to the post since I think this is such a great hobby and want newcomers to know that everyone started as an amateur
Tank Inspiration
Dennis Wong's planted tanks. If you guys don't know who this is, I have already served a good purpose by introducing you to the founder of the 2Hr aquarist. He has a scientific horticulturist approach to planted tank that resonates well to my scientific mind. He is one of the few that I have read and listened to who mentions the different schools of thoughts when it comes to managing planted tanks and does not stick with a single approach.
Anyways a long winded rambling to say that everyone should read through the 2hr aquarist website. His products are all called APT (Advanced planted tank), and i think that is what his company was called before. His current display tanks are all planted tanks, which are beautiful mostly without hardscape but with lush plant growth and do not follow the rules of Dutch scaping. To anyone who wants to understand his philosophy more, i would recommend in addition to the website watch some videos where he has been interviewed.
I wanted to re-create this type of tank, but obviously as a beginner/amateur. I am hoping to learn more about growing plants with my ultimate goal to advance to a next scape which might be more nature style where i can take the knowledge from growing plants and now incorporate hardscape to it.
Equipment
Tank
- Waterbox mini 25
Background
Fish List (Preliminary)
Photos
photo 1 - Day 11
Photo 2 - Day 20
Photo 3 - Day 21 - Current - Testing - Ammonia 0, Nitrate about 10 on API kit - Changed filter outlet location to get reduced current
Photo 4 - Day 21 - Side view
Thanks for reading so far!
There has been some good growth, some expected filamentous algae/diatmos and some melting, all expected hopefully this would not get too bad.
The Rotala blood red, Florida and Ludwigea arcuata are doing great. Both the florida and Arcuata seems to do much better on the aquasoil than on my prior intert substrate.
Blyxa melted a little but getting better, the Tulunadensis is struggling. The rest holding stable.
Interesting observation - The Rotala blood red, started putting out lot of roots and side shoots which i think is mainly because the plant was being pushed by the current to almost bend sideways and I believe it is thinking that it close the surface and doing its thing. With the changed filter outlet location I am hoping that it will be more erect and when i cut and replant there will be less roots. 2hr aquarist has written about this as well, but i think the bending sideways leading to rooting is not mentioned.
I am not liking the layout as much as i thought i would. Have been discussing with BurrAqua and have some suggestions but still thinking about this. Thoughts and suggestions welcome. Hopefully lot of people with (@Burr740 , @Dennis Wong @Art @techman81 @Pepere @Unexpected @Naturescapes_Rocco @Jeff Miotke @BenB @DutchMuch ) and without experience will follow and share this tank journey with me.
This is a great forum and i have tagged people that i am familiar with on the forum who have answered my questions and helped.
I am going to hold on to my beginner/amateur flair to the post since I think this is such a great hobby and want newcomers to know that everyone started as an amateur
Tank Inspiration
Dennis Wong's planted tanks. If you guys don't know who this is, I have already served a good purpose by introducing you to the founder of the 2Hr aquarist. He has a scientific horticulturist approach to planted tank that resonates well to my scientific mind. He is one of the few that I have read and listened to who mentions the different schools of thoughts when it comes to managing planted tanks and does not stick with a single approach.
Anyways a long winded rambling to say that everyone should read through the 2hr aquarist website. His products are all called APT (Advanced planted tank), and i think that is what his company was called before. His current display tanks are all planted tanks, which are beautiful mostly without hardscape but with lush plant growth and do not follow the rules of Dutch scaping. To anyone who wants to understand his philosophy more, i would recommend in addition to the website watch some videos where he has been interviewed.
I wanted to re-create this type of tank, but obviously as a beginner/amateur. I am hoping to learn more about growing plants with my ultimate goal to advance to a next scape which might be more nature style where i can take the knowledge from growing plants and now incorporate hardscape to it.
Equipment
Tank
- Waterbox mini 25
- 60 cm x 40 cm x 40 cm
- 90 liters or 24 gallons
- This is a big upgrade from my 29 gallon standard tank. The silicone work is flawless.
- It does come with a leveling mat.
- It is deeper and slightly taller than a 60P or UNS 60U. I thought it would be useful to have more depth.
- Background - Thanks to @Jeff Miotke suggestion
- Waterbox stand - Black
- The main contention is that it does not come with side holes like some of the other expensive stands do.
- It just comes with opening in the back, so getting the tubing out is messy.
- The door attachment is a soft close but it needs to be leveled which can be finicky
- I did add a magnetic holder for tools and will add some light as well at some point.
- It does come with leveling foot holders.
- It is nicely built other wise.
- I wish it came with a pull out like the Oase stands but guess would be very expensive.
- Overall Ok, but nothing to highly recommend about.
- Oase Biomaster 350 thermo
- Replaced the biological media with Seachem Matrix
- Replaced one of the foams with Seachem Matrix as well.
- Steel lily pipes from GLA with extension. I think many of liked this company. But I personally would not buy anything again from them. They had quality control issues with this. One of the holders were metal and other acrylic and they would not send me another metal one. These are not the cheapest especially and you also have to buy extension separately. These are made by a chinese company and not made by GLA.
- I used to have glass lily pipes but got tired of cleaning them.
- I read many people commenting that using a skimmer attached to the inflow or outflow might be a pain to adjust, so ended up getting the Oase Crystal skim
- Fzone Co2 inline diffuser
- These work great and this is the second one that i have gotten. Trouble free but might need to replace parts of it if it gets clogged. Important thing is that it can be opened to clean.
- I have a Fzone dual stage regulator
- Cheapest that i could find and works very well - highly recommend
- I use RO water and remineralize it with APT Sky to a GH of around 4. Use the calculator on APT webpage.
- My goals are to have a low KH, and GH of around 4 - 5.
- APT feast about 12 Liters
- You can read about my experience cycling it here using Dark Start (sort of)
- I did not want Aquasoil in the front of the tank and wanted a thin lining of gravel so used a gravel from Carribsea, and some smooth lava stones to separate them. More about this later but i don't really like the way it turned out.
- Chihiros WRGB II - 10th anniv edition - 60 cm.
Background
- Left - Rotala blood red
- Middle - Rotala Tulunadensis (From Burr Aqua)
- Right - Alteranthera Reineckii Rosaefolia
- Left - Blyxa Joponica
- Middle - Ludwigea Arcuata, Pogostemon Decannensis, Rotala Florida, Staurogyne Repens
- Right - Syngonathus Belem/Macrocaulon(From Burr Aqua)
- Left - Lobelia cardinalis mini
- Middle/Right - S.Repens and Montecarlo
- Still to come - Eleocharis Aricularis mini (in the place where the stones are)
- Clump of Hydrocortyle Tripartita to absorb nitrogen - Trust me you do not want this plant for any other reason, will take over your tank and get everything into a tangled mess.
Fish List (Preliminary)
- 4 Rasbora espei
- 2 Otos
- Will be adding more from my prior tank
- Lighting - 30% - 8 am - 3 pm
- Co2 - 40 ppm by Hanna co2 kit, 5 am - 3 pm
- Fertilizer - APT 1 - Still not settled on a routine but the recommended dose for daily dosing would be about 2.3 ml and i do about 2-3 ml every 3 days.
- Water changes 75% every 3 - 4 days, will make it weekly in the next couple of weeks
Photos
photo 1 - Day 11
Photo 2 - Day 20
Photo 3 - Day 21 - Current - Testing - Ammonia 0, Nitrate about 10 on API kit - Changed filter outlet location to get reduced current
Photo 4 - Day 21 - Side view
Thanks for reading so far!
There has been some good growth, some expected filamentous algae/diatmos and some melting, all expected hopefully this would not get too bad.
The Rotala blood red, Florida and Ludwigea arcuata are doing great. Both the florida and Arcuata seems to do much better on the aquasoil than on my prior intert substrate.
Blyxa melted a little but getting better, the Tulunadensis is struggling. The rest holding stable.
Interesting observation - The Rotala blood red, started putting out lot of roots and side shoots which i think is mainly because the plant was being pushed by the current to almost bend sideways and I believe it is thinking that it close the surface and doing its thing. With the changed filter outlet location I am hoping that it will be more erect and when i cut and replant there will be less roots. 2hr aquarist has written about this as well, but i think the bending sideways leading to rooting is not mentioned.
I am not liking the layout as much as i thought i would. Have been discussing with BurrAqua and have some suggestions but still thinking about this. Thoughts and suggestions welcome. Hopefully lot of people with (@Burr740 , @Dennis Wong @Art @techman81 @Pepere @Unexpected @Naturescapes_Rocco @Jeff Miotke @BenB @DutchMuch ) and without experience will follow and share this tank journey with me.
This is a great forum and i have tagged people that i am familiar with on the forum who have answered my questions and helped.


177 Replies
·
19593 views


Journal High-Tech 90P Build
Hi guys!
I'm new here, but not entirely new to planted tanks though I've been out of the hobby for the better part of the last decade between kids and moving a couple of times - but finally in a spot where I can do something again. I'm mostly going to be making things up as I go along, but plan on a lot of automation (I want to integrate everything into home assistant) and a lot of DIY as I love the challenge of building things out myself.
The starting point:
I picked up a 90P rimless, low-iron tank on a great deal.
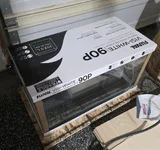
I have a rough idea in my head for a stand to be built from plywood - just have a couple other house projects to finish off before starting that built.
Wife says I can only have one aquarium, so for this tank, I want to go all out with a sump to allow for auto top off, and auto water changes, auto fertilizer dosing etc. etc. I have half a plan in my mind.
I've also started on the light fixture which I've modeled up in CAD, and plan on making out of an 8020 extrusion, and some 3D printed bits.
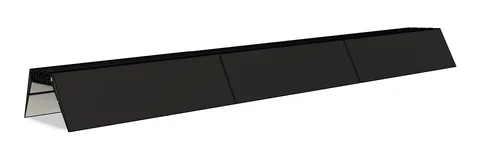
I'm using bridgelux gen 3 thrive CW (3000k) and WW (5000k) LED strips which have super high CRI at 98+ along with some specific XPE2 wavelengths that I'll solder onto some starboards. Far Red (730nm), Red (654nm), Cyan (495nm), Blue (455nm), Visible UV (415nm). Each segment of the white channels will be on its own driver so I can adjust left to right brightness in thirds, and each colour channel on its own driver so I can vary each channel on a time-based approach.
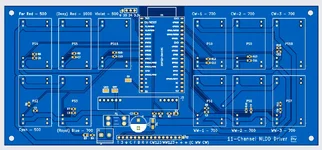
These will be run from a custom PCB board with Meanwell N-LDD drivers, and will run ESPHome on an ESP32 so it can link up with my Home Assistant installation.
That's it for now, this will probably be a very slow build so be warned if you follow along!
I'm new here, but not entirely new to planted tanks though I've been out of the hobby for the better part of the last decade between kids and moving a couple of times - but finally in a spot where I can do something again. I'm mostly going to be making things up as I go along, but plan on a lot of automation (I want to integrate everything into home assistant) and a lot of DIY as I love the challenge of building things out myself.
The starting point:
I picked up a 90P rimless, low-iron tank on a great deal.
I have a rough idea in my head for a stand to be built from plywood - just have a couple other house projects to finish off before starting that built.
Wife says I can only have one aquarium, so for this tank, I want to go all out with a sump to allow for auto top off, and auto water changes, auto fertilizer dosing etc. etc. I have half a plan in my mind.
I've also started on the light fixture which I've modeled up in CAD, and plan on making out of an 8020 extrusion, and some 3D printed bits.
I'm using bridgelux gen 3 thrive CW (3000k) and WW (5000k) LED strips which have super high CRI at 98+ along with some specific XPE2 wavelengths that I'll solder onto some starboards. Far Red (730nm), Red (654nm), Cyan (495nm), Blue (455nm), Visible UV (415nm). Each segment of the white channels will be on its own driver so I can adjust left to right brightness in thirds, and each colour channel on its own driver so I can vary each channel on a time-based approach.
These will be run from a custom PCB board with Meanwell N-LDD drivers, and will run ESPHome on an ESP32 so it can link up with my Home Assistant installation.
That's it for now, this will probably be a very slow build so be warned if you follow along!
73 Replies
·
5185 views


Staff member
I Donated 2026
Founding Member
An area of confusion for me has been the degassing of CO2 in my aquarium. It's often talked about but we don't seem to have real data except for that done by our friend @Dennis Wong in his article How to measure CO2 levels in an aquarium.
According to this article, standing water sits at .6 ppm of dissolved CO2 and a normal planted aquarium will degass to 2-3 ppm. Therefore, our tanks are never full degassing CO2, especially because we supplement to such a high level. This, in turn, concerned me of an ever increasing CO2 level.
For example, if we started at 2-3 ppm and we went up to 30 ppm on day one, is it possible that on day two you degass only to 3-4 ppm and that is your starting point. Adding the same amount of CO2 would then end up at 31 ppm on day two. This would continue increasing the total high over time.
Curious that I have not created a CO2 disaster in my tanks in the past, I decided to pull up my Apex Fusion log showing my pH drop daily. Here it is:

I was pleasantly surprised to see that my 1.3 - 1.4 pH drop is absolutely consistent day after day. This seems to indicate that I am not on an ever increasing cycle but one that repeats exactly the same day after day.
Does this mean that degassing really isn't an issue to be concerned about or that it's more about oxygenation than decreasing CO2?
According to this article, standing water sits at .6 ppm of dissolved CO2 and a normal planted aquarium will degass to 2-3 ppm. Therefore, our tanks are never full degassing CO2, especially because we supplement to such a high level. This, in turn, concerned me of an ever increasing CO2 level.
For example, if we started at 2-3 ppm and we went up to 30 ppm on day one, is it possible that on day two you degass only to 3-4 ppm and that is your starting point. Adding the same amount of CO2 would then end up at 31 ppm on day two. This would continue increasing the total high over time.
Curious that I have not created a CO2 disaster in my tanks in the past, I decided to pull up my Apex Fusion log showing my pH drop daily. Here it is:
I was pleasantly surprised to see that my 1.3 - 1.4 pH drop is absolutely consistent day after day. This seems to indicate that I am not on an ever increasing cycle but one that repeats exactly the same day after day.
Does this mean that degassing really isn't an issue to be concerned about or that it's more about oxygenation than decreasing CO2?
18 Replies
·
2265 views
I understand that the process of aquasoil neutralizing kh is basically it turning it into co2 through chemical reactions.
However, in practice it just seems to raise the ph if the soil if the ph buffering capacity is exhausted?
If I pre-acidify RO water with HCL the aquasoil seems to raise the ph back up to around where it normally is after a day or 2.
However, in practice it just seems to raise the ph if the soil if the ph buffering capacity is exhausted?
If I pre-acidify RO water with HCL the aquasoil seems to raise the ph back up to around where it normally is after a day or 2.
0 Replies
·
23 views

Supporting
I Donated 2026
Rockstar
Article Contributor
Like my no-tech bowl scaping thread where I have a list of inspiring bowl scapers, I thought it would be awesome to do the same with a Dutch-inspired / True Dutch thread! I have a ton, but I'll post them over time. If anyone else finds good examples of dutch tanks, post them here, too!
First up:
I translated the transcript and got as much info as I could. Here's the things I find interesting:
50% WC weekly
He front-load doses the incoming fresh water volume to:
If you were to look at it through full-volume dosing lens, it's:
Micros are dosed 3x per week, but nothing specific provided. Probably ~0.3-0.5ppm/week? He does say the iron is all gone/undetectable by the evening.
Beautiful tank! I love the balance of colors, textures, and plant groupings. That tiger lily is amazing. Very little algae, too!
First up:
I translated the transcript and got as much info as I could. Here's the things I find interesting:
50% WC weekly
He front-load doses the incoming fresh water volume to:
- NO3: ~30 ppm
- PO4: ~4.2 ppm
- K: ~34 ppm
- Mg: ~3.4 ppm
If you were to look at it through full-volume dosing lens, it's:
- NO3: ~15 ppm
- PO4: ~2.1 ppm
- K: ~17 ppm
- Mg: ~1.7 ppm
Micros are dosed 3x per week, but nothing specific provided. Probably ~0.3-0.5ppm/week? He does say the iron is all gone/undetectable by the evening.
Beautiful tank! I love the balance of colors, textures, and plant groupings. That tiger lily is amazing. Very little algae, too!
11 Replies
·
729 views

Rockstar
Journal 62G AIO Dirty Soil Lagoon

Well I’m done talking about it, it’s time to get this journal started.
I have been really out of it the last year or so in terms of maintaining my own tank, mainly out of frustration with time constraints and inconsistency with dosing etc. However, I have now acquired a dream tank, rimless and with low iron glass like I’ve always wanted. While I loved having a sump and prided myself on putting it together, I’m past that desire. The AIO allows the same benefits with hiding equipment, and overall easier maintenance without climbing in and out of cabinets. Now onto the details of this build.
Tank: Planet Aquariums Tideline 62 Gallon AIO Lagoon
Filtration: (2) 250gph pumps on either side of the tank with center overflow into socks (I’m going to punch holes in the socks for now and stuff with polyfill, reviews state the socks clog way too quickly and there is no replacement sock as the insert is not the common round style). The baffles will be stuffed with the poret foam I have already from my sump for extra mechanical/biological.
Substrate: The bottom layer will comprise of bagged pond soil/peat/earthworm castings/ STS. This will be a thin layer and will mainly act as filler to raise up the cap of APT Feast. This is similar to a substrate setup I did when I first started back up in 2020, And that tank did very well. While capping with sand and relying on the dirt to feed the stems worked well, it did require a little more effort on my end with dosing. I don’t trust myself to be as diligent as some members on here are with their inert subs, so I’m taking the mulligan and using aquasoil as a cap, hence, “dirty soil.” This will be another island style layout, and the surrounding substrate will be comprised of Caribsea Carolina Creek Sand.
Hardscape: River rock (local hardscape center sourced) and malaysian driftwood. I have recently acquired another large piece of wood and I’m sourcing new stone this week, as what I have just isn’t meshing with my current vision for the tank.
Plants: …. I have not solidified my vision of what this scape will look like just yet as I haven’t been able to setup the hardscape to outline the island. The plan is to use a good amount of colorful stems, epiphytes, and potentially moss.
Lighting: I will be ordering the Week Aqua Z400 this week and am excited to test it out.
That’s all for now, more pictures and details to come. I should hopefully have the hardscape setup by the end of this coming week after acquiring more stone and wood.
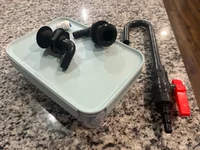
CO2: Almost forgot, for Co2 injection I have made a DIY Yugang with a locking food storage container. It will be stored in the cabinet and the hook will feed into the return pump chamber on the right. I initially was bummed that I had to sacrifice storage to fit a 5lb CO2 tank under the stand, which also meant getting rid of of the 20lb tank I’ve only been having to fill twice a year. @GreggZ Will appreciate this, my awesome father in law suggested that I hide the co2 tank in the pantry closet which is directly behind that wall and just drill a hole for the co2 line. Since my father in laws word is pure gold in my wife’s eyes, that suggestion was approved! He’s just as much my dad too so I appreciated him supporting the project

70 Replies
·
4912 views

Rockstar
Journal 22 gallon long bookshelf
Time to start a new thread.
I’ll fill in some details later, but I’m working on the hardscape now. Any and all criticism is appreciated. The vision is nothing more, and nothing less, than something appealing to the eye.
90cm x 30cm x 30cm Lifegard Aquatics ultra clear bookshelf tank. Buce and anubias on the hardscape, stems towards the back and center, mid to front carpet with some changes in shade and texture down to a flat grade on the right side of the tank.
Lily pipe inlet and skimmer will be in the back left corner with the outflow in the front left to hopefully achieve circular flow. I’ll be running an in-line diffuser. Light will be the P600 Pro that I regrettably did not upside to 900. Oh well. I’ll mount it high and hopefully it’ll have enough spread.
I have some dragon stone and red lava rock rubble I’ll use at the base to blend into the substrate, as well as some stratum I may or may not cap with.


I’ll fill in some details later, but I’m working on the hardscape now. Any and all criticism is appreciated. The vision is nothing more, and nothing less, than something appealing to the eye.
90cm x 30cm x 30cm Lifegard Aquatics ultra clear bookshelf tank. Buce and anubias on the hardscape, stems towards the back and center, mid to front carpet with some changes in shade and texture down to a flat grade on the right side of the tank.
Lily pipe inlet and skimmer will be in the back left corner with the outflow in the front left to hopefully achieve circular flow. I’ll be running an in-line diffuser. Light will be the P600 Pro that I regrettably did not upside to 900. Oh well. I’ll mount it high and hopefully it’ll have enough spread.
I have some dragon stone and red lava rock rubble I’ll use at the base to blend into the substrate, as well as some stratum I may or may not cap with.
296 Replies
·
33041 views

Rockstar
Journal Ben's Plant Pharm 2.0
I am working on my mistakes…. The next one will be huge.
Instead of continuing the old build thread, I wanted to make a new one. This build might go just as terrible, but I want to put the old one behind me. I really wish I had given myself a month or two break because I feel like I have algae PTSD. I’m pretty burned out, and I sort of dread trying again. Oh well, too late now.
I wanted to try 2Hr Aquarist stuff, but already had the Controlsoil. I bought it a year prior (see previous journal) and decided to go ahead and use it. Hopefully I’ll make a successful transition to nutrient depleted aquasoil, and then restart with the 2Hr stuff later.
I didn't plan on starting a new journal until about a month in, but since my aquasoil is already starting to give out of ammonia, I need to get it going to get help making the transition to full NPK dosing.
With that said…..
Ben’s Plant Pharm 2.0
(BTW, in case you were wondering, I’m a pharmacist. Hence the pharm)
Setup Date
8-11-25 (Day 0)
Goals
Enjoying some farming.
Successfully navigate the different stages of aqusoil nutrient release and subsequent depletion.
Tank
ADA 60p
Light
Chihiros WRGB Pro II
Starting out at 40% of the Fish setting
Red 53, Blue 34, Green 55, White 23
PAR 105 under the light (estimated)
Substrate
UNS Extra Fine Black 1 x 10L bag
Plants
From Previous Build
Xiris Red from S21 Aquatics
Eriocaulon quinguangulare from Cherries Nature Aquarium
TC plants from Buce Plant
Cryptocoryne parva, Pogostemon helferi, Rotala Sunset
Came in in questionable shape despite paying extra for insulated box. Were very jumbled.
TC from The Fish Room
Alternanthera reineckii ‘Mini’, Rotala macrandra, Gratiola viscidula, Rotala wallichi, Lobelia Cardinalis ‘Mini’
From S21 Aquatics
Synogonthas Vichada, Centrolepis drummondiana (Blood Vomit)
From Aquatic Plants Factory
Pogostemon stellatus Dassen and Rotala Florida? (TBD)
Fertilizer
Micros: Burr Aquatic Trace (BurrFertz)
Macros: DIY- dosages to be determined
PO, K, Mg at the beginning. Been adding about 2-3ppm PO4 daily
Transition to the addition of NO3 as aquasoil depletes
Filter
Oase HOB BioStyle
CO2
Injected via GLA regulator
Bar type diffuser placed inside the HOB filter
Livestock
None
Notes
Day 0


Day 1

Week 1

Week 2

Week 3


Here you can see the older Rotala Sunset on the left. On the right is supposed to be Rotala Florida, but it is looking a lot like the Sunset did at the same stage. Argh!

Pogostemon stellatas Dassen changing from emersed to submersed form

Syn Vichada is doing pretty good. It is growing slow. The new growth is all green and the old growth is dying off. I want to cut old leaves and clean it up a little, but right now, I don't really want to disturb it. I watch it every minute. I loving having it.

Instead of continuing the old build thread, I wanted to make a new one. This build might go just as terrible, but I want to put the old one behind me. I really wish I had given myself a month or two break because I feel like I have algae PTSD. I’m pretty burned out, and I sort of dread trying again. Oh well, too late now.
I wanted to try 2Hr Aquarist stuff, but already had the Controlsoil. I bought it a year prior (see previous journal) and decided to go ahead and use it. Hopefully I’ll make a successful transition to nutrient depleted aquasoil, and then restart with the 2Hr stuff later.
I didn't plan on starting a new journal until about a month in, but since my aquasoil is already starting to give out of ammonia, I need to get it going to get help making the transition to full NPK dosing.
With that said…..
Ben’s Plant Pharm 2.0
(BTW, in case you were wondering, I’m a pharmacist. Hence the pharm)
Setup Date
8-11-25 (Day 0)
Goals
Enjoying some farming.
Successfully navigate the different stages of aqusoil nutrient release and subsequent depletion.
Tank
ADA 60p
Light
Chihiros WRGB Pro II
Starting out at 40% of the Fish setting
Red 53, Blue 34, Green 55, White 23
PAR 105 under the light (estimated)
Substrate
UNS Extra Fine Black 1 x 10L bag
Plants
From Previous Build
Xiris Red from S21 Aquatics
Eriocaulon quinguangulare from Cherries Nature Aquarium
TC plants from Buce Plant
Cryptocoryne parva, Pogostemon helferi, Rotala Sunset
Came in in questionable shape despite paying extra for insulated box. Were very jumbled.
TC from The Fish Room
Alternanthera reineckii ‘Mini’, Rotala macrandra, Gratiola viscidula, Rotala wallichi, Lobelia Cardinalis ‘Mini’
From S21 Aquatics
Synogonthas Vichada, Centrolepis drummondiana (Blood Vomit)
From Aquatic Plants Factory
Pogostemon stellatus Dassen and Rotala Florida? (TBD)
Fertilizer
Micros: Burr Aquatic Trace (BurrFertz)
Macros: DIY- dosages to be determined
PO, K, Mg at the beginning. Been adding about 2-3ppm PO4 daily
Transition to the addition of NO3 as aquasoil depletes
Filter
Oase HOB BioStyle
CO2
Injected via GLA regulator
Bar type diffuser placed inside the HOB filter
Livestock
None
Notes
- The Alternanthera reineckii ‘Mini’ was in bad shape when I opened the container. Might have been bad when I got it and then it was a week before I used it.
- 8-15-25: Added Synogonthas Vichada and Blood Vomit. Checked NO3 for the first time. It was 40. Started making twice weekly water changes.
- 8-18-25: Increased light to 45% of the full “Fish” setting. PAR should be just about 114
- 8-23-25: Pogostemon stellatus Dassen and Rotala Florida added
- 8-29-25: Discovered my NO3 was 0. Aquasoil is giving out way earlier than I expected
- Had a short diatom period, but it seems to be resolving
- I had planned to increase my light to 50% of full "Fish" setting which would be a (tested) PAR of 126, but right now, things are going so good, I don't want to mess it up. We'll hold off for now.
- 8-31-25: Starting to dose my own mixture of NPK and Mg. I really need to determine my actual water volume. What I am trying to dose, and what it tests as after I dose it are a good bit off.
Day 0
Day 1
Week 1
Week 2
Week 3
Here you can see the older Rotala Sunset on the left. On the right is supposed to be Rotala Florida, but it is looking a lot like the Sunset did at the same stage. Argh!
Pogostemon stellatas Dassen changing from emersed to submersed form
Syn Vichada is doing pretty good. It is growing slow. The new growth is all green and the old growth is dying off. I want to cut old leaves and clean it up a little, but right now, I don't really want to disturb it. I watch it every minute. I loving having it.

171 Replies
·
15155 views


Supporting
I Donated 2026
AquaGirls
I managed to acquire some Eriocaulon ratnagiricum. It should arrive early next week. I am pulling my 60U out of its extended dark start this weekend, and figured it would be an intriguing addition at the base of the large stones. (Not my image, this was from the seller):
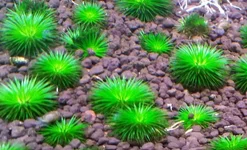
I did read Dennis Wong's 'how to grow' for this species, which was very helpful, and will add some APT Jazz in the areas that I plant it as it seems it wants a fairly rich soil. Tank is 0KH, remineralized RO with APT Sky initially to dGH 6 when I initiated the dark start.
However, despite being sold as 'inert', the Sensei stone I acquired from AFA is most definitely not proving to be entirely inert. I haven't drained the tank yet, but will this weekend when I start planting, but this morning KH is holding at 0, but dGH is currently sitting at 10! There is a vein of quartz-like crystal running through the largest stone, presumably calcite, as it is driving the GH up, and leaving KH unaffected. Calcite reportedly can run in some Magura/Sensei stone. I am already reconsidering the type of shrimp for this tank based on the higher GH level, but I am wondering if anyone has experience with this plant in a tank with higher GH? This Erio is KH sensitive, and the tank is ok there, but I am wondering if the excess calcium in the water column, pushing that higher GH, might be less than ideal for this Eriocaulon?
I did consider sealing the vein of calcite with cyanoacrylate glue, and covering it in riccardia to maybe slow the leaching/rise in GH, but I think most of the rocks have at least some of this material running through them to varying degree, and I am expecting that the leaching could increase once the CO2 is running, and the pH drops. Regardless, if anyone has experience growing this lovely little spiky Erio, please share!
I did read Dennis Wong's 'how to grow' for this species, which was very helpful, and will add some APT Jazz in the areas that I plant it as it seems it wants a fairly rich soil. Tank is 0KH, remineralized RO with APT Sky initially to dGH 6 when I initiated the dark start.
However, despite being sold as 'inert', the Sensei stone I acquired from AFA is most definitely not proving to be entirely inert. I haven't drained the tank yet, but will this weekend when I start planting, but this morning KH is holding at 0, but dGH is currently sitting at 10! There is a vein of quartz-like crystal running through the largest stone, presumably calcite, as it is driving the GH up, and leaving KH unaffected. Calcite reportedly can run in some Magura/Sensei stone. I am already reconsidering the type of shrimp for this tank based on the higher GH level, but I am wondering if anyone has experience with this plant in a tank with higher GH? This Erio is KH sensitive, and the tank is ok there, but I am wondering if the excess calcium in the water column, pushing that higher GH, might be less than ideal for this Eriocaulon?
I did consider sealing the vein of calcite with cyanoacrylate glue, and covering it in riccardia to maybe slow the leaching/rise in GH, but I think most of the rocks have at least some of this material running through them to varying degree, and I am expecting that the leaching could increase once the CO2 is running, and the pH drops. Regardless, if anyone has experience growing this lovely little spiky Erio, please share!
3 Replies
·
141 views

Supporting
I Donated 2026
Rockstar
I hadn't seen it mentioned by others that attended Aquashella, but if you hadn't already heard about it or seen it in Aquashella videos, ADA has come out with Amazonia Pro. It's not a replacement for Version 2, but an addition. It is essentially Version 2 on steroids with higher nutrients and of course the negative side effect of potentially higher initial ammonia leaching and, if your not prepared and skilled, more chance of algae. That's even from the mouth of Homma-san himself. The scaping competitors were using it in the competition and AFA was selling 9l bags at the show. They said it would be available on the website within the next couple weeks.
26 Replies
·
695 views

I feel i need to do a journal so I have a internet calendar on what's happened or Ill forget lol! This is now 4 months back into the planted tank world and I'm happy to be back yet lost on true aquascapingI I have a current 29g as a farm tank for future builds going. zrdr 4l co2 bought locally full setup for 40.00, 29g free. A 20long I just bought with metal stand, hygger decent new led light.new heater. few foam bubble filters, ar a nice dual air pump. some new stratum about 16lbs , tons of good food, etc etc and 6 live plants crypts, swords, anubis about 30 stems of rotundifolia 12" tall for 85,00 it was a decent deal with what is came with , I thought!
Original plans was a 29 and 20 long. Well 3 weeks forward to 3 days ago picked up a free 36 bow front with stand, foods.heater, some dragon stone, bubbler all working freeby deal of the year for sure! The tanks pretty clean, some light hard water stains lll razor blade off very clean. Did come with about 35lbs stratum and blk rocks mix.
I threw substrate in tank after light rinse. LOL it went to pitch blk even after 2 big filters with filter floss still blk water after 36 hours later its muck now the stratum is crap imo other than deeper substrate to cover up with build. I have no clue on any age of the stratum 2 months or 5 years no info was free on side of road literally. I decided today to dump the stratum its a dam mess! may strain the stratum with my several size buckets to strain out small materials away from the blk gravel and use it with eco!? Just got 2 20lb bags of eco complete for 55 shipped my 2005 go to, easy no breakdown and same cost as bulk gravel from pet stores in the end.
I Would do the blk blasting sand its cheaper but don't want all sand and in end as I still do some gravel clean monthly oops.. The eco complete last imo forever I have 20 year old eco now in tank. Yeah its inert but still whole rocks. I"Ill be posting many pics of the my dry scapes holy hell! And more as it goes. Its been 19 years since I've done a planted tank def not a newbie just don't remember as much as I did and things have changed any help appreciated for sure! Joe burr has been help sure thanks dutchscape god!
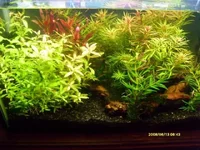
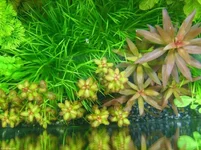
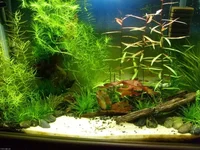
Posted few pics of old tanks 19 years ago when I didn't know what an aquascape was lol no co2 just dry ferts, metride 14 and power compacts it worked! algae was very null. Im calling my new tanks the cheap skape 20 and now 36g the freebie. I usually try to go cheapo as I can get Im not rich rather spend 30.00 on steaks at home than 30.00 on stems lol. I'm mr diy I only buy what I cant build usually.
Original plans was a 29 and 20 long. Well 3 weeks forward to 3 days ago picked up a free 36 bow front with stand, foods.heater, some dragon stone, bubbler all working freeby deal of the year for sure! The tanks pretty clean, some light hard water stains lll razor blade off very clean. Did come with about 35lbs stratum and blk rocks mix.
I threw substrate in tank after light rinse. LOL it went to pitch blk even after 2 big filters with filter floss still blk water after 36 hours later its muck now the stratum is crap imo other than deeper substrate to cover up with build. I have no clue on any age of the stratum 2 months or 5 years no info was free on side of road literally. I decided today to dump the stratum its a dam mess! may strain the stratum with my several size buckets to strain out small materials away from the blk gravel and use it with eco!? Just got 2 20lb bags of eco complete for 55 shipped my 2005 go to, easy no breakdown and same cost as bulk gravel from pet stores in the end.
I Would do the blk blasting sand its cheaper but don't want all sand and in end as I still do some gravel clean monthly oops.. The eco complete last imo forever I have 20 year old eco now in tank. Yeah its inert but still whole rocks. I"Ill be posting many pics of the my dry scapes holy hell! And more as it goes. Its been 19 years since I've done a planted tank def not a newbie just don't remember as much as I did and things have changed any help appreciated for sure! Joe burr has been help sure thanks dutchscape god!
Posted few pics of old tanks 19 years ago when I didn't know what an aquascape was lol no co2 just dry ferts, metride 14 and power compacts it worked! algae was very null. Im calling my new tanks the cheap skape 20 and now 36g the freebie. I usually try to go cheapo as I can get Im not rich rather spend 30.00 on steaks at home than 30.00 on stems lol. I'm mr diy I only buy what I cant build usually.


18 Replies
·
1120 views