Welcome to ScapeCrunch
We are ScapeCrunch, the place where planted aquarium hobbyists come to build relationships and support each other. When you're tired of doom scrolling, you've found your home here.
Social Feed
Resource Are your test kits actually accurate? Testing test kits: Salifert Freshwater NO3, PO4, and K.
Results/summary will be near the bottom of this post!
I've tried API, Sera, and Salifert test kits for a while now, and I found that I "liked" using the Salifert kits the most. The test kits usually aligned with my observations of plant health and algae growth. Remember, healthy plants don't grow algae, and plants can't be healthy if they don't have every single element available to them in some form. If I have a decrease or issue with CO2 injection, I get staghorn/hair algae on my plants. If I bottom out on NO3, I get hair algae or cyanobacteria on the plants. If I bottom out on PO4, I get GSA (especially on the glass and large-leaved plants). If I bottom out on K, well, plants stop growing altogether, and I often get GDA or other algae on my plants.

You can see on the right door my little selection of different test kits that I use. Journal for this tank here.
Testing gives me an idea as to whether I'm in the "zone" for growing plants (which is basically anything greater than 0ppm). It's not foolproof, but it's one of the best tools and I've found it to be SERIOUSLY enlightening to help me understand what I'm observing. I'm now to the point that I can often guess correctly if a certain nutrient has bottomed out simply based on what changes my plants are going through. I usually test once every week or two, but these are high energy systems. If something is bottomed out/out of balance, I'll pay the price very quickly compared to low-tech, which I can imagine requires far less frequent testing to gain an understanding of the system.
Dry salt fertilizers aren't always the most pure. and even a little dissolved in some RO water massively increases the ppm beyond what these test kits use. For example, to increase 1 gallon of RO water to 50ppm NO3, you need to add 0.309g KNO3. That's WAY too small of an amount to be accurately measured (even by my precision 0.0001g lab scale), especially because there could happen to be some impurities in my powder sample that would have a massive effect at only 0.309g.

You can see random dark spots, flecks of grey/black, and other potential impurities in my KNO3 from GLA ferts. This isn't a problem for the amounts we actually use in DIY fertilizer solutions, or dry fert dosing, but it is a problem for testing the accuracy of test kits.
So, I need to make a large enough "stock" concentrate solution that I'm using a "sizeable" amount of the dry salts to avoid impurity issues and measurement issues. Then , I'll mathematically dilute the concentrated stock to a known usable/testable solution.
This only works with pure RO water. My RO water is about 0-2TDS and should work fine. I'll be testing not just one test kit each, but two per nutrient! I bought 9 kits total, 3 of each lol
The math:
Formula is C1*V1=C2*V2, where:C1= concentration of stock,
V1= volume of stock to be diluted in RO water later,
C2= desired concentration of diluted solution,
V2= desired volume of diluted solution.
Solve for V1:
V1=(C2*V2)/C1
Then: V2-V1= volume of pure RO water to add V1 to to make your diluted solution.
Example: Dilute some volume (V1) of a 300ppm unusable concentrate into 100mL of a usable 10ppm solution:
Dissolve 1.85g KNO3 in 3,785.4g (1gal) RO water to make a 300ppm concentrate stock.
V1 = (10ppm*100mL)/300ppm = 3.333mL concentrate
RO water needed for diluted solution: (100mL desired volume V2 ) - (3.333mL) = 96.667mL RO water needed
Answer: Dilute 3.333mL of the 300ppm NO3 concentrate solution in 96.667mL RO water to create 100mL of a 10ppm NO3 solution.
The work:

Start with 1 gallon of RO water (3,785.4g).

Into the 1 gallon RO water, dissolve 1.85g KNO3 and stir without splashing/removing water. You now have a 300ppm NO3 concentrate.

Measure 96.667mL pure RO water.

Using a precise syringe (like this 1.0mL syringe) add 3.33mL of the concentrate to the pure RO water to make 100mL total at 10ppm concentration.
Now, follow the instructions for the Salifert Freshwater NO3 test kit: 2mL water sample in vial, 4 drops of NO3-1 (make sure you hold vertically when dropping, always!), swirl 10s+, then 1 level scoop of NO3-2. I use the soft sides of the container to compress the scoop into a very level scoop:


Swirl for 30 seconds, then start the 3-minute timer:

After 3 minutes, read top-down, ideally with natural light:

That's pretty bang-on for 10ppm NO3!
I repeated the process a second time and got 10ppm. I had my partner come take a look, and she said 10ppm for both results.
I then tried it with a second kit as well:

Also got 10ppm (hard to see in this photo).
However, it's important to note with this salifert test kit (and many No3 test kits out there):
The results change if you let them sit for too long. I found that 3.5 minutes post-swirl had the most spot on results for 10ppm, but if I let the vial sit for even 6 or 10 minutes, the results changed quickly:

After 6 minutes it looked like 20ppm.

After 15 minutes, it looked like 40ppm.
The instructions clearly state to take a reading after 3 minutes, but they don't emphasize this enough. You have approx 30-60 seconds after the 3-minute post-swirl timer to get a correct reading. Not a problem or even an issue at all, just something important to know. API nitrate also does this, btw.

Here are two vials, both at 10ppm NO3. The top is fresh off the 3-minute timer, while the bottom sat for over 20 minutes. Again, super accurate @ 10ppm as long as you take the reading between 3-4 minutes post-swirl.
Then, I tried a 40ppm solution to test the high range of the solution. After 3 minutes with test kit 1, here's the results:

Test kit 1 results @ 40ppm

test kit 2 results @ 40ppm
Findings for Salifert Freshwater NO3:
With known 10ppm solution:Kit 1, #1: 10ppm
Kit 1, #2: 10ppm
Kit 2, #1: 10ppm
Kit 2, #2: 10ppm
With known 40ppm solution:
Kit 1, #1: 40ppm
Kit 1, #2: 40ppm (almost looked closer to 30ppm, but not by much)
Kit 2, #1: 40ppm
Kit 2, #2: 40ppm
I'd say that between these two different kits (all reagents within expiration date) this gets my seal of approval. That's very accurate for a liquid test kit.
Results:
After testing two different NO3 test kits at two different NO3 concentrations (med-low and high) it appears to be very accurate (at least between 10-40ppm).Make sure you are packing the NO3-2 mini spoon flat/level with powder. Swirl hard for 30 seconds and set a strict 3 minute timer.
Readings may be most accurate at 3.5 minutes. Read top down. Very accurate, 9/10 would recommend.
14 replies
·
2327 views


Journal Mini Yugang - My experience
This journal documents my thought process and design decisions for building mini yugang reactors for tanks below 20 gallons/60P.
If this is your first time learning about a yugang reactor, head over to this article:
Yugang CO2 Reactor - A Guide
One of the challenges with the yugang reactor is that they are tough to build for smaller tanks due to material availability. But that issue was solved in this thread below:
Yugang Reactors for Smaller Tanks
After reading the thread above, I thought that the PC cooling reservoir would be a great idea for three reasons:

Challenges with the mini yugang and how to resolve them:

I hope the reader will find my experience helpful in designing their own mini yugang. Thank you for reading.
If this is your first time learning about a yugang reactor, head over to this article:
Yugang CO2 Reactor - A Guide
One of the challenges with the yugang reactor is that they are tough to build for smaller tanks due to material availability. But that issue was solved in this thread below:
Yugang Reactors for Smaller Tanks
After reading the thread above, I thought that the PC cooling reservoir would be a great idea for three reasons:
- You will be able to disassemble it for cleanup
- It’s see-through, so you can adjust flow as required, as the flow will decrease over time from filter clog-up. This is sort of important for mini yugangs as significant flow reductions could lead to a slower rate of pH drop. This is discussed in detail later in the journal.
- Its outflow is off-centre and the cylinder is rotatable as shown in the photo below, thus you can increase or decrease pH drop based on your tank size. This feature is particularly important as the PC cooling reservoirs come in fixed sizes, so the only real way to adjust pH drop is by rotating the cylinder to increase or decrease CO2 absorption.
Challenges with the mini yugang and how to resolve them:
- Low volume: I have used a 310 mm PC cooling reservoir, with a usable diameter of 40mm. This means that during operation at full capacity the volume of water in the reactor is pretty low; about 185ml. This is a little problematic as the low mass flow rate requirement of the mini yugang coupled with the low volume means that only a small amount of water gets injected with CO2 at any point in time. This leads to the pH drop being very slow for a tank size of 20 gallons. I had designed my yugang for a pH drop of 1.4 and it takes me about 5-6 hours to achieve this. The way to resolve this issue would be by using a reactor with a great length (to be able to afford larger mass flow rates) and a larger volume, but this would mean that you would have a tough time running the reactor in overflow mode as the CO2 gas pocket would have to be very small due to the bigger reactor size. The other solution is to start injecting early like I do. So to conclude, the “rate of pH drop” is dependent on reactor volume, mass flow rate and the size of the fish tank. So keep this in mind if you’re trying to use a mini yugang for tanks bigger than 20 gallons.
- Usually small volumes of air being purged into the reactor isn’t an issue as yugang points out in his article but if the filter is purging out massive bubbles of air frequently then this most certainly will affect reactor operation. If you own one of the older biomasters one of the issues you’d encounter is the filter purging air into the reactor. This happens in two cases; if you don’t have a bypass or if the tee joint at the bypass is oriented incorrectly. This is why my suggestion would be to install a bypass, as it just gives you more control over the situation. So, what is then the correct tee joint orientation? If you look at the photo below, you’ll see how the bull head of the tee joint is pointing upwards against gravity and that the bypass is connected to the bull head while the reactor inflow is connected to the parallel down-flow. This is key because the bypass being connected to the upwards facing bull head ensures that any bubbles being purged from the filter is not entering the reactor; this happens as bubbles have an affinity to move upwards. In this case, the filter purges air and the bubbles shoot straight into the bypass and out into the tank without entering the reactor and disrupting reactor performance.
I hope the reader will find my experience helpful in designing their own mini yugang. Thank you for reading.
0 replies
·
9 views
replies
Legacy View

I have this pH tester. You're supposed to keep the probe wet in a specific preservative solution between uses. I have the correct solution. The problem is that it dries out so quickly. I go months between using it, and it dries out. Does anyone have an idea on how to keep it wet? I'm going to put a small piece of sponge in the bottom of the cap and see if that helps.
3 replies
·
33 views
Started a new tank with the idea of show casing Lagenandra meeboldii which I have not showcased before. Wanted to feature Hygrophila lower Hlaingbwe, but I removed it later as I think it would be too large for this tank.
New substrate, new filter, squeezed filter mulm from the other matured tank, then ran the tank one week day before planting. 100% water change after planting, then 100% water change every other day since then. Dosing 1ml APT3 after water change day, and remineralizing to 5dGH using APT Sky. Trying out the low water column dosing approach for the initial period.
Filter: Oase 250
Lights: Week aqua a430 80%
Substrate: APT Feast
Was going to Journal about startup issues, however, it seems like the tank has already stabilized, skipping diatoms and green dust phase.
Freshly planted for a couple of days:
13/2/2026

Replanted the tops for Myriophyllum roraima, Cut and replanted Rotala blood red to begin building up the bush form. Trimmed old leaves
Foreground seems a bit blocky for now, so I think I'lll move stuff round again. Probably when the BV grows out some more.
Pic on 23/2/2026
Readings at this stage:
Potassium: 2.3ppm
Ammonia: 0.1ppm
reduce water changes to 2 times a week.

New substrate, new filter, squeezed filter mulm from the other matured tank, then ran the tank one week day before planting. 100% water change after planting, then 100% water change every other day since then. Dosing 1ml APT3 after water change day, and remineralizing to 5dGH using APT Sky. Trying out the low water column dosing approach for the initial period.
Filter: Oase 250
Lights: Week aqua a430 80%
Substrate: APT Feast
Was going to Journal about startup issues, however, it seems like the tank has already stabilized, skipping diatoms and green dust phase.
Freshly planted for a couple of days:
13/2/2026
Replanted the tops for Myriophyllum roraima, Cut and replanted Rotala blood red to begin building up the bush form. Trimmed old leaves
Foreground seems a bit blocky for now, so I think I'lll move stuff round again. Probably when the BV grows out some more.
Pic on 23/2/2026
Readings at this stage:
Potassium: 2.3ppm
Ammonia: 0.1ppm
reduce water changes to 2 times a week.
73 replies
·
4872 views

Hi all
My Cambomba sometimes develops these roots from the nodes.
Rotala H'ra does it too, but not as aggressively as the Cambomba.
Any ideas why this happens?
My Cambomba sometimes develops these roots from the nodes.
Rotala H'ra does it too, but not as aggressively as the Cambomba.
Any ideas why this happens?

10 replies
·
130 views
Tin Foil Hat Garlic in aquascapes
This Garlic-centric tank concept popped out on Facebook, wondered what you think about it.
0 replies
·
26 views
replies
Legacy View
I want to buy a dozen marbeled hatchetfish for my 75 gallon, and everywhere I look they are sold out.
I know a large proportion are wild caught, I would guess after the rainy season with its explosion of breeding.
So is there a season they are more likely on the market?
I know a large proportion are wild caught, I would guess after the rainy season with its explosion of breeding.
So is there a season they are more likely on the market?
14 replies
·
1102 views
Journal Farmer D. Singh's journal
Ive reorganized the order of my tanks so I can better keep track of them ie. Tank 2 moss tank is now tank 3. This helps in any confusion I had when tracking tanks they are in a sort of order now. Rather than taking time editing my old journal id rather create a new thread. Pics will be current (for the most part) as they are posted. I am not aquascaping. I am just farming.
17 replies
·
792 views
This is the future home for the announcements when someone obtains an achievement badge. Let the games begin!
1978 replies
·
47112 views
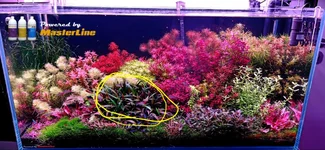
Hi all,
First time posting! I was browsing FB and saw someone posted a picture of their tank. Was wondering if anyone could help me ID the plant middle left? Crypt?
Thank you for your help!
First time posting! I was browsing FB and saw someone posted a picture of their tank. Was wondering if anyone could help me ID the plant middle left? Crypt?
Thank you for your help!

4 replies
·
87 views
Both tanks contain a lot of bucephalandra stems I have recently melted by feeding my caridina tanks with mulberry leaves. I have no idea what the heck happened but all buces melted in those tanks heavily over 3 days with every other plant + shrimp being fine. Don't wanna risk the plants dying so I'm throwing them back into high tech for a few months to recover.
Set Up:
Both tanks uses heavy co2 misting
Horticulture LED lights (dimmed, so probably 25-30 watts?)
Will steadily increase light weekly if I see no issues, max is 40 watts.
Dual sponge filters. (Air bubbles help prevent co2 gassing, also seems to really help stabilize tank, so less algae)
1 Internal filter with an atomizer for misting.
Regime:
All tanks get a 30-50% water change, twice per week.
Micros dosed daily (unless I forget, which happens fairly often.)
Macros Front Loaded and only in new incoming water.
6 Gallon bucket water change:
~350tds (Using seachem equilibrium remineralizer)
~22ppm KNO3, using KNO3 + KH2PO4
~40-50 ppm Potassium due to remineralizer
~4-5GH
Buce Lottery Colors
Lots of buces, various names, collected over the years. A lot of them were ultra rare and I cannot buy them anymore. Most of the ultra rare I probably accidentally killed from trying to grow them in a "no filter, no co2" style tank. Either way, not much color in low tech, will see what lottery colors we pull once they get going with better colors in higher lights + co2.
Both tanks are planted tightly front to back with bucephalandra. Kinda hard to see it all with moss blocking the way, but my view will be your view.
Random Mosses
Some mosses I've collected as well, honestly I grow a lot of them free floating so they kinda look the same. We will find out how they look after I attach them to something.
15 Gallon, very aged sand + pebble tank.

20 Gallon long, aged aquasoil I pulled from an existing caridina tank.

Wanted to take some macro shots, but does anyone know how to take an angle show on the glass without distortion? I have a DSLR long tube lens that works under water but color rendition is really bad.
Why so much moss?
Mostly to help stabilize the tank and to reduce light bleed. Less surface for algae to grow.
Set Up:
Both tanks uses heavy co2 misting
Horticulture LED lights (dimmed, so probably 25-30 watts?)
Will steadily increase light weekly if I see no issues, max is 40 watts.
Dual sponge filters. (Air bubbles help prevent co2 gassing, also seems to really help stabilize tank, so less algae)
1 Internal filter with an atomizer for misting.
Regime:
All tanks get a 30-50% water change, twice per week.
Micros dosed daily (unless I forget, which happens fairly often.)
Macros Front Loaded and only in new incoming water.
6 Gallon bucket water change:
~350tds (Using seachem equilibrium remineralizer)
~22ppm KNO3, using KNO3 + KH2PO4
~40-50 ppm Potassium due to remineralizer
~4-5GH
Buce Lottery Colors
Lots of buces, various names, collected over the years. A lot of them were ultra rare and I cannot buy them anymore. Most of the ultra rare I probably accidentally killed from trying to grow them in a "no filter, no co2" style tank. Either way, not much color in low tech, will see what lottery colors we pull once they get going with better colors in higher lights + co2.
Both tanks are planted tightly front to back with bucephalandra. Kinda hard to see it all with moss blocking the way, but my view will be your view.
Random Mosses
Some mosses I've collected as well, honestly I grow a lot of them free floating so they kinda look the same. We will find out how they look after I attach them to something.
15 Gallon, very aged sand + pebble tank.
20 Gallon long, aged aquasoil I pulled from an existing caridina tank.
Wanted to take some macro shots, but does anyone know how to take an angle show on the glass without distortion? I have a DSLR long tube lens that works under water but color rendition is really bad.
Why so much moss?
Mostly to help stabilize the tank and to reduce light bleed. Less surface for algae to grow.
11 replies
·
756 views