Noahspapa
Active Member
so from a co2 perspective I believe you use the precision regulator from Bettatail, the Dwyer flow meter and a horizontal reactor - correct? And you use the reactor in the second mode in your document covering reactors?
Follow along with the video below to see how to install our site as a web app on your home screen.
Note: This feature may not be available in some browsers.
I have the same surface agitation on my 55 G or even a bit more, but I don't have a skimmer. In a few days I should receive an Oase Crystalskim 350 that hopefully will be enough to let me reduce the surface agitation a little bit.I ran my my Dwyer RMA-150 at about 40CC/min on my 140Gal "Many Lessons" tank. There are many factors that affect actual CO2 levels, though, so we can't really compare the level on the meter with what is actually comparable to our tanks.
I like using a lot of surface agitation:
so I also need more CO2/minute. Lots of oxygen and lots of CO2 is how I like it!
My 39gal, running at 40-45ppm CO2, requires about 25CC/min.
Yes, the CO2 flows from the regulator's precision needle valve, to the flow meter, to the horizontal reactor. I've run multiple horizontal reactors in both "overflow" mode, and "regulator" mode. Regulator mode is awesome because you can get 100% CO2 use with no waste, but requires manual gas bubble purging 1-2 times per week. Overflow mode is awesome because once you get it dialed in, especially with a flow meter and good needle valve, you literally never have to do anything to it. The only downside is you're wasting some % of CO2, but the cost is probably an extra $5-$10 per month.so from a co2 perspective I believe you use the precision regulator from Bettatail, the Dwyer flow meter and a horizontal reactor - correct? And you use the reactor in the second mode in your document covering reactors?
That's a tricky question. Most of us don't really know the precise amount.What value do you all target for CO2 in the water column?
I'm not that interested in doing the math, but at first glance, I think your cost estimate is on the high side. If a 5lb tank costs about $30 to refill and lasts over 4 months, even in overflow mode, it's hard to imagine that big of a cost difference to regulator mode.but the cost is probably an extra $5-$10 per month
What value do you all target for CO2 in the water column?
Are you getting a 1.4 pH drop daily or 1.4 pH drop from a completely degassed sample?That's a tricky question. Most of us don't really know the precise amount.
In my case because I have so little dKH the charts and calculators don't really work well. When I was at about 2 dKH they would say my CO2 was at about 80ppm. Was it really? I don't know and never bothered to buy a CO2 test kit.
In general use the pH drop method. In my case my pH drop from CO2 injection is 1.4. I came to that by slowly dropping pH until the fish just starting showed signs of stress, then backed it off a little. Whatever that level is I don't know for sure but it works.
If you don't know what the pH drop method is......ask. There are plenty here who are glad to help.
There are no stupid questions in this forum!Can I ask a truly fundamental, slightly stupid, question?
Yes, I 3D print custom brackets for my flow meters. Honestly IDK how anyone else mounts theirs, I hadn't even considered not having a 3D printer with these flowmeters. They're weird shapes and sizes. I can 3D print you a custom bracket if you want, shouldn't cost much.Do you wall mount the Dwyer somehow with a custom bracket, or simply replace the bubble counter on the regulator, and utilize the NPT threads with something like this?
I can 3D print you a custom bracket if you want, shouldn't cost much.

For my first regulator build. I'm mounting the flow meter directly with the elbow like you linked, but it does result in added height to the CO2 setup, so if you have limited room in your stand, or just want to better see the meter, @Naturescapes_Rocco's 3D bracket idea is the best way to go.Do you wall mount the Dwyer somehow with a custom bracket, or simply replace the bubble counter on the regulator, and utilize the NPT threads with something like this?

Good point, I didn't even think about the extra height. My 10lb tank is fairly tall, so certainly something to check if it was going to be mounted to the regulator. I like the idea of using a wall mounted bracket, though, if only to keep the meter down where I can easily read it.For my first regulator build. I'm mounting the flow meter directly with the elbow like you linked, but it does result in added height to the CO2 setup, so if you have limited room in your stand, or just want to better see the meter, @Naturescapes_Rocco's 3D bracket idea is the best way to go.
I've had a 3D printer for years but never used it much until I got into aquarium keeping.
View attachment 17059
I initially bought some of those same Inkbird brackets on Etsy only because I didn't have a design of my own yet and I'm rather slow to do the CAD design side of it, and other projects inevitably get put before it. I did find another inkbird bracket file on makerworld though, so if you need anymore of those down the road, just ask.Good point, I didn't even think about the extra height. My 10lb tank is fairly tall, so certainly something to check if it was going to be mounted to the regulator. I like the idea of using a wall mounted bracket, though, if only to keep the meter down where I can easily read it.
As for 3D printers, I don't yet have one, but I can see this may become a slippery slopeI saw an old post from @Koan a couple of weeks ago that linked to this for the Inkbirds:
Inkbird Wall Mount Kit
I got one, and it's perfect. Scapers are both a creative and practical bunch, and Etsy is now my first port of call when looking for custom 3D stuff. Just couldn't find anything for mounting the flow meter!


View attachment 17061
View attachment 17062
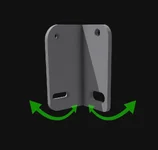
The design I made is just a simple wall-mounted bracket. The bottom holes allow it to be rotated forward and backward, side to side, so the flowmeter can be held perfectly vertical:
View attachment 17063
The important part is that the screws that came with the flowmeter are used to attach the bracket to the back of the flowmeter. If you have those, then you're good to go.