Welcome to ScapeCrunch

We are ScapeCrunch, the place where planted aquarium hobbyists come to build relationships and support each other. When you're tired of doom scrolling, you've found your home here.

Speaking of Flow Meters

  • Thread starter Thread starter JayP
  • Start date Start date
  • Tagged users Tagged users None
I ran my my Dwyer RMA-150 at about 40CC/min on my 140Gal "Many Lessons" tank. There are many factors that affect actual CO2 levels, though, so we can't really compare the level on the meter with what is actually comparable to our tanks.

I like using a lot of surface agitation:
so I also need more CO2/minute. Lots of oxygen and lots of CO2 is how I like it!

My 39gal, running at 40-45ppm CO2, requires about 25CC/min.
I have the same surface agitation on my 55 G or even a bit more, but I don't have a skimmer. In a few days I should receive an Oase Crystalskim 350 that hopefully will be enough to let me reduce the surface agitation a little bit.

Eventually I have found a second hand RMA 151 SSV on eBay (there was only one available in all EU), the day after tomorrow I will install it!
 
so from a co2 perspective I believe you use the precision regulator from Bettatail, the Dwyer flow meter and a horizontal reactor - correct? And you use the reactor in the second mode in your document covering reactors?
Yes, the CO2 flows from the regulator's precision needle valve, to the flow meter, to the horizontal reactor. I've run multiple horizontal reactors in both "overflow" mode, and "regulator" mode. Regulator mode is awesome because you can get 100% CO2 use with no waste, but requires manual gas bubble purging 1-2 times per week. Overflow mode is awesome because once you get it dialed in, especially with a flow meter and good needle valve, you literally never have to do anything to it. The only downside is you're wasting some % of CO2, but the cost is probably an extra $5-$10 per month.

For my next tank setup, I plan to run the reactor in overflow mode for the ease of use and peace of mind. I'd gladly pay an extra $5-$10 per month in CO2 costs to have consistent, labor-free CO2 injection!
 
What value do you all target for CO2 in the water column?
That's a tricky question. Most of us don't really know the precise amount.

In my case because I have so little dKH the charts and calculators don't really work well. When I was at about 2 dKH they would say my CO2 was at about 80ppm. Was it really? I don't know and never bothered to buy a CO2 test kit.

In general use the pH drop method. In my case my pH drop from CO2 injection is 1.4. I came to that by slowly dropping pH until the fish just starting showed signs of stress, then backed it off a little. Whatever that level is I don't know for sure but it works.

If you don't know what the pH drop method is......ask. There are plenty here who are glad to help.
 
but the cost is probably an extra $5-$10 per month
I'm not that interested in doing the math, but at first glance, I think your cost estimate is on the high side. If a 5lb tank costs about $30 to refill and lasts over 4 months, even in overflow mode, it's hard to imagine that big of a cost difference to regulator mode.
 
What value do you all target for CO2 in the water column?

That depends on your goals for the tank 👍

If you want the most glorious plants like Rocco has 😁 and you find the maintenance upkeeping and tending to be all part of the fun, as Rocco says 35 to 40 PPM will get you there 💯💯

If you want quieter growth, 15 PPM with blue green to teal drop checker does great!

As long as you have some kh, the Hanna CO2 tester will tell you exactly what you have. If you're getting down in the 0° to 1° KH it's not quite as accurate but still helpful.

Here's @Dennis Wong's CO2 library, to give you some context! 👍

 
Last edited:
That's a tricky question. Most of us don't really know the precise amount.

In my case because I have so little dKH the charts and calculators don't really work well. When I was at about 2 dKH they would say my CO2 was at about 80ppm. Was it really? I don't know and never bothered to buy a CO2 test kit.

In general use the pH drop method. In my case my pH drop from CO2 injection is 1.4. I came to that by slowly dropping pH until the fish just starting showed signs of stress, then backed it off a little. Whatever that level is I don't know for sure but it works.

If you don't know what the pH drop method is......ask. There are plenty here who are glad to help.
Are you getting a 1.4 pH drop daily or 1.4 pH drop from a completely degassed sample?
 
Hi, as I said I installed it last Friday. It's working and finally I can dose CO2 with far more consistency.
The only problem is that if I set the flow with the valve of the flowmeter, the flow changes when CO2 turns on again the following day. So I have used the needle valve of my CO2 regulator and now the flow is steady over these days (20 cc/min, 1,5 bar).
 
Can I ask a truly fundamental, slightly stupid, question? I picked up a Dwyer flow meter, as I am trying to make CO2 bottle changes as straightforward as possible. Putting it together last night I realized that I am not sure where/how to mount it in the aquarium cabinet, especially with barb fittings for the CO2 line attached. I am not entirely new to flowmeters, as I rely on them while my patients are out under anesthesia, but those come mounted to the carts already 😜

Do you wall mount the Dwyer somehow with a custom bracket, or simply replace the bubble counter on the regulator, and utilize the NPT threads with something like this?

90 Degree Barstock Street Elbow 1/8" NPT Male x 1/8" NPT Female

I know I won't be able to count bubbles for a tank this size, so the bubble counter seems rather pointless. I am using a GLA PRO DS regulator if that matters, and the Dwyer outflow is running through the checkvalve straight to the Yugang.
 
Can I ask a truly fundamental, slightly stupid, question?
There are no stupid questions in this forum! :)
Do you wall mount the Dwyer somehow with a custom bracket, or simply replace the bubble counter on the regulator, and utilize the NPT threads with something like this?
Yes, I 3D print custom brackets for my flow meters. Honestly IDK how anyone else mounts theirs, I hadn't even considered not having a 3D printer with these flowmeters. They're weird shapes and sizes. I can 3D print you a custom bracket if you want, shouldn't cost much.
 
I can 3D print you a custom bracket if you want, shouldn't cost much.

That would be awesome! I would happily pay you for a custom bracket! I can easily send Paypal. Will your bracket fit with the barb connections on the back, or would that put the meter too far away from the wall? I can always change out the connectors if it won't work. This is the RMA-151-SSV (I am starting there, but do have a 150 if I need to change it out, this tank will be fairly slow growing plants though).

20260514_103254.webp
 
Do you wall mount the Dwyer somehow with a custom bracket, or simply replace the bubble counter on the regulator, and utilize the NPT threads with something like this?
For my first regulator build. I'm mounting the flow meter directly with the elbow like you linked, but it does result in added height to the CO2 setup, so if you have limited room in your stand, or just want to better see the meter, @Naturescapes_Rocco's 3D bracket idea is the best way to go.

I've had a 3D printer for years but never used it much until I got into aquarium keeping. :D

Reg Side.webp
 
For my first regulator build. I'm mounting the flow meter directly with the elbow like you linked, but it does result in added height to the CO2 setup, so if you have limited room in your stand, or just want to better see the meter, @Naturescapes_Rocco's 3D bracket idea is the best way to go.

I've had a 3D printer for years but never used it much until I got into aquarium keeping. :D

View attachment 17059
Good point, I didn't even think about the extra height. My 10lb tank is fairly tall, so certainly something to check if it was going to be mounted to the regulator. I like the idea of using a wall mounted bracket, though, if only to keep the meter down where I can easily read it.

As for 3D printers, I don't yet have one, but I can see this may become a slippery slope :LOL: I saw an old post from @Koan a couple of weeks ago that linked to this for the Inkbirds:

Inkbird Wall Mount Kit

I got one, and it's perfect. Scapers are both a creative and practical bunch, and Etsy is now my first port of call when looking for custom 3D stuff. Just couldn't find anything for mounting the flow meter!
 
Good point, I didn't even think about the extra height. My 10lb tank is fairly tall, so certainly something to check if it was going to be mounted to the regulator. I like the idea of using a wall mounted bracket, though, if only to keep the meter down where I can easily read it.

As for 3D printers, I don't yet have one, but I can see this may become a slippery slope :LOL: I saw an old post from @Koan a couple of weeks ago that linked to this for the Inkbirds:

Inkbird Wall Mount Kit

I got one, and it's perfect. Scapers are both a creative and practical bunch, and Etsy is now my first port of call when looking for custom 3D stuff. Just couldn't find anything for mounting the flow meter!
I initially bought some of those same Inkbird brackets on Etsy only because I didn't have a design of my own yet and I'm rather slow to do the CAD design side of it, and other projects inevitably get put before it. I did find another inkbird bracket file on makerworld though, so if you need anymore of those down the road, just ask.
 
1778775605203.webp
1778775621817.webp

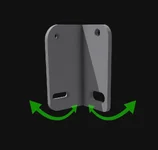
The design I made is just a simple wall-mounted bracket. The bottom holes allow it to be rotated forward and backward, side to side, so the flowmeter can be held perfectly vertical:

1778775873206.webp

The important part is that the screws that came with the flowmeter are used to attach the bracket to the back of the flowmeter. If you have those, then you're good to go.
 
View attachment 17061
View attachment 17062

The design I made is just a simple wall-mounted bracket. The bottom holes allow it to be rotated forward and backward, side to side, so the flowmeter can be held perfectly vertical:

View attachment 17063

The important part is that the screws that came with the flowmeter are used to attach the bracket to the back of the flowmeter. If you have those, then you're good to go.

Simple and brilliant! My meter will be on the right side cabinet wall, so that's perfect. I do still have the screws for the meter. DM me with a price and somewhere to Paypal you, and will gladly order one! Thank you!
 

Top 10 Trending Threads

Back
Top