
Welcome to ScapeCrunch
We are ScapeCrunch, the place where planted aquarium hobbyists come to build relationships and support each other. When you're tired of doom scrolling, you've found your home here.
Social Feed

I Donated 2026
I've been consuming tons of information from this amazing forum and decided its time to start my own journal.
One, to get constructive criticism/suggestions on how to improve which would be most welcome and two, just to show other approaches to starting a new tank as everyone thinks a bit differently and to see other peoples perspective.
I only started using pressurised CO2 about 18 months ago so haven't been in the hobby that long.
The first pic below was of said attempt starting with CO2. The other reason for showing that tank is I'm using the same physical tank and also starting off the new setup with plants from that tank.
Speaking of the tank, as you will see in the first pic of the new build it is an old second hand rimmed tank with less than stellar glass. In my list of planned upgrades one of them will be to order a low iron rimless tank so I can actually appreciate what's inside it. I can never get a photo to show a clear shot of the tank. Its not a great tank but it is definitely clearer than what the photos show. I think the camera really highlights how crappy the glass is lol.
No direct inspiration here apart from including a reasonable amount of hardscape and probably having a more nature style tank, so not so formal.
I've had a large piece of driftwood hanging around that I've wanted to use in a scape. I've used it previously in a larger tank but was a fish only tank. I do know after a year submerged (tied down) it still went straight to the top when released/untied so is basically unsinkable. Not sure of the type of wood though.
I also cut it in half depth wise as it was too large for a 4 foot tank.
After trying to glue it to rocks around it etc I filled the tank...and of course all went to hell. The driftwood wanted to get to the surface so bad it broke away from the glue LOL. So I had to start the scape with a large rock sitting on it and the driftwood in a different position from where it started. Temporary at first but now I plan to cover the rock with epiphytes etc so it should be ok eventually, just not so much right now. One of those it is what it is. I'm only playing around here anyways.
I'll also say, as per the heading of this journal, I'm treating this as an experimental tank, not even close to a show tank. I'll purchase a nice tank when I think I'm at a level where I deserve to bring it justice so not yet. Hopefully this tank will bring me a long way towards that point.
I've only previously used organic soil capped with sand (so the classic dirted tank). That provides good growth for around 6 months or so but if a lot of the organics start rising up and leaching into the water column, its not such a great setup for high tech tanks. Ask how I know!
I've never used aqua soil. I would like to try one day but for now decided to skip that and go straight to inert. Encouraged purely by some of you on here that have been using BDBS. That is what I would like to have used but not readily available in Aus so I'm using pool filter sand for this rendition.
Apologies for the rambling, onto the details.
Started around 5th January, did the full changeover from the old setup
Tank size:
Filter
Wave maker / power head
- Aqua One 8000 reef sim (apart from obviously to help circulation - was mainly put in here to help with the CO2 distribution - so is now situated at the opposite end of the tank to the filter outlet/inlet) Flow from 528 G/H to 2113 G/H. Have it on the lowest setting and probably still too strong
CO2
Water
- Tap (GH 7 KH 6), PH is around 7.6-7.8 out of the tank - at the moment
Substrate
- Pool filter sand only
Lighting
Initial plant list (as mentioned just selecting some from previous iteration of this tank)
I've deliberately not used what i call starter plants to kick it off as I find they can take over easily in a high tech tank, then you have to gradually rip them all out. I know a higher risk of more algae without them but lets go!
Ferts
Water change
- Currently around 55% weekly (I will be refining this a bit more too. I have a TDS meter now so will be working out exact water change volume using Rocco's TDS method which will also help with refining the fert dosing)
Current fish list
I plan to gradually increase the rainbow collection a bit too over time. Love the Boseman's
Other miscellaneous stuff
Upgrades planned
Ferts uptake and adjusting over time:
My initial aim is to try and avoid the infamous diatom stage by using a slightly reduced light schedule and ferts to start the tank.
First impressions for me is the driftwood is too large for this tank but it is a different piece so will persevere whilst in this tank.
Anyways the pic of the tank before I pulled it down;

Start of the new scape.

You can really see the crappy condition of the tank here with the scratches, water stains etc. I'm not too bothered though. It will make me more look forward when I eventually get a nice tank.
Just after filling up and initial planting. You can see the big heavy rock on the right. Without it, the driftwood shoots all over the place.

Noting that entire lot of MC melted soon after this, it wasn't in the best condition when it started though. Hoping it will eventually start up again. I'm patient, uhmm kind of!
One, to get constructive criticism/suggestions on how to improve which would be most welcome and two, just to show other approaches to starting a new tank as everyone thinks a bit differently and to see other peoples perspective.
I only started using pressurised CO2 about 18 months ago so haven't been in the hobby that long.
The first pic below was of said attempt starting with CO2. The other reason for showing that tank is I'm using the same physical tank and also starting off the new setup with plants from that tank.
Speaking of the tank, as you will see in the first pic of the new build it is an old second hand rimmed tank with less than stellar glass. In my list of planned upgrades one of them will be to order a low iron rimless tank so I can actually appreciate what's inside it. I can never get a photo to show a clear shot of the tank. Its not a great tank but it is definitely clearer than what the photos show. I think the camera really highlights how crappy the glass is lol.
No direct inspiration here apart from including a reasonable amount of hardscape and probably having a more nature style tank, so not so formal.
I've had a large piece of driftwood hanging around that I've wanted to use in a scape. I've used it previously in a larger tank but was a fish only tank. I do know after a year submerged (tied down) it still went straight to the top when released/untied so is basically unsinkable. Not sure of the type of wood though.
I also cut it in half depth wise as it was too large for a 4 foot tank.
After trying to glue it to rocks around it etc I filled the tank...and of course all went to hell. The driftwood wanted to get to the surface so bad it broke away from the glue LOL. So I had to start the scape with a large rock sitting on it and the driftwood in a different position from where it started. Temporary at first but now I plan to cover the rock with epiphytes etc so it should be ok eventually, just not so much right now. One of those it is what it is. I'm only playing around here anyways.
I'll also say, as per the heading of this journal, I'm treating this as an experimental tank, not even close to a show tank. I'll purchase a nice tank when I think I'm at a level where I deserve to bring it justice so not yet. Hopefully this tank will bring me a long way towards that point.
I've only previously used organic soil capped with sand (so the classic dirted tank). That provides good growth for around 6 months or so but if a lot of the organics start rising up and leaching into the water column, its not such a great setup for high tech tanks. Ask how I know!
I've never used aqua soil. I would like to try one day but for now decided to skip that and go straight to inert. Encouraged purely by some of you on here that have been using BDBS. That is what I would like to have used but not readily available in Aus so I'm using pool filter sand for this rendition.
Apologies for the rambling, onto the details.
Started around 5th January, did the full changeover from the old setup
Tank size:
- 122 cm x 47 cm deep x 45 cm high (uhmm so in imperial 48" x 18.5" x 17.5")
- Litres/gallons - 258 litres / 68 Gallons
Filter
- Just what I have on hand and had been using in the tank (Aqua One Nautilus 1100) so around 290 G/H so of course in reality a lot less than that. Only filled mainly with sponges though, limited the bio media.
- I have a perfectly working FX5 sitting in the shed gathering dust but I think too powerful for this size tank. That connected to a Yugang reactor though and one inch lily pipes could be a good combo. Will have to think about that for the future.
Wave maker / power head
- Aqua One 8000 reef sim (apart from obviously to help circulation - was mainly put in here to help with the CO2 distribution - so is now situated at the opposite end of the tank to the filter outlet/inlet) Flow from 528 G/H to 2113 G/H. Have it on the lowest setting and probably still too strong
CO2
- Aqualabs Pro dual stage regulator (recently added this, replacing a cheap chinese one from ebay - about 6 times the cost!)
- Aqualabs inline diffuser
- Gets to around 45 ppm but I need to do some more refined testing ( I only have the JBL CO2 kit but seems to be working ok)
- CO2 starts 3.5 hours before lights start and 4 hours before lights build up to their set level.
Water
- Tap (GH 7 KH 6), PH is around 7.6-7.8 out of the tank - at the moment
Substrate
- Pool filter sand only
Lighting
- Week Aqua L1200 (using Red preset at R - 64%, G - 71% B - 44% and UV - 90%) TBH not sure the UV light does much but it is what it is.
- So the lights aren't on that high, I started off the tank even lower but crept it up to what it is now.
Initial plant list (as mentioned just selecting some from previous iteration of this tank)
- MC as the front carpet
- Hygrophila corymbosa (restricted this quite a bit as it grows too fast with direct CO2 access) so hidden in the opposite corner to CO2 lol
- One amazon sword - I wanted to keep one in here to prove you don't need rich substrate
- Crypt wendtii brown - similar to above
- Ludwigia repens
- Helanthium bolivianum 'Quadricostatus (I think thats what it is or similar. produces runners like nothing on earth but a nice looking plant. Thats the one in the back right corner in the first photo of the new setup)
- AR Mini
- Hydrocotyle tripartite mini
- Limnophila Aromatica
I've deliberately not used what i call starter plants to kick it off as I find they can take over easily in a high tech tank, then you have to gradually rip them all out. I know a higher risk of more algae without them but lets go!
Ferts
- DIY Macros and micro mix - Rexolin APN (dosed for water tank volume)
- Started 9/2/20 now 10/2.5/20 (yes I know quite low for an inert substrate compared to most and will gradually increase this in time)
- Front load around 50% Macros, then the rest dosed throughout the week - only just started this method to try and limit the swings during the week
- Micros dose evenly throughout the week adding up to 0.45 fe / week
Water change
- Currently around 55% weekly (I will be refining this a bit more too. I have a TDS meter now so will be working out exact water change volume using Rocco's TDS method which will also help with refining the fert dosing)
Current fish list
- Around maybe 15 Rummy nose
- 4 SAE's
- Couple of oto's
- 4 Corys
- 6 Crimson spotted Rainbows ( i received these in a swap, plants for rainbows )
I plan to gradually increase the rainbow collection a bit too over time. Love the Boseman's
Other miscellaneous stuff
- Fluval SK400 surface skimmer (seemed like a little toy when I first set it up but does an ok job actually)
- Aqualabs pro skim lily pipes, and added quick release to the filter hosing to get to these easily. They are glass.
- Inkbird wifi heater control
Upgrades planned
- RO/DI - Just received but need a few more bits and pieces then I'll introduce the RO water over a 4 week period (25/50/75/100). I plan to remineralise to around 5dGH (4:1 for CA:MG), wont be adding any dKH, again following you guys lead here. I think this will be a huge upgrade as my tap water is sourced from a creek and is inconsistent. PH varies between 7 and 8 and KH has risen from 4 to 6 over the last few months.
- CO2 reactor - Looking at the Yugang of course. This will also I think make a big difference compared to inline diffusers. When setting up the tank I put in some work to try and determine the best flow to maximise CO2 distribution but still think I haven't got it right.
- New tank - as mentioned above
- Possible auto fert doser for the next tank
Ferts uptake and adjusting over time:
- The NO3 seems to provide a consistent 10 ppm before each water change which is the same amount I'm dosing now. Coincidence or is it only using what's readily available in the system. I know with slower growing plants and not a huge plant mass the uptake is obviously less.
- PO4 - similar story, test (which I'm not sure how accurate it is) seems to provide a consistent result of 2 ppm, again similar to what I have been dosing.
- I'll gradually increase both and see where I can find the sweet spot but may wait mainly till after the RO/DI is running.
My initial aim is to try and avoid the infamous diatom stage by using a slightly reduced light schedule and ferts to start the tank.
First impressions for me is the driftwood is too large for this tank but it is a different piece so will persevere whilst in this tank.
Anyways the pic of the tank before I pulled it down;
Start of the new scape.
You can really see the crappy condition of the tank here with the scratches, water stains etc. I'm not too bothered though. It will make me more look forward when I eventually get a nice tank.
Just after filling up and initial planting. You can see the big heavy rock on the right. Without it, the driftwood shoots all over the place.
Noting that entire lot of MC melted soon after this, it wasn't in the best condition when it started though. Hoping it will eventually start up again. I'm patient, uhmm kind of!
38 Replies
·
3717 views


Supporting
I Donated 2026
Rockstar
Article Contributor


Main idea/inspiration:
Since my main 150p aquarium is in our front room and is the first thing we and our guests see, I can't afford to experiment much with it. I also spent like $600 on aquasoil to fill it, so I thought I'd like to try something different.This tank will be 100% BDBS substrate, no fertilized substrate. No root tabs (yet), no aquasoil. Only water column fertilization, to challenge myself to see whether I can grow plants well without aquasoil or not! Inspired by the @Burr740 BDBS journals and many other amazing inert-substrate aquariums out there. This isn't a dutch style, only a general "garden" style tank.
222 Replies
·
25194 views

Hi guys,
I'm planning to do a switch, but I would like to know if it makes sense before buying anything.
My actual tank is a 110x50x60h, this is my first bigger tank and it's the tank where I started to truly love this hobby.
This tanks gave me joy, anxiety and satisfaction.
I bought it for relatively cheap (around 130€), but know I was thinking to buy a standard 120p.
I plan to reuse my old tropica aquasoil (I'll remove the First 1-2cm and topping It with apt feast).
What do you think? It's a waste of time/money or you'll think that is a change that make sense?
I always felt strange about this tanks proportion.
I plan to do it with 3 buckets (fish, plants and soil). The water is fully ro.
Any suggestions for doing it? Is worth it? Or it's just late and I'm overthinking?
I'm planning to do a switch, but I would like to know if it makes sense before buying anything.
My actual tank is a 110x50x60h, this is my first bigger tank and it's the tank where I started to truly love this hobby.
This tanks gave me joy, anxiety and satisfaction.
I bought it for relatively cheap (around 130€), but know I was thinking to buy a standard 120p.
I plan to reuse my old tropica aquasoil (I'll remove the First 1-2cm and topping It with apt feast).
What do you think? It's a waste of time/money or you'll think that is a change that make sense?
I always felt strange about this tanks proportion.
I plan to do it with 3 buckets (fish, plants and soil). The water is fully ro.
Any suggestions for doing it? Is worth it? Or it's just late and I'm overthinking?
8 Replies
·
131 views

Staff member
Supporting
I Donated 2026
Rockstar


- We grow super interesting plants here
- Everybody has extra tank / filter / heaters around they've been meaning to get around to building into a farm tank...

It's easy!
TRIMMERS
Next time you have a big trim planned, or have just done: post a pic here of the plants!
Include the
- species name
- date cut / uprooted
- expiration / you-will-toss after date
- your zip code
TAKERS
Check cost of FedEx /UPS to your own address, and send the trimmer a PM with the offer to pay shipping


22 Replies
·
1342 views


Rockstar
These plants have been sitting in this container in the dark for 9 days. They are still wet, but the container isn't 100% air tight.
Plants look great. They are crispy and green. I removed them from the tank on Oct 11. It's Oct 20.
I haven't had a chance to do hardly any tank maintenance since my trip, but I needed to get some stuff out to make room for some tc plants I ordered.
I thought someone might want some of this, so I put it in this container, and was going to offer it all up if I thought I'd have time to ship. (Too late now)
I can't believe how long they've lasted.
So if you need a way to store some plants for a few days. This might be an option.
Note: Both things were pulled up roots and all. If I had cut stems, they might not have lasted?
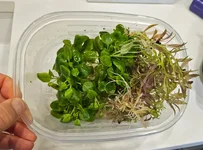
Plants look great. They are crispy and green. I removed them from the tank on Oct 11. It's Oct 20.
I haven't had a chance to do hardly any tank maintenance since my trip, but I needed to get some stuff out to make room for some tc plants I ordered.
I thought someone might want some of this, so I put it in this container, and was going to offer it all up if I thought I'd have time to ship. (Too late now)
I can't believe how long they've lasted.
So if you need a way to store some plants for a few days. This might be an option.
Note: Both things were pulled up roots and all. If I had cut stems, they might not have lasted?
3 Replies
·
163 views

Supporting
I Donated 2026
Rockstar
Browsed the Sreepadma booth at Aquashella briefly today. I'd not heard of them but they are the largest aquatic plant farm in India and have been selling their TC offerings in the US for about 2 years. I was actually impressed with the qualty I was seeing of their TC cups and wish I had room in a tank for some (and some ADA TC). Has anyone else purchased any of their plants. One of the first that I spotted was Red Tiger Crypt which was a coincidence since we have a thread discussing it.
19 Replies
·
887 views

Hey all,
Just wondering what your thoughts or experiences are with running some form of moon or dusk lighting.
With my tank only running 8hrs of light per day, I have recently added a 2-3% setting on my Chihiros WRGB II from 18:00 - 21:00.
It's running quite a blue light and is just so that I can still get some enjoyment from my fish when I am at home in the evening.
Does anyone else do this in planted tanks? Do you think it will create algae issues?
Cheers
Chimera
Just wondering what your thoughts or experiences are with running some form of moon or dusk lighting.
With my tank only running 8hrs of light per day, I have recently added a 2-3% setting on my Chihiros WRGB II from 18:00 - 21:00.
It's running quite a blue light and is just so that I can still get some enjoyment from my fish when I am at home in the evening.
Does anyone else do this in planted tanks? Do you think it will create algae issues?
Cheers
Chimera
8 Replies
·
164 views

Staff member
I Donated 2026
Founding Member
Well, as this thread exists in a few places, I figured why not have it here also. Perhaps we can take up the baton and keep it active and bring some value to hobbyists.
For those of you that don't know, I got into thinking much more about my micros when I read this thread on another forum. It was started by our very own @GreggZ. It was spurred into existence because of our own @Burr740 and his work with micro fertilizers. Some really good discussion followed and a lot was learned.
I don't want to steal Gregg's thunder with this so I hope he posts his current thoughts on the subject and we can all take it from there.
All the best,
Art
For those of you that don't know, I got into thinking much more about my micros when I read this thread on another forum. It was started by our very own @GreggZ. It was spurred into existence because of our own @Burr740 and his work with micro fertilizers. Some really good discussion followed and a lot was learned.
I don't want to steal Gregg's thunder with this so I hope he posts his current thoughts on the subject and we can all take it from there.
All the best,
Art
101 Replies
·
16939 views
Rockstar
I mention this plant on occasion, but no one ever comments. So I thought I'd make a post for others and me for future reference.
It is my favorite Erio. It is a darker green, doesn't get too big, and for me it has never sent up any seed stalks.
I find it easy to grow. I have high light but nothing crazy at 124PAR and high CO2, 50+ppm. It gets about max 3-4" and makes side daughter plants when large. I'm not sure my dosing scheme is. Sort of an EI daily dosing kind of thing.
What gets me is every autumn, it starts to melt. I'm not sure how it knows it's autumn with consistent light and a heater, but it must get a little cooler in the tank or something. The plant starts to turn brown and sends up (I'm not sure of the correct term) vegetative stalks with little plantlets on the ends. I've found you can plant these stalks into the substrate with the plantlet on top, and it will grow into a new plant. They've been easy to grow. This is the third year this has happened to me.
Pic of plantlets below. I'll try to get a better one sometime. All I had time for tonight was a crappy phone pic.
This year I divided one of the mother plants in hopes that it wouldn't fully melt and would regrow. That is still in progress.
Anyone else's experiences are welcome.
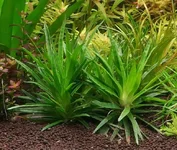
This plant is the same plant as the one on the right above.

It is my favorite Erio. It is a darker green, doesn't get too big, and for me it has never sent up any seed stalks.
I find it easy to grow. I have high light but nothing crazy at 124PAR and high CO2, 50+ppm. It gets about max 3-4" and makes side daughter plants when large. I'm not sure my dosing scheme is. Sort of an EI daily dosing kind of thing.
What gets me is every autumn, it starts to melt. I'm not sure how it knows it's autumn with consistent light and a heater, but it must get a little cooler in the tank or something. The plant starts to turn brown and sends up (I'm not sure of the correct term) vegetative stalks with little plantlets on the ends. I've found you can plant these stalks into the substrate with the plantlet on top, and it will grow into a new plant. They've been easy to grow. This is the third year this has happened to me.
Pic of plantlets below. I'll try to get a better one sometime. All I had time for tonight was a crappy phone pic.
This year I divided one of the mother plants in hopes that it wouldn't fully melt and would regrow. That is still in progress.
Anyone else's experiences are welcome.
This plant is the same plant as the one on the right above.
13 Replies
·
710 views


Sounds like a joke question but for reasons unknown I cant get moss to grow period, Got a huge baseball of moss for free from shrimp breeder. I put some in 5g shrimp tank, low light no heater around 74 its dead. 3 other tanks 76 degree low to medium light its all dead or looks dead its grey color I'd say it's dead. water parms are pretty spot on no big shifts or other plants would have issues imo.
what do I need to do to grow java moss ? grew it for years no issues would take over now im lost! I can grow anything but moss?
what do I need to do to grow java moss
? grew it for years no issues would take over now im lost! I can grow anything but moss?
7 Replies
·
592 views

Rockstar
I’m often out and about working in the field and stumble upon breathtaking examples of often overlooked and under appreciated slices of nature that Florida has to offer.
My neck of the woods is filled with marsh/wetlands ripe with both native and invasive wildlife of all flavors; I want to start a thread where I can document and share.
I’ll update this thread whenever I capture something noteworthy. Much of what catches my eye is aquatic flora, but I try and document anything captivating. I hope you find this as beautiful and fascinating as I do.


My neck of the woods is filled with marsh/wetlands ripe with both native and invasive wildlife of all flavors; I want to start a thread where I can document and share.
I’ll update this thread whenever I capture something noteworthy. Much of what catches my eye is aquatic flora, but I try and document anything captivating. I hope you find this as beautiful and fascinating as I do.
141 Replies
·
11693 views