
Welcome to ScapeCrunch
We are ScapeCrunch, the place where planted aquarium hobbyists come to build relationships and support each other. When you're tired of doom scrolling, you've found your home here.
Social Feed

Journal 20g Long Nature Style: Rescape
This is my first journal. Would love the feedback as I progressively alter this aquascape with replacement plants. This is one of my 5* currently active planted tanks operating in my home.
This is 2 weeks after resetting an old low-tech 20g tank re-using most of the plants seen in the photo.
I'm frequently studying ADA style setups and am often looking for educational content aquascaping. My current issue is not having enough tanks to simply practice repetition of new designs with various pieces of hardscape.
Eventually I'd like to attend some US-based aquascaping competitions. I acquired this manzanita driftwood recently from Aquashella (New Jersey) this year while mostly hanging around the aquascapers setting up the competition tanks. I did get a chance to meet @Jeff Miotke and chat about how I just joined this forum!

As for the tank details...
==Hardware and setup==
Light: Brand new Chihiros B60 LED Light. (Tank was previously growing all these plants with an off-brand amazon light).
Substrate: Fluval Aquasoil + Root tabs / Aqua Natural "Delta Sand"
Hardscape: Ghost Wood (Manzanita) & Hakkai Stone
Filter: Generic Box-Branded HOB filters. (I plan to purchase the Hygger Backpack filter. Had to leave some things on the Christmas list. )
==Plants==
Just about as generic of a plant list as you can get for a low-tech setup. I plan to test out a number of other plants as I replace some once the tank is fully established. Most of the mindset right now is growing fast plants to soak up nutrients.
Feel free to be critical of my plant placement. The given scenario of this setup was to re-use as much of the previous plant material as possible, but I'd like to still exercise some competition principles and what may be judged more harshly. I am aware the aquasoil needs cleanup, but I would love to know if there are flaws in the balance of the hardscape/scaling/plant use of this tank.
Unsure if I'd like to add C02, but I'm considering to add S. Repens, Blyxa Japonia, and more H. Pinnatifida.
I'd also like to know if any of you have experience with Fissidens Fontanus without C02. I have clumps of it growing in another tank, and it's a bit cramped. I'd love to build some matts and house it in this tank where it can get more of the spotlight.
As for fertilizers, I'm stuck deciding between continuing to use EasyGreen and APT1. EasyGreen had been used for this tank with lean dosing. I only discovered APT products this year and use APT3 for my high-tech setup.

This is 2 weeks after resetting an old low-tech 20g tank re-using most of the plants seen in the photo.
I'm frequently studying ADA style setups and am often looking for educational content aquascaping. My current issue is not having enough tanks to simply practice repetition of new designs with various pieces of hardscape.
Eventually I'd like to attend some US-based aquascaping competitions. I acquired this manzanita driftwood recently from Aquashella (New Jersey) this year while mostly hanging around the aquascapers setting up the competition tanks. I did get a chance to meet @Jeff Miotke and chat about how I just joined this forum!
As for the tank details...
==Hardware and setup==
Light: Brand new Chihiros B60 LED Light. (Tank was previously growing all these plants with an off-brand amazon light).
Substrate: Fluval Aquasoil + Root tabs / Aqua Natural "Delta Sand"
Hardscape: Ghost Wood (Manzanita) & Hakkai Stone
Filter: Generic Box-Branded HOB filters. (I plan to purchase the Hygger Backpack filter. Had to leave some things on the Christmas list. )
==Plants==
- Cryptocoryne Wendtii 'Green'
- Cryptocoryne Wendtii 'Brown'
- Cryptocoryne Lucens
- Anubias Nana
- Corkscrew Vallisneria
- Limnophila Sessiliflora
- Ludwigia Repens
- Hygrophila Pinnatifida
- Rotala Bloodred
- Echinodorus 'Ozelot'
- Anubias Congensis
Just about as generic of a plant list as you can get for a low-tech setup. I plan to test out a number of other plants as I replace some once the tank is fully established. Most of the mindset right now is growing fast plants to soak up nutrients.
Feel free to be critical of my plant placement. The given scenario of this setup was to re-use as much of the previous plant material as possible, but I'd like to still exercise some competition principles and what may be judged more harshly. I am aware the aquasoil needs cleanup, but I would love to know if there are flaws in the balance of the hardscape/scaling/plant use of this tank.
Unsure if I'd like to add C02, but I'm considering to add S. Repens, Blyxa Japonia, and more H. Pinnatifida.
I'd also like to know if any of you have experience with Fissidens Fontanus without C02. I have clumps of it growing in another tank, and it's a bit cramped. I'd love to build some matts and house it in this tank where it can get more of the spotlight.
As for fertilizers, I'm stuck deciding between continuing to use EasyGreen and APT1. EasyGreen had been used for this tank with lean dosing. I only discovered APT products this year and use APT3 for my high-tech setup.
10 replies
·
1069 views


Journal Farmer D. Singh's journal
Ive reorganized the order of my tanks so I can better keep track of them ie. Tank 2 moss tank is now tank 3. This helps in any confusion I had when tracking tanks they are in a sort of order now. Rather than taking time editing my old journal id rather create a new thread. Pics will be current (for the most part) as they are posted. I am not aquascaping. I am just farming.
11 replies
·
380 views

I am new to this side of the hobby and am curious. In reef keeping a tank isn't really considered heathy and established until it has reached a year. Once reef tank is healthy and running smoothly the trend is to just let it ride without major changes. Coral takes several months to years to start looking good. In my playing around with planted tanks the trend seems to be to break tanks down much more frequently. Plants grow much more quickly so I guess a planted tank can reach its maximum potential in a few months.
So what is the average duration of your planted tanks? What is the longest you have gone without any major changes?
So what is the average duration of your planted tanks? What is the longest you have gone without any major changes?
How long do you usually keep your planted tank up without a major redo or rescape?
6 votes total
2 replies
·
29 views

Hello folks,
I have a Twinstar 1200S V (the new model that has app support). I love the look of the light itself and it makes my tank look great, but either the app is fundamentally flawed or I'm missing something obvious. I have a smart plug on this light so I can turn it off and on with a voice command. The light clearly has a saved state as when it gets powered on it turns on with the right spectrum and the intensity. BUT, it also only turns on for 6 hours before turning off. Every. Single. Time.
My set photoperiod is 8 hours, so the light turns off 2 hours short of the correct time every day.
I can make a work around by turning the light off and back on again at the smart plug, (gaining an additional 6 hour window of 'on' time when I only need 2 hours before the smart switch unplugs the light again). BUT, I would much rather have the light allow for it to be on for as long as I want and turn off when I want.
I contacted twinstar support via email more then a month ago and got absolutely no response. So pretty much the worse product support something can have.
The obvious issue is the inbuilt timer in the app is defaulting to 6 hours. I have tried changing this timer to be longer (set it for 23 hours). I also have tried having the timer just set to 'off'. Neither does anything.
Does anyone else have this light? Does anyone else have any suggestions?
I have a Twinstar 1200S V (the new model that has app support). I love the look of the light itself and it makes my tank look great, but either the app is fundamentally flawed or I'm missing something obvious. I have a smart plug on this light so I can turn it off and on with a voice command. The light clearly has a saved state as when it gets powered on it turns on with the right spectrum and the intensity. BUT, it also only turns on for 6 hours before turning off. Every. Single. Time.
My set photoperiod is 8 hours, so the light turns off 2 hours short of the correct time every day.
I can make a work around by turning the light off and back on again at the smart plug, (gaining an additional 6 hour window of 'on' time when I only need 2 hours before the smart switch unplugs the light again). BUT, I would much rather have the light allow for it to be on for as long as I want and turn off when I want.
I contacted twinstar support via email more then a month ago and got absolutely no response. So pretty much the worse product support something can have.
The obvious issue is the inbuilt timer in the app is defaulting to 6 hours. I have tried changing this timer to be longer (set it for 23 hours). I also have tried having the timer just set to 'off'. Neither does anything.
Does anyone else have this light? Does anyone else have any suggestions?
2 replies
·
32 views

This is the future home for the announcements when someone obtains an achievement badge. Let the games begin!
1962 replies
·
45055 views
I decided to write this, despite the fact that I generally don't leave reviews/vents, due to my atrocious experience with Oase support. I was surprised that I had the experience that I did because everywhere it seems like they are generally responsive. I unfortunately did not experience this and was ghosted by them despite following up multiple times, trying to open a new ticket on their website and even requesting an escalation in my frustration.
Onto the story:
I purchased a Biomaster 2 Therm 850 in August 2025 as it seemed a lot of people had good experiences with them and I liked the built in heater. I set it up and had no issues with it for about 3 months. Over time however it started to randomly purge air, which isn't a huge deal but it just kept getting worse. Eventually it was purging for a minute at a time at least every 30 minutes. I tried to burp the canister and it had so much air in it that it sounded like it was running dry. I did get all the air out eventually and literally 2 hours later it was back to the original amount of randomly purging and sounding like it was running dry. I did what any person would do and disassembled the filter, reseated everything and cleaned/lubricated every o ring I could find with silicone grease. Well, that did nothing to my issue. I checked my other tubing connections as well and as far as I could tell nothing was leaking. I reached out to support and they had me check a bunch of things and send videos over. Long story short they decided that I was experiencing this amount of purging because I was injecting co2. I have a griggs style reactor on my output and there are very few microbubbles in my tank so I was sure that it wasnt the case. I shut co2 off for a couple days and the purging kept happening so that clearly wasnt the issue. I reached out 3 weeks ago with that as my update and that's when they stopped responding. At this point I was either going to throw this filter out or find the issue and fix it myself. I ended up figuring out that the intake side of the inlet/outlet block on the filter was letting in air somehow. Unfortunately I dont think it is possible to disassemble to fix it internally it so I ended up ordering a new one and bam, all my issues went away.
I don't expect any resolution from this, just wanted to rant about how frustrated I am with their support and the unprofessionalism of ghosting me. All I needed was a $11 part and all my problems went away.
Onto the story:
I purchased a Biomaster 2 Therm 850 in August 2025 as it seemed a lot of people had good experiences with them and I liked the built in heater. I set it up and had no issues with it for about 3 months. Over time however it started to randomly purge air, which isn't a huge deal but it just kept getting worse. Eventually it was purging for a minute at a time at least every 30 minutes. I tried to burp the canister and it had so much air in it that it sounded like it was running dry. I did get all the air out eventually and literally 2 hours later it was back to the original amount of randomly purging and sounding like it was running dry. I did what any person would do and disassembled the filter, reseated everything and cleaned/lubricated every o ring I could find with silicone grease. Well, that did nothing to my issue. I checked my other tubing connections as well and as far as I could tell nothing was leaking. I reached out to support and they had me check a bunch of things and send videos over. Long story short they decided that I was experiencing this amount of purging because I was injecting co2. I have a griggs style reactor on my output and there are very few microbubbles in my tank so I was sure that it wasnt the case. I shut co2 off for a couple days and the purging kept happening so that clearly wasnt the issue. I reached out 3 weeks ago with that as my update and that's when they stopped responding. At this point I was either going to throw this filter out or find the issue and fix it myself. I ended up figuring out that the intake side of the inlet/outlet block on the filter was letting in air somehow. Unfortunately I dont think it is possible to disassemble to fix it internally it so I ended up ordering a new one and bam, all my issues went away.
I don't expect any resolution from this, just wanted to rant about how frustrated I am with their support and the unprofessionalism of ghosting me. All I needed was a $11 part and all my problems went away.
13 replies
·
145 views


Hello guys I’m wondering how can I know that I’m not giving too little or too much micros or accumulating them to abnormal levels, I have the hanna digital test for fe however someone was saying that it doesn’t detect all forms of it. So what can I do about it? Because as far as I can remember someone was saying plants line reneickii mini is sensitive to high fe levels
13 replies
·
123 views

Journal 62G AIO Dirty Soil Lagoon

Well I’m done talking about it, it’s time to get this journal started.
I have been really out of it the last year or so in terms of maintaining my own tank, mainly out of frustration with time constraints and inconsistency with dosing etc. However, I have now acquired a dream tank, rimless and with low iron glass like I’ve always wanted. While I loved having a sump and prided myself on putting it together, I’m past that desire. The AIO allows the same benefits with hiding equipment, and overall easier maintenance without climbing in and out of cabinets. Now onto the details of this build.
Tank: Planet Aquariums Tideline 62 Gallon AIO Lagoon
Filtration: (2) 250gph pumps on either side of the tank with center overflow into socks (I’m going to punch holes in the socks for now and stuff with polyfill, reviews state the socks clog way too quickly and there is no replacement sock as the insert is not the common round style). The baffles will be stuffed with the poret foam I have already from my sump for extra mechanical/biological.
Substrate: The bottom layer will comprise of bagged pond soil/peat/earthworm castings/ STS. This will be a thin layer and will mainly act as filler to raise up the cap of APT Feast. This is similar to a substrate setup I did when I first started back up in 2020, And that tank did very well. While capping with sand and relying on the dirt to feed the stems worked well, it did require a little more effort on my end with dosing. I don’t trust myself to be as diligent as some members on here are with their inert subs, so I’m taking the mulligan and using aquasoil as a cap, hence, “dirty soil.” This will be another island style layout, and the surrounding substrate will be comprised of Caribsea Carolina Creek Sand.
Hardscape: River rock (local hardscape center sourced) and malaysian driftwood. I have recently acquired another large piece of wood and I’m sourcing new stone this week, as what I have just isn’t meshing with my current vision for the tank.
Plants: …. I have not solidified my vision of what this scape will look like just yet as I haven’t been able to setup the hardscape to outline the island. The plan is to use a good amount of colorful stems, epiphytes, and potentially moss.
Lighting: I will be ordering the Week Aqua Z400 this week and am excited to test it out.
That’s all for now, more pictures and details to come. I should hopefully have the hardscape setup by the end of this coming week after acquiring more stone and wood.
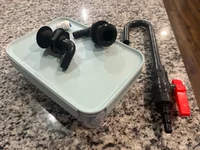
CO2: Almost forgot, for Co2 injection I have made a DIY Yugang with a locking food storage container. It will be stored in the cabinet and the hook will feed into the return pump chamber on the right. I initially was bummed that I had to sacrifice storage to fit a 5lb CO2 tank under the stand, which also meant getting rid of of the 20lb tank I’ve only been having to fill twice a year. @GreggZ Will appreciate this, my awesome father in law suggested that I hide the co2 tank in the pantry closet which is directly behind that wall and just drill a hole for the co2 line. Since my father in laws word is pure gold in my wife’s eyes, that suggestion was approved! He’s just as much my dad too so I appreciated him supporting the project

34 replies
·
1567 views

Catchy title isnt it. By golly it makes my heart beat faster…
Well maybe this photo can help make up for a dry title..
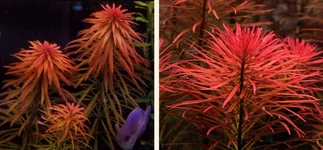
“Ludwigia pantanal with stunted crowns grown in a tank with high nitrate in the water column (20+ppm) but no ammoniacal nitrogen (left picture) VS Ludwigia pantanal grown in a tank with limited nitrate (0ppm residual in the water column) but with ammoniacal nitrogen in the substrate zone (right picture).”
I was reading this in @Dennis Wong article on the 2 hr aquarist.

 www.2hraquarist.com
I have grown L Pantanal that look like the photo on the left in a water column only fertilized tank..
Now I was finding the stem grew so fast it would have to be shortened weekly. I uprooted it and shortened it and replanted the upper portion and would cut remaining stems prgressively shorter to form an attractive bush.
I had tried cutting off the top and forming the bush that way and regrowth was affected and the bunch never looked as good.
My question relates to how well a shortened stem without roots absorbs from the substrate? Dies the growth stall from lack of nutrients as it grows roots?
What exactly is the best method of shortening the stems and getting an attractive presentation and good growth using lean wc dosing and rich aquasoil?
Well maybe this photo can help make up for a dry title..
“Ludwigia pantanal with stunted crowns grown in a tank with high nitrate in the water column (20+ppm) but no ammoniacal nitrogen (left picture) VS Ludwigia pantanal grown in a tank with limited nitrate (0ppm residual in the water column) but with ammoniacal nitrogen in the substrate zone (right picture).”
I was reading this in @Dennis Wong article on the 2 hr aquarist.
Root or water column fertilization?
Should we use root tablets or dose directly into the water column for your planted tank? What works and why..
www.2hraquarist.com
I have grown L Pantanal that look like the photo on the left in a water column only fertilized tank..
Now I was finding the stem grew so fast it would have to be shortened weekly. I uprooted it and shortened it and replanted the upper portion and would cut remaining stems prgressively shorter to form an attractive bush.
I had tried cutting off the top and forming the bush that way and regrowth was affected and the bunch never looked as good.
My question relates to how well a shortened stem without roots absorbs from the substrate? Dies the growth stall from lack of nutrients as it grows roots?
What exactly is the best method of shortening the stems and getting an attractive presentation and good growth using lean wc dosing and rich aquasoil?
2 replies
·
23 views

I've been consuming tons of information from this amazing forum and decided its time to start my own journal.
One, to get constructive criticism/suggestions on how to improve which would be most welcome and two, just to show other approaches to starting a new tank as everyone thinks a bit differently and to see other peoples perspective.
I only started using pressurised CO2 about 18 months ago so haven't been in the hobby that long.
The first pic below was of said attempt starting with CO2. The other reason for showing that tank is I'm using the same physical tank and also starting off the new setup with plants from that tank.
Speaking of the tank, as you will see in the first pic of the new build it is an old second hand rimmed tank with less than stellar glass. In my list of planned upgrades one of them will be to order a low iron rimless tank so I can actually appreciate what's inside it. I can never get a photo to show a clear shot of the tank. Its not a great tank but it is definitely clearer than what the photos show. I think the camera really highlights how crappy the glass is lol.
No direct inspiration here apart from including a reasonable amount of hardscape and probably having a more nature style tank, so not so formal.
I've had a large piece of driftwood hanging around that I've wanted to use in a scape. I've used it previously in a larger tank but was a fish only tank. I do know after a year submerged (tied down) it still went straight to the top when released/untied so is basically unsinkable. Not sure of the type of wood though.
I also cut it in half depth wise as it was too large for a 4 foot tank.
After trying to glue it to rocks around it etc I filled the tank...and of course all went to hell. The driftwood wanted to get to the surface so bad it broke away from the glue LOL. So I had to start the scape with a large rock sitting on it and the driftwood in a different position from where it started. Temporary at first but now I plan to cover the rock with epiphytes etc so it should be ok eventually, just not so much right now. One of those it is what it is. I'm only playing around here anyways.
I'll also say, as per the heading of this journal, I'm treating this as an experimental tank, not even close to a show tank. I'll purchase a nice tank when I think I'm at a level where I deserve to bring it justice so not yet. Hopefully this tank will bring me a long way towards that point.
I've only previously used organic soil capped with sand (so the classic dirted tank). That provides good growth for around 6 months or so but if a lot of the organics start rising up and leaching into the water column, its not such a great setup for high tech tanks. Ask how I know!
I've never used aqua soil. I would like to try one day but for now decided to skip that and go straight to inert. Encouraged purely by some of you on here that have been using BDBS. That is what I would like to have used but not readily available in Aus so I'm using pool filter sand for this rendition.
Apologies for the rambling, onto the details.
Started around 5th January, did the full changeover from the old setup
Tank size:
Filter
Wave maker / power head
- Aqua One 8000 reef sim (apart from obviously to help circulation - was mainly put in here to help with the CO2 distribution - so is now situated at the opposite end of the tank to the filter outlet/inlet) Flow from 528 G/H to 2113 G/H. Have it on the lowest setting and probably still too strong
CO2
Water
- Tap (GH 7 KH 6), PH is around 7.6-7.8 out of the tank - at the moment
Substrate
- Pool filter sand only
Lighting
Initial plant list (as mentioned just selecting some from previous iteration of this tank)
I've deliberately not used what i call starter plants to kick it off as I find they can take over easily in a high tech tank, then you have to gradually rip them all out. I know a higher risk of more algae without them but lets go!
Ferts
Water change
- Currently around 55% weekly (I will be refining this a bit more too. I have a TDS meter now so will be working out exact water change volume using Rocco's TDS method which will also help with refining the fert dosing)
Current fish list
I plan to gradually increase the rainbow collection a bit too over time. Love the Boseman's
Other miscellaneous stuff
Upgrades planned
Ferts uptake and adjusting over time:
My initial aim is to try and avoid the infamous diatom stage by using a slightly reduced light schedule and ferts to start the tank.
First impressions for me is the driftwood is too large for this tank but it is a different piece so will persevere whilst in this tank.
Anyways the pic of the tank before I pulled it down;

Start of the new scape.

You can really see the crappy condition of the tank here with the scratches, water stains etc. I'm not too bothered though. It will make me more look forward when I eventually get a nice tank.
Just after filling up and initial planting. You can see the big heavy rock on the right. Without it, the driftwood shoots all over the place.

Noting that entire lot of MC melted soon after this, it wasn't in the best condition when it started though. Hoping it will eventually start up again. I'm patient, uhmm kind of!
One, to get constructive criticism/suggestions on how to improve which would be most welcome and two, just to show other approaches to starting a new tank as everyone thinks a bit differently and to see other peoples perspective.
I only started using pressurised CO2 about 18 months ago so haven't been in the hobby that long.
The first pic below was of said attempt starting with CO2. The other reason for showing that tank is I'm using the same physical tank and also starting off the new setup with plants from that tank.
Speaking of the tank, as you will see in the first pic of the new build it is an old second hand rimmed tank with less than stellar glass. In my list of planned upgrades one of them will be to order a low iron rimless tank so I can actually appreciate what's inside it. I can never get a photo to show a clear shot of the tank. Its not a great tank but it is definitely clearer than what the photos show. I think the camera really highlights how crappy the glass is lol.
No direct inspiration here apart from including a reasonable amount of hardscape and probably having a more nature style tank, so not so formal.
I've had a large piece of driftwood hanging around that I've wanted to use in a scape. I've used it previously in a larger tank but was a fish only tank. I do know after a year submerged (tied down) it still went straight to the top when released/untied so is basically unsinkable. Not sure of the type of wood though.
I also cut it in half depth wise as it was too large for a 4 foot tank.
After trying to glue it to rocks around it etc I filled the tank...and of course all went to hell. The driftwood wanted to get to the surface so bad it broke away from the glue LOL. So I had to start the scape with a large rock sitting on it and the driftwood in a different position from where it started. Temporary at first but now I plan to cover the rock with epiphytes etc so it should be ok eventually, just not so much right now. One of those it is what it is. I'm only playing around here anyways.
I'll also say, as per the heading of this journal, I'm treating this as an experimental tank, not even close to a show tank. I'll purchase a nice tank when I think I'm at a level where I deserve to bring it justice so not yet. Hopefully this tank will bring me a long way towards that point.
I've only previously used organic soil capped with sand (so the classic dirted tank). That provides good growth for around 6 months or so but if a lot of the organics start rising up and leaching into the water column, its not such a great setup for high tech tanks. Ask how I know!
I've never used aqua soil. I would like to try one day but for now decided to skip that and go straight to inert. Encouraged purely by some of you on here that have been using BDBS. That is what I would like to have used but not readily available in Aus so I'm using pool filter sand for this rendition.
Apologies for the rambling, onto the details.
Started around 5th January, did the full changeover from the old setup
Tank size:
- 122 cm x 47 cm deep x 45 cm high (uhmm so in imperial 48" x 18.5" x 17.5")
- Litres/gallons - 258 litres / 68 Gallons
Filter
- Just what I have on hand and had been using in the tank (Aqua One Nautilus 1100) so around 290 G/H so of course in reality a lot less than that. Only filled mainly with sponges though, limited the bio media.
- I have a perfectly working FX5 sitting in the shed gathering dust but I think too powerful for this size tank. That connected to a Yugang reactor though and one inch lily pipes could be a good combo. Will have to think about that for the future.
Wave maker / power head
- Aqua One 8000 reef sim (apart from obviously to help circulation - was mainly put in here to help with the CO2 distribution - so is now situated at the opposite end of the tank to the filter outlet/inlet) Flow from 528 G/H to 2113 G/H. Have it on the lowest setting and probably still too strong
CO2
- Aqualabs Pro dual stage regulator (recently added this, replacing a cheap chinese one from ebay - about 6 times the cost!)
- Aqualabs inline diffuser
- Gets to around 45 ppm but I need to do some more refined testing ( I only have the JBL CO2 kit but seems to be working ok)
- CO2 starts 3.5 hours before lights start and 4 hours before lights build up to their set level.
Water
- Tap (GH 7 KH 6), PH is around 7.6-7.8 out of the tank - at the moment
Substrate
- Pool filter sand only
Lighting
- Week Aqua L1200 (using Red preset at R - 64%, G - 71% B - 44% and UV - 90%) TBH not sure the UV light does much but it is what it is.
- So the lights aren't on that high, I started off the tank even lower but crept it up to what it is now.
Initial plant list (as mentioned just selecting some from previous iteration of this tank)
- MC as the front carpet
- Hygrophila corymbosa (restricted this quite a bit as it grows too fast with direct CO2 access) so hidden in the opposite corner to CO2 lol
- One amazon sword - I wanted to keep one in here to prove you don't need rich substrate
- Crypt wendtii brown - similar to above
- Ludwigia repens
- Helanthium bolivianum 'Quadricostatus (I think thats what it is or similar. produces runners like nothing on earth but a nice looking plant. Thats the one in the back right corner in the first photo of the new setup)
- AR Mini
- Hydrocotyle tripartite mini
- Limnophila Aromatica
I've deliberately not used what i call starter plants to kick it off as I find they can take over easily in a high tech tank, then you have to gradually rip them all out. I know a higher risk of more algae without them but lets go!
Ferts
- DIY Macros and micro mix - Rexolin APN (dosed for water tank volume)
- Started 9/2/20 now 10/2.5/20 (yes I know quite low for an inert substrate compared to most and will gradually increase this in time)
- Front load around 50% Macros, then the rest dosed throughout the week - only just started this method to try and limit the swings during the week
- Micros dose evenly throughout the week adding up to 0.45 fe / week
Water change
- Currently around 55% weekly (I will be refining this a bit more too. I have a TDS meter now so will be working out exact water change volume using Rocco's TDS method which will also help with refining the fert dosing)
Current fish list
- Around maybe 15 Rummy nose
- 4 SAE's
- Couple of oto's
- 4 Corys
- 6 Crimson spotted Rainbows ( i received these in a swap, plants for rainbows )
I plan to gradually increase the rainbow collection a bit too over time. Love the Boseman's
Other miscellaneous stuff
- Fluval SK400 surface skimmer (seemed like a little toy when I first set it up but does an ok job actually)
- Aqualabs pro skim lily pipes, and added quick release to the filter hosing to get to these easily. They are glass.
- Inkbird wifi heater control
Upgrades planned
- RO/DI - Just received but need a few more bits and pieces then I'll introduce the RO water over a 4 week period (25/50/75/100). I plan to remineralise to around 5dGH (4:1 for CA:MG), wont be adding any dKH, again following you guys lead here. I think this will be a huge upgrade as my tap water is sourced from a creek and is inconsistent. PH varies between 7 and 8 and KH has risen from 4 to 6 over the last few months.
- CO2 reactor - Looking at the Yugang of course. This will also I think make a big difference compared to inline diffusers. When setting up the tank I put in some work to try and determine the best flow to maximise CO2 distribution but still think I haven't got it right.
- New tank - as mentioned above
- Possible auto fert doser for the next tank
Ferts uptake and adjusting over time:
- The NO3 seems to provide a consistent 10 ppm before each water change which is the same amount I'm dosing now. Coincidence or is it only using what's readily available in the system. I know with slower growing plants and not a huge plant mass the uptake is obviously less.
- PO4 - similar story, test (which I'm not sure how accurate it is) seems to provide a consistent result of 2 ppm, again similar to what I have been dosing.
- I'll gradually increase both and see where I can find the sweet spot but may wait mainly till after the RO/DI is running.
My initial aim is to try and avoid the infamous diatom stage by using a slightly reduced light schedule and ferts to start the tank.
First impressions for me is the driftwood is too large for this tank but it is a different piece so will persevere whilst in this tank.
Anyways the pic of the tank before I pulled it down;
Start of the new scape.
You can really see the crappy condition of the tank here with the scratches, water stains etc. I'm not too bothered though. It will make me more look forward when I eventually get a nice tank.
Just after filling up and initial planting. You can see the big heavy rock on the right. Without it, the driftwood shoots all over the place.
Noting that entire lot of MC melted soon after this, it wasn't in the best condition when it started though. Hoping it will eventually start up again. I'm patient, uhmm kind of!
32 replies
·
1758 views

Journal UNS 150U - Nature Aquarium
The adventure begins...again. After a substantial absence from the hobby, I dunked my toe back in last fall with a small 60F shrimp tank, a Chihiros WRGB slim, and a Chihiros CO2 (citric/baking soda) system. A lot has changed since I started this hobby in the 90s, and it's been about 20 years since I tore my last tank down. 'Aquascaping' per se wasn't as much a thing back then. I didn't know anyone running CO2, and LED lights didn't really exist. The 60F was fun, and the shrimp seem happy, but I have been itching to get to building something with more elbow room.
I did happen to find a pic of my old 75 gallon bowfront tank a few weeks ago that was taken just before I tore it down prior to a big move. It ran great for 7 years. Was a simple low tech setup, with one hunk of driftwood, no rocks, plain gravel (no soil) a lot of simple plants (the sword plants did great), and some peaceful fish. Algae wasn't an issue, filtration was pretty subpar by current standards, but the tank did well despite that, and algae wasn't really an issue. Aesthetically blah by today's standards, and certainly not my goal for this build, but I remember being proud of how well this tank ran back then, and wasn't too demanding. Important as my life was very hectic back then.

So, the tech plan so far for the new 150U:
I ordered the tank and stand from UNS, and to my amazement, despite the worst mid-January winter storm we had in some years here, it was delivered on time by the freight company. I do not recommend trying to move a 5ft wide 400+lb tank and stand across snow and ice, down a slope, into to basement. Very thankful to have a tractor with forks, but still was a bit stressful getting this into the house. Miraculously we got it in the house in one piece, and I seriously questioned ever getting a tank larger than this in the future!

It did require disassembly outside the basement door to actually get it into the house around a berm of snow, along with some extra muscle from a few friends. (This was originally meant to be a 120P, until I realized the hardscape plan I had wouldn't quite fit. What's a another foot in length? )
)

Just getting the tank through the snow and ice was enough, and the base cabinet and tank just sort of landed in the room, and stayed there for a few days while devising a strategy for the next step. After recruiting a tall and strong friend, and sourcing some of those giant suction cup handles you use for moving shower glass walls, a few days later the tank was finally hoisted up onto the base.
As there is a dropped ceiling in the basement my plan was to hang the lights directly above the tank from the ceiling, rather than using a light stand. A few tiles were removed to investigate the structure above, and with some 2x4 extra bracing for the anchors, as none of the joists were in quite the right spot, two Chihiros Vivid 3 lights were installed directly above the tank. At this point I discovered that none of the electrical circuits in the basement were GFCI protected, so obviously that was immediately remedied. Too much gear and too much water to mess around with unprotected circuits.

With the ceiling open, I decided to run the lighting cables over the top of the wall to the left of the tank, and down into the mechanicals room there. The advantage being that the power cords are hidden from view after going through the ceiling tiles, and it's two less large power sources cluttering up the cabinet under the tank. Had to add an outlet in that closet, but I like how it turned out.
With the tank in position and leveled, and the lights finally installed, the next big issue is water. The well water here is liquid limestone. That was the initial mistake I made with the shrimp tank. Sure, neocaridina like hard water, but not THAT hard, and I quickly had to shift to remineralized distilled. I knew before even getting serious about planning this tank that the only reasonable option, for any future tanks here, is RO. The well water might be fine for Malawi Cichlids, but that's not my plan for this tank, but it will be great to have flexibility going forward. It's a big glass box, at just over 140 gallons, and it won't be the only one here (I hope), so the water part I want to get right from the start, and to make it easy to do water changes. The basement is a walkout, so draining water during water changes will be easy, and I would like to make filling it just as easy. I sourced two 70 gallon storage tanks for the RO water from Northern Tool, and ordered a Vectra S2 pump which will help with transfering water between tanks, as well as pumping it out through a hose to the aquarium(s) during water changes. Forgot to take a pic when I was done, but the pvc is all glued up now. I will finish installing the RO unit this weekend.

So, aquarium set up, lights in, and RO system with storage in progress. Next up? The exciting part. Hardscape! I have been hoarding Manzanita, Hakkai stone, and substrate for several months, so I'm excited to move on to the next step! Tank so far pictured below (although I have already removed the privacy film on the back in favor of adding the ARC RGB light screen in part due to the stair rail being visible and distracting. First screen was damaged in transit, so waiting on a replacement).

I did happen to find a pic of my old 75 gallon bowfront tank a few weeks ago that was taken just before I tore it down prior to a big move. It ran great for 7 years. Was a simple low tech setup, with one hunk of driftwood, no rocks, plain gravel (no soil) a lot of simple plants (the sword plants did great), and some peaceful fish. Algae wasn't an issue, filtration was pretty subpar by current standards, but the tank did well despite that, and algae wasn't really an issue. Aesthetically blah by today's standards, and certainly not my goal for this build, but I remember being proud of how well this tank ran back then, and wasn't too demanding. Important as my life was very hectic back then.
So, the tech plan so far for the new 150U:
| UNS 150U Tank & Stand |
| Chihiros Vivid 3 x2 |
| Chihirios Vivid 3 Shades x2 |
| GLA PRO-DS-1 Dual Stage CO2 System (Modular) |
| Chihiros Auto Dosing System (4 doser) |
| Chihiros Dosing Flow Adapter |
| Oase Biomaster 2 Thermo 600 |
| Oase Biomaster 2 Thermo 850 |
| ARC RBG Backlight Screen |
| ARC Stainless Yugang CO2 Reactor (Large) |
I ordered the tank and stand from UNS, and to my amazement, despite the worst mid-January winter storm we had in some years here, it was delivered on time by the freight company. I do not recommend trying to move a 5ft wide 400+lb tank and stand across snow and ice, down a slope, into to basement. Very thankful to have a tractor with forks, but still was a bit stressful getting this into the house. Miraculously we got it in the house in one piece, and I seriously questioned ever getting a tank larger than this in the future!
It did require disassembly outside the basement door to actually get it into the house around a berm of snow, along with some extra muscle from a few friends. (This was originally meant to be a 120P, until I realized the hardscape plan I had wouldn't quite fit. What's a another foot in length?
)Just getting the tank through the snow and ice was enough, and the base cabinet and tank just sort of landed in the room, and stayed there for a few days while devising a strategy for the next step. After recruiting a tall and strong friend, and sourcing some of those giant suction cup handles you use for moving shower glass walls, a few days later the tank was finally hoisted up onto the base.
As there is a dropped ceiling in the basement my plan was to hang the lights directly above the tank from the ceiling, rather than using a light stand. A few tiles were removed to investigate the structure above, and with some 2x4 extra bracing for the anchors, as none of the joists were in quite the right spot, two Chihiros Vivid 3 lights were installed directly above the tank. At this point I discovered that none of the electrical circuits in the basement were GFCI protected, so obviously that was immediately remedied. Too much gear and too much water to mess around with unprotected circuits.
With the ceiling open, I decided to run the lighting cables over the top of the wall to the left of the tank, and down into the mechanicals room there. The advantage being that the power cords are hidden from view after going through the ceiling tiles, and it's two less large power sources cluttering up the cabinet under the tank. Had to add an outlet in that closet, but I like how it turned out.
With the tank in position and leveled, and the lights finally installed, the next big issue is water. The well water here is liquid limestone. That was the initial mistake I made with the shrimp tank. Sure, neocaridina like hard water, but not THAT hard, and I quickly had to shift to remineralized distilled. I knew before even getting serious about planning this tank that the only reasonable option, for any future tanks here, is RO. The well water might be fine for Malawi Cichlids, but that's not my plan for this tank, but it will be great to have flexibility going forward. It's a big glass box, at just over 140 gallons, and it won't be the only one here (I hope), so the water part I want to get right from the start, and to make it easy to do water changes. The basement is a walkout, so draining water during water changes will be easy, and I would like to make filling it just as easy. I sourced two 70 gallon storage tanks for the RO water from Northern Tool, and ordered a Vectra S2 pump which will help with transfering water between tanks, as well as pumping it out through a hose to the aquarium(s) during water changes. Forgot to take a pic when I was done, but the pvc is all glued up now. I will finish installing the RO unit this weekend.
So, aquarium set up, lights in, and RO system with storage in progress. Next up? The exciting part. Hardscape! I have been hoarding Manzanita, Hakkai stone, and substrate for several months, so I'm excited to move on to the next step! Tank so far pictured below (although I have already removed the privacy film on the back in favor of adding the ARC RGB light screen in part due to the stair rail being visible and distracting. First screen was damaged in transit, so waiting on a replacement).

94 replies
·
4929 views