
Welcome to ScapeCrunch
We are ScapeCrunch, the place where planted aquarium hobbyists come to build relationships and support each other. When you're tired of doom scrolling, you've found your home here.
Social Feed
There is a lot of information out there RE: iron dosing, and specifically the chelating agent that it’s bound to and its availability to plants. From what I understand, the stronger the chelating agent, the longer it's available in the water column, and the harder it is for plants to utilize. On the flip side of the coin, weaker chelating agents will only leave the iron available for a short period of time, but it's much easier for the plants to use. All of this is affected not only by the chelating agent, but the pH of the water as well.
I have an auto-doser, and was wondering if there would be any benefit in basically microdosing FE Gluconate hourly during the photoperiod. It wouldn’t be that hard to figure out how much to dose, by basically taking the weekly target and dividing by 42 (6 hours * 7 days).
Do you think there could be any benefit of doing it this way? Any potential harmful side effects?
I have an auto-doser, and was wondering if there would be any benefit in basically microdosing FE Gluconate hourly during the photoperiod. It wouldn’t be that hard to figure out how much to dose, by basically taking the weekly target and dividing by 42 (6 hours * 7 days).
Do you think there could be any benefit of doing it this way? Any potential harmful side effects?
3 replies
·
999 views

This is a quick guide for anyone wants to DIY a set of double stage co2 system.
The main components for this co2 system:
Rebranded ASA(victor SGT500) stainless steel double stage regulator, 40 psi max output
Peter Paul E52 series stainless steel solenoid, 4 watts
Swagelok M series metering valve, angle pattern with vernier handle.


DIY parts list:
1. CGA320 nipple and nut set(with washer), 1.5 inch nipple/stem, stainless steel.
2. Victor SGT500 stainless steel bar stock double stage regulator, 1/4 female npt ports.
3. 1/4 male npt to 1/8 male npt adapter, short form hex, stainless steel.
4. 1/8 female npt to 1/8 male npt, 45 degree elbow, stainless steel. Parker 2-2-SVE-SS, Brennan 5503-02-02-SS
5. Peter Paul E52 solenoid, wired conduit casing, stainless steel, 1/8 female npt inlet/outlet.
6. 1/8 male npt to 1/4 compression tube port elbow, Swagelok part number SS-400-2-2
7. Swagelok 1/4 OD port connector, part number SS-401-PC
8. Swagelok M series metering valve, part number SS-4MA-MH
9. Swagelok 1/4 OD tube stub to 1/8 male npt adapter, part number SS-4-TA-1-2
10. bubble counter.
--The grey teflon tape in video is high density type for stainless steel to stainless steel fitting/thread connections.
Questions, answers and discussion on how to build are all welcome.
happy aquascaping.
The main components for this co2 system:
Rebranded ASA(victor SGT500) stainless steel double stage regulator, 40 psi max output
Peter Paul E52 series stainless steel solenoid, 4 watts
Swagelok M series metering valve, angle pattern with vernier handle.
DIY parts list:
1. CGA320 nipple and nut set(with washer), 1.5 inch nipple/stem, stainless steel.
2. Victor SGT500 stainless steel bar stock double stage regulator, 1/4 female npt ports.
3. 1/4 male npt to 1/8 male npt adapter, short form hex, stainless steel.
4. 1/8 female npt to 1/8 male npt, 45 degree elbow, stainless steel. Parker 2-2-SVE-SS, Brennan 5503-02-02-SS
5. Peter Paul E52 solenoid, wired conduit casing, stainless steel, 1/8 female npt inlet/outlet.
6. 1/8 male npt to 1/4 compression tube port elbow, Swagelok part number SS-400-2-2
7. Swagelok 1/4 OD port connector, part number SS-401-PC
8. Swagelok M series metering valve, part number SS-4MA-MH
9. Swagelok 1/4 OD tube stub to 1/8 male npt adapter, part number SS-4-TA-1-2
10. bubble counter.
--The grey teflon tape in video is high density type for stainless steel to stainless steel fitting/thread connections.
Questions, answers and discussion on how to build are all welcome.
happy aquascaping.
9 replies
·
955 views


Added 4 red fire cherry shrimps recently and I saw them for few days but now haven’t seen them for more than a week. Should I assume they are dead? Have checked the skimmer and don’t see them.
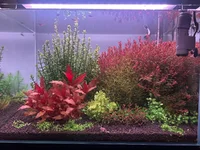
3 replies
·
29 views

This is the future home for the announcements when someone obtains an achievement badge. Let the games begin!
1964 replies
·
45404 views

Journal 62G AIO Dirty Soil Lagoon

Well I’m done talking about it, it’s time to get this journal started.
I have been really out of it the last year or so in terms of maintaining my own tank, mainly out of frustration with time constraints and inconsistency with dosing etc. However, I have now acquired a dream tank, rimless and with low iron glass like I’ve always wanted. While I loved having a sump and prided myself on putting it together, I’m past that desire. The AIO allows the same benefits with hiding equipment, and overall easier maintenance without climbing in and out of cabinets. Now onto the details of this build.
Tank: Planet Aquariums Tideline 62 Gallon AIO Lagoon
Filtration: (2) 250gph pumps on either side of the tank with center overflow into socks (I’m going to punch holes in the socks for now and stuff with polyfill, reviews state the socks clog way too quickly and there is no replacement sock as the insert is not the common round style). The baffles will be stuffed with the poret foam I have already from my sump for extra mechanical/biological.
Substrate: The bottom layer will comprise of bagged pond soil/peat/earthworm castings/ STS. This will be a thin layer and will mainly act as filler to raise up the cap of APT Feast. This is similar to a substrate setup I did when I first started back up in 2020, And that tank did very well. While capping with sand and relying on the dirt to feed the stems worked well, it did require a little more effort on my end with dosing. I don’t trust myself to be as diligent as some members on here are with their inert subs, so I’m taking the mulligan and using aquasoil as a cap, hence, “dirty soil.” This will be another island style layout, and the surrounding substrate will be comprised of Caribsea Carolina Creek Sand.
Hardscape: River rock (local hardscape center sourced) and malaysian driftwood. I have recently acquired another large piece of wood and I’m sourcing new stone this week, as what I have just isn’t meshing with my current vision for the tank.
Plants: …. I have not solidified my vision of what this scape will look like just yet as I haven’t been able to setup the hardscape to outline the island. The plan is to use a good amount of colorful stems, epiphytes, and potentially moss.
Lighting: I will be ordering the Week Aqua Z400 this week and am excited to test it out.
That’s all for now, more pictures and details to come. I should hopefully have the hardscape setup by the end of this coming week after acquiring more stone and wood.
CO2: Almost forgot, for Co2 injection I have made a DIY Yugang with a locking food storage container. It will be stored in the cabinet and the hook will feed into the return pump chamber on the right. I initially was bummed that I had to sacrifice storage to fit a 5lb CO2 tank under the stand, which also meant getting rid of of the 20lb tank I’ve only been having to fill twice a year. @GreggZ Will appreciate this, my awesome father in law suggested that I hide the co2 tank in the pantry closet which is directly behind that wall and just drill a hole for the co2 line. Since my father in laws word is pure gold in my wife’s eyes, that suggestion was approved! He’s just as much my dad too so I appreciated him supporting the project

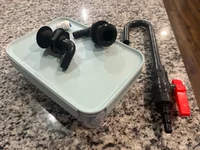
37 replies
·
1704 views

I’m looking for some help troubleshooting hair algae that’s absolutely destroying my Wallichii.
The Wallichii was planted as tissue cultures when I first rescaped the tank. The hair algae is heavily attached to the stems and manual removal hasn’t been very successful—it doesn’t want to let go of the plants.
My biggest concern right now is honestly the algae. I know my CO₂ isn’t where I want it to be, but the algae is getting bad enough that I’m worried it’s going to kill a huge portion of the Wallichii before I get everything dialed in.
Current setup:
UNS 20
Skylight Hyperspot at 100 percent
Photoperiod: 7:30 AM–3:15 PM
Apt 3 1 pump per gallon during weekly water change
CO₂ via inline atomizer
Parameters (5/30):
I’ve tried manually removing the algae, but it’s so attached to the Wallichii that I can’t really get it off without damaging the plants.
At this point I’m trying to figure out:

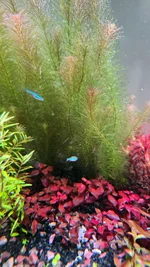

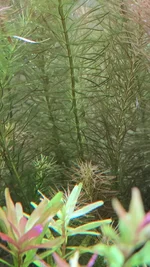


The Wallichii was planted as tissue cultures when I first rescaped the tank. The hair algae is heavily attached to the stems and manual removal hasn’t been very successful—it doesn’t want to let go of the plants.
My biggest concern right now is honestly the algae. I know my CO₂ isn’t where I want it to be, but the algae is getting bad enough that I’m worried it’s going to kill a huge portion of the Wallichii before I get everything dialed in.
Current setup:
UNS 20
Skylight Hyperspot at 100 percent
Photoperiod: 7:30 AM–3:15 PM
Apt 3 1 pump per gallon during weekly water change
CO₂ via inline atomizer
Parameters (5/30):
- pH: 6.6
- NH₃/NH₄: 0
- NO₂: 0
- NO₃: 20–30 ppm
- GH: 14
- KH: 4
- TDS: 323
- CO2: 65ppm midway through photo period
I’ve tried manually removing the algae, but it’s so attached to the Wallichii that I can’t really get it off without damaging the plants.
At this point I’m trying to figure out:
- Is this primarily a CO₂ stability issue?
- Is the Hyperspot too much light for this tank?
- Should I be aggressively trimming/removing affected stems?
- What would you do to stop the algae before it wipes out the Wallichii?
11 replies
·
107 views
Hello Welcome, Gino
Welcome to ScapeCrunch, @Gino!
We would love to get to know you. Please tell us about yourself. What tank do you have?
We would love to get to know you. Please tell us about yourself. What tank do you have?
3 replies
·
35 views
Hello Welcome, astrobooger
Welcome to ScapeCrunch, @astrobooger!
We would love to get to know you. Please tell us about yourself. What tank do you have?
We would love to get to know you. Please tell us about yourself. What tank do you have?
2 replies
·
33 views

Hey everyone, so today I luckily happened to glance at the silicone on my tank, which I bought used. Just to give you some context, this tank has been running in my house for about 3 years now and it’s definitely not in pristine condition, but I'm wondering if those dark spots are a serious cause for concern (maybe it's water getting in, or something else?). Since we're talking about a 55-gallon rimless tank, I'd really like to know how much of a risk I'm looking at here...


0 replies
·
27 views
replies
Legacy View

Journal Low and Slow
Finally a journal.
I’ll soon be setting up two new tanks, a UNS 90p and a 50c. (Not so!) Patiently awaiting tanks and stands delivery.
They will both be middle energy tanks. I have lengthy periods of busy time and travel that mean the tanks need to survive without human intervention here and there. So plenty of automation is needed, and slow and steady wins over high energy. Or in BBQ smoking terms: low and slow.
Plans:
My last tank has had a rough year. Hurricane Helene meant two weeks with no electricity, and much longer without decent water changes.
Then last summer the tank developed a slow leak while I was out of town (ugh!). Had to fly home for a week to triage. Fish and plants have been in temporary tanks. Plants are struggling. Photo is when they had already been in temporary bin for over 6 weeks, I was surprised it didn’t look like an algae infested swamp.

Sooo ready for my new tanks! These are my first really nice tanks, I’ve only owned petco specials before.
For the new tanks I'm planning on over ordering plants since my surviving plants are clearly pretty weak at this point.
I’ll soon be setting up two new tanks, a UNS 90p and a 50c. (Not so!) Patiently awaiting tanks and stands delivery.
They will both be middle energy tanks. I have lengthy periods of busy time and travel that mean the tanks need to survive without human intervention here and there. So plenty of automation is needed, and slow and steady wins over high energy. Or in BBQ smoking terms: low and slow.
Plans:
- Injected CO2, but less than 30ppm
- Inert gravel
- Tidal HOB filter and partial UGF plate.
- Less than EI ferts, but more than PPS pro.
- Tap water (my tap is 50 TDS and only 10ppm Ca) remineralized to 30ppm Ca and 3-4 dKH.
- Lower light levels: Week aqua L on 90p and Chihiros wrgb 2 slim on 50c.
- Easy slow growing plants, and a few fish. Thinking the 50c will be a shrimp tank.
- Some hardscape but nothing crazy
My last tank has had a rough year. Hurricane Helene meant two weeks with no electricity, and much longer without decent water changes.
Then last summer the tank developed a slow leak while I was out of town (ugh!). Had to fly home for a week to triage. Fish and plants have been in temporary tanks. Plants are struggling. Photo is when they had already been in temporary bin for over 6 weeks, I was surprised it didn’t look like an algae infested swamp.
Sooo ready for my new tanks! These are my first really nice tanks, I’ve only owned petco specials before.
For the new tanks I'm planning on over ordering plants since my surviving plants are clearly pretty weak at this point.
52 replies
·
3400 views


Has anyone grown the pearl varietal? Is this the correct form for the plant? Does it colour up more or does the top side of the leaf stay green?
0 replies
·
31 views
replies
Legacy View