
Welcome to ScapeCrunch
We are ScapeCrunch, the place where planted aquarium hobbyists come to build relationships and support each other. When you're tired of doom scrolling, you've found your home here.
Social Feed

Hello everybody,
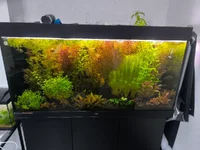
I want to vacuum my complete soil and pull out all the plants add some apt root tabs en replant after.
Does anybody have tips or tricks to keep the shrimp safe during this big clean up.
I have a 350 liter tank 120x50x60. So thats quite a big surface.
The reason for the clean up is that my plants need to be replanted since i have not been doing maintenance for a few weeks and had some algae problems.
Since i need to pull out all the plants, a big vacuum would not hurt and will be easy.
Thanks in advance
I want to vacuum my complete soil and pull out all the plants add some apt root tabs en replant after.
Does anybody have tips or tricks to keep the shrimp safe during this big clean up.
I have a 350 liter tank 120x50x60. So thats quite a big surface.
The reason for the clean up is that my plants need to be replanted since i have not been doing maintenance for a few weeks and had some algae problems.
Since i need to pull out all the plants, a big vacuum would not hurt and will be easy.
Thanks in advance
0 Replies
·
12 views

I Donated 2026
I wanted to share my experience so far with a cheap flow meter from Aliexpress.
I am generally a “you get what you pay for” aquarist, but I have taken a gamble due to circumstances. It is still early days, but it feels like it may have paid off.
Looking to add a flow meter to help tune my CO2 in a newly set up 130L tank, I searched far and wide for the different options. They were few and far between, most were for far larger flows than I needed and those that were appropriate were ridiculously expensive to get to Australia. So I went searching on the various Chinese discount sites and came across the LZB-3WB flow meters. They are cheap… real cheap. Less than $30 Australian landed, which made me nervous, but felt it was worth a shot at that price.
Not knowing what flow ranges I would need I ordered a 6-60ml/minute model.
After installing it, it was clearly too high of a range for my tank, but it did allow for some visibility while adjusting CO2. It was certainly better than a bubble counter.
Here is a picture of it action:

As you can see, the reading is below the scale of the meter, but with a marker I could at least set a starting point as I adjusted my CO2 higher. Also the adjustment valve was useless, a tiny turn would shut the flow off or open it to max out the meter.
I ordered the below as a replacement:

2.5-25ml/minute seems like a good range for my tank.
As a bonus the valve is better than most standard regulator needle valves. I can adjust the flow in increments of about 1ml/minute.
Below is the valve in action:

They have been in service for 2 months total now, 1 month each, so still an early review. It has been a solid upgrade though and was an easy install. They come with big 8mm barbed fittings but they can be unscrewed to reveal 1/8 female threads that standard needle valves for aquariums fit. I have also got some 1/8 to push fit fittings that I am yet to install as I am heading away on holiday for 2 weeks soon and don’t want to make any changes for the house-sitters to potentially have to fix!
Pros: adjusting my CO2 was made so much easier by being able to see exactly how much of an increase I was making with each adjustment. Monitoring that the valve isn’t drifting has been easy also, a quick check of the meter tells me it is steady.
Cons: I doubt that the reading is accurate. This means little to me, as I am not using it for a calculation or comparison between tanks. As long as the reading is consistent, even if it is wrong, I am fine with that. Also, the max pressure is listed as 40psi. I am unsure if that is a failure or accuracy maximum. Again, it doesn’t affect me as I run a low regulator pressure due to using a reactor. If I were using a diffuser that needed a high pressure, it may make me nervous.
As always, with any cheap gear, your mileage may vary. But, I thought it was worth sharing as it may help those with limited access to flow meters of appropriate sizes. So far it is proving to be the second best $25 I have spent on this tank, second only to the super red bristlenose I have in the tank.
I am generally a “you get what you pay for” aquarist, but I have taken a gamble due to circumstances. It is still early days, but it feels like it may have paid off.
Looking to add a flow meter to help tune my CO2 in a newly set up 130L tank, I searched far and wide for the different options. They were few and far between, most were for far larger flows than I needed and those that were appropriate were ridiculously expensive to get to Australia. So I went searching on the various Chinese discount sites and came across the LZB-3WB flow meters. They are cheap… real cheap. Less than $30 Australian landed, which made me nervous, but felt it was worth a shot at that price.
Not knowing what flow ranges I would need I ordered a 6-60ml/minute model.
After installing it, it was clearly too high of a range for my tank, but it did allow for some visibility while adjusting CO2. It was certainly better than a bubble counter.
Here is a picture of it action:
As you can see, the reading is below the scale of the meter, but with a marker I could at least set a starting point as I adjusted my CO2 higher. Also the adjustment valve was useless, a tiny turn would shut the flow off or open it to max out the meter.
I ordered the below as a replacement:
2.5-25ml/minute seems like a good range for my tank.
As a bonus the valve is better than most standard regulator needle valves. I can adjust the flow in increments of about 1ml/minute.
Below is the valve in action:
They have been in service for 2 months total now, 1 month each, so still an early review. It has been a solid upgrade though and was an easy install. They come with big 8mm barbed fittings but they can be unscrewed to reveal 1/8 female threads that standard needle valves for aquariums fit. I have also got some 1/8 to push fit fittings that I am yet to install as I am heading away on holiday for 2 weeks soon and don’t want to make any changes for the house-sitters to potentially have to fix!
Pros: adjusting my CO2 was made so much easier by being able to see exactly how much of an increase I was making with each adjustment. Monitoring that the valve isn’t drifting has been easy also, a quick check of the meter tells me it is steady.
Cons: I doubt that the reading is accurate. This means little to me, as I am not using it for a calculation or comparison between tanks. As long as the reading is consistent, even if it is wrong, I am fine with that. Also, the max pressure is listed as 40psi. I am unsure if that is a failure or accuracy maximum. Again, it doesn’t affect me as I run a low regulator pressure due to using a reactor. If I were using a diffuser that needed a high pressure, it may make me nervous.
As always, with any cheap gear, your mileage may vary. But, I thought it was worth sharing as it may help those with limited access to flow meters of appropriate sizes. So far it is proving to be the second best $25 I have spent on this tank, second only to the super red bristlenose I have in the tank.
22 Replies
·
1432 views


Journal Waterbox 20g AIO Planted Tank
NC AL’s Waterbox 20g AIO Planted Tank
Current view as of 5/26/26

Current view as of 5/26/26
Tank: Waterbox 20 AIO
Return pump: AI Axis 40
Lighting: (2) AI Blade Fresh 12”
Dosing pump: Ecotech Marine
CO2 injected
The purpose of this tank is to maintain a healthy planted tank for at least 1 year. There is a stipulation that I must be able to do this using my tap water for water changes.
57 Replies
·
2714 views

I Donated 2026
Journal 75P - Journey Into High Tech
Inspiration, Goals, & Considerations
I've had an interest in aquariums since a young age and had my own aquarium with fish like Angelfish and Mollies around middle school. Growing up, my dad had a bigger tank with Blood Parrots and Silver Dollars. Over 10 years ago, I had a low maintenance 55 gallon planted tank. I was pretty proud of it, but always envied the high tech tanks I saw on forums/social media and told myself when I broke that tank down that the next time I set up a tank, it would be like what I envied. At the end of 2024, I set up a small low tech 5 gallon planted tank to help scratch my aquarium itch, which really only reaccelerated my desire for setting up a high tech tank. And now, here we are!
The size of the tank was mostly dictated by the space. I originally planned on something around 30 gallons, but my LFS had the UNS 75P in stock and after measuring and discussing with my wife, we agreed it would work for the space. The tank is between the kitchen and living room, which is essentially a play area for my son, so lighting needs to be adjusted to make sure he's not blinded by the light when looking up at the tank.
Generally, I'd like to have a visually pleasing aquarium with lots of fish and plants that's peaceful to enjoy. I'd like to automate / reduce as much friction as possible and I realize there's still plenty I need to learn, so I'll need to have patience when things go wrong. I want to keep away from anything that's hard to get out of the tank once it's in (duckweed, moss, pest snails, etc). I felt like sharing prices below might give value to anyone in the future that's looking to start where I did with a high tech tank.
Specs (prices include sales tax)
Tank:
Lighting:
Filtration:
Co2:
Inflow & Outflow Pipes:
Substrate & Hardscape:
Fertilization:
Other Misc Equipment:
Chihiros CO2 Drop Checker
5 x Oase ShutOff Valve 16/22
Inkbird WiFi ITC-308 - $38
SwitchBot Leak Detectors - $15 each
"Stand"
Because the guts are located in a kitchen cabinet, I didn't want to screw directly into it and damage it. I was also concerned silicone would not be able to dry and outgas properly when sealing the edges. I opted to line the cabinet with contact paper. It's essentially a giant sticker, so I lined the sides, bottoms, and a second layer over the bottom edges/joints. I built a 3 panel "stand" inside of the cabinet so I could house everything and screw into the plywood without any concerns. I used 1 sheet of 3/4" Maple plywood and coated 1 side with a latex primer followed by a layer of latex white paint. This is mostly for water resistance and not necessarily water proof. I placed a silicone cabinet liner under the right side equipment. I made a shelf to place the EcoFlow on so if there's a catastrophic leak it's off the bottom.
One consideration I hadn't thought about was how "cramped" the cabinet would be since I placed the EcoFlow on a shelf with a "wall", which essentially made the work area much tighter.
Cable Management: Raceway and cable clips
Water
Express Water RO5DX - $160
Coming soon
I've had an interest in aquariums since a young age and had my own aquarium with fish like Angelfish and Mollies around middle school. Growing up, my dad had a bigger tank with Blood Parrots and Silver Dollars. Over 10 years ago, I had a low maintenance 55 gallon planted tank. I was pretty proud of it, but always envied the high tech tanks I saw on forums/social media and told myself when I broke that tank down that the next time I set up a tank, it would be like what I envied. At the end of 2024, I set up a small low tech 5 gallon planted tank to help scratch my aquarium itch, which really only reaccelerated my desire for setting up a high tech tank. And now, here we are!
The size of the tank was mostly dictated by the space. I originally planned on something around 30 gallons, but my LFS had the UNS 75P in stock and after measuring and discussing with my wife, we agreed it would work for the space. The tank is between the kitchen and living room, which is essentially a play area for my son, so lighting needs to be adjusted to make sure he's not blinded by the light when looking up at the tank.
Generally, I'd like to have a visually pleasing aquarium with lots of fish and plants that's peaceful to enjoy. I'd like to automate / reduce as much friction as possible and I realize there's still plenty I need to learn, so I'll need to have patience when things go wrong. I want to keep away from anything that's hard to get out of the tank once it's in (duckweed, moss, pest snails, etc). I felt like sharing prices below might give value to anyone in the future that's looking to start where I did with a high tech tank.
Specs (prices include sales tax)
Tank:
UNS 75P (8mm Glass - 29.52" x 17.71" x 17.71") - $519
UNS Atmos Backlight - $274
Lid - Working on getting a custom lid made
Lighting:
Chihiros WRGB II Pro 60 - $263
Chihiros WRGB II Pro Shades- $40
3D Printed Side Shades - Still need to do this
Chihiros Hanging Rope Kit- $37
Chihiros LED Lights Hanging Stand Kit - $64
Chihiros WRGB II Pro Shades- $40
3D Printed Side Shades - Still need to do this
Chihiros Hanging Rope Kit- $37
The mounting screws provided protruded beyond the bracket and would not fit with the backlight. I ended up getting washers and placing them outside the bracket to limit the screw depth.
Really disliked the fact that the stand was branded with Chihiros and visible when looking into the aquarium.
UNS Light Hanging Bar - $105
Filtration:
Oase BioMaster 2 Thermo 850 - $461
Oase tubing - Included with filter
Co2:
Misc. 10lb Cylinder - $118 (includes CO2)
CO2 Art PRO-SE Regulator - $105
Aqua Rocks Colorado Small Yugang Reactor 19mm w/ 90 degree elbows - $150
Inflow & Outflow Pipes:
Aqua Rocks Colorado Stainless Steel Lily Pipes 17mm - $54
Aqua Rocks Colorado Lily Pipe Clipper - $11
Substrate & Hardscape:
UNS Controsoil - Black, 'normal' used as a base and ‘fine’ on top - ~$129
CaribSea Super Naturals- Jungle River Sand (foreground sand) - $42 (only used a small mount of the bag - will user remainder in upcoming tank)
UNS Controsand Santa Fe (used as accent around dragon stone) - $57 (only used a small mount of the bag - will user remainder in upcoming tank)
UNS Controsand Sequoia (used as accent around dragon stone) - $52 (only used a small mount of the bag - will user remainder in upcoming tank)
I was surprised how dirty these rocks were and how much rinsing was required. For the price point, I felt like they should have come pre-washed.
Driftwood & Dragon Stone from Aquarium Co-Op - $111
Fertilization:
Burr Aqua Micros and Macros
Chihiros Magnetic Stirrers - $100
Battery Backup & PowerEcoFlow DELTA 3 Max (2kwh) - $680
Unfortunately prolonged power outages are not uncommon for us. We've been without power for multiple consecutive days, 7 days being the longest. This battery backup gives me some peace of mind knowing the tank can run for some time uninterrupted giving me the flexibility to get the generator out and running at a later time, refill with gas, etc. I believe run time will be around 12 hours.
Other Misc Equipment:
Chihiros CO2 Drop Checker
5 x Oase ShutOff Valve 16/22
Inkbird WiFi ITC-308 - $38
SwitchBot Leak Detectors - $15 each
"Stand"
Because the guts are located in a kitchen cabinet, I didn't want to screw directly into it and damage it. I was also concerned silicone would not be able to dry and outgas properly when sealing the edges. I opted to line the cabinet with contact paper. It's essentially a giant sticker, so I lined the sides, bottoms, and a second layer over the bottom edges/joints. I built a 3 panel "stand" inside of the cabinet so I could house everything and screw into the plywood without any concerns. I used 1 sheet of 3/4" Maple plywood and coated 1 side with a latex primer followed by a layer of latex white paint. This is mostly for water resistance and not necessarily water proof. I placed a silicone cabinet liner under the right side equipment. I made a shelf to place the EcoFlow on so if there's a catastrophic leak it's off the bottom.
One consideration I hadn't thought about was how "cramped" the cabinet would be since I placed the EcoFlow on a shelf with a "wall", which essentially made the work area much tighter.
Cable Management: Raceway and cable clips
Water
Express Water RO5DX - $160
I saw this recommended by @Naturescapes_Rocco, and feel like the value is pretty hard to beat. I waited until it was on sale to purchase, but even at the $190 list price, it's great. Water source is an artesian spring (well). From the tap, TDS measures 56. In my 5g, I've used water straight from the tap, but opted for RO so I can keep things consistent with this setup. TDS after initial filter flushing was 0 (yeah, 0!).
55 Gallon Brute Trash Can, 44 Gallon Brute Trash Can, 32 Gallon Greenmade Trash Can, and 2x dollys.I need to improve this setup because it's a PITA. RO goes into the 55g, then I need to transfer it to the 44g to fill the tank. The 32g was originally what I purchased because that was the biggest Costco had, but it didn't hold enough water to fill the tank, so I had to rethink my plans. Seeing the 55g in person, I wasn't confident I could fit 2 side by side in the space I set up the RO in (which I couldn't). This setup is very clunky and requires a lot of water moving to make it to the tank. I've been using the 32g for waste water so I could water plants with it, but I might get worn down quickly and send it down the drain.
Plants (all UNS TC)- Homalomena Sp Sekadau South (babysitter)
- Hydrocotyle Tripartita (potentially babysitter)
- Alternanthera Reineckii Rosanervig (initially planned as babysitter, but may keep some in long term)
- Hemianthus Callitrichoides 'Cuba'
- Rotala Rotundifolia Blood Red
- Anubias Nana Petite
- Micranthemum 'Monte Carlo'
- Alternanthera Reineckii 'Mini'
- Echinodorus Rose
Coming soon
- 25x Red Neon Blue Eye Rainbow
- 7x C005 Corydoras pantanalensis
- 3x C123 Yellow Cory 'Rio Nanay'
- Aphyosemion bivittatum 'Funge' Pair
- 5x Stiphodon rutilaureus Goby
- 1x True Siamese Algae Eaters
- 1x Bamboo Shrimp
- 8x Amano Shrimp
92 Replies
·
6123 views

Staff member
I Donated 2026
Founding Member
Hi,
One thing we don’t always share is the tools (DIY or purchased) that we use to maintain the work of art that you have put together. This thread is intended to change this.
I will start. This is probably the tool I use the most. Yes, I use scissors but nothing helps me keep algae in check more than the humble toothbrush.
Stiff bristle, natural. I scrub hardscape and swirl it to pull out any hair algae. I scrub the aquarium’s corners and comb it through hair grass.
This is the one I use: https://a.co/d/04hAiPcg
Let’s help each other by posting what we use.
One thing we don’t always share is the tools (DIY or purchased) that we use to maintain the work of art that you have put together. This thread is intended to change this.
I will start. This is probably the tool I use the most. Yes, I use scissors but nothing helps me keep algae in check more than the humble toothbrush.
Stiff bristle, natural. I scrub hardscape and swirl it to pull out any hair algae. I scrub the aquarium’s corners and comb it through hair grass.
This is the one I use: https://a.co/d/04hAiPcg
Let’s help each other by posting what we use.
8 Replies
·
202 views

Supporting
I Donated 2026
Received this email this morning, 9/2/2026
----
Dear Customer,
After several years of serving aquarium hobbyists around the world, ChihirosAquaticStudio.com will officially close on September 6, 2026.
Before we close, we’re offering one final storewide promotion.
FINAL CLOSING SALE — 30% OFF
Use code:
FINAL30
at checkout to receive 30% off your order.
This is the final opportunity to shop at ChihirosAquaticStudio.com before the store closes. Stock is limited, and some products may sell out before the final day.
Store closes September 6, 2026.
Thank you for your support over the years and for being part of our journey.
----
This brings up a lot of questions.
Is it just the site ChihirosAquaticStudio.com that's closing?
What about Chihiros.com? Is that going away as well?
What about support, warranty, ongoing app updates, etc?
----
Dear Customer,
After several years of serving aquarium hobbyists around the world, ChihirosAquaticStudio.com will officially close on September 6, 2026.
Before we close, we’re offering one final storewide promotion.
FINAL CLOSING SALE — 30% OFF
Use code:
FINAL30
at checkout to receive 30% off your order.
This is the final opportunity to shop at ChihirosAquaticStudio.com before the store closes. Stock is limited, and some products may sell out before the final day.
Store closes September 6, 2026.
Thank you for your support over the years and for being part of our journey.
----
This brings up a lot of questions.
Is it just the site ChihirosAquaticStudio.com that's closing?
What about Chihiros.com? Is that going away as well?
What about support, warranty, ongoing app updates, etc?
36 Replies
·
1112 views

Supporting
I Donated 2026
Rockstar
Before taking up this hobby, I had a Creality 3D printer I used on rare occasions. I purchased it used and had problems with it from the start. It was supposed to be user friendly but that definitely wasn't my experience.
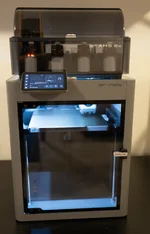
Once I put together my first scape and realized I could print some helpful parts and tools, I decided to purchase a new Bambu Labs A1 Mini. It opened my eyes to how easy and fun 3D printing could be. In the time since, I've been printing more and more items, not just for aquarium use, but stuff for projects all around the house. I decided it was time for an upgrade to something with a larger build volume. I was planning to move up to the A1 initially but then began thinking, perhaps having an enclosed printer might be smarter, to future proof my needs and desires going forward. After a lot of back-n-forth debating between the Bambu P2S and X2D, I ended up with the P2S this weekend. I have an expanding list of new aquarium related items I want to print
So what printers do others here use and what are your thoughts?
Once I put together my first scape and realized I could print some helpful parts and tools, I decided to purchase a new Bambu Labs A1 Mini. It opened my eyes to how easy and fun 3D printing could be. In the time since, I've been printing more and more items, not just for aquarium use, but stuff for projects all around the house. I decided it was time for an upgrade to something with a larger build volume. I was planning to move up to the A1 initially but then began thinking, perhaps having an enclosed printer might be smarter, to future proof my needs and desires going forward. After a lot of back-n-forth debating between the Bambu P2S and X2D, I ended up with the P2S this weekend. I have an expanding list of new aquarium related items I want to print
So what printers do others here use and what are your thoughts?
1 Replies
·
53 views
Cyanobacteria / BGA.
How do we get rid of it?
What are the causes?
Is there a fool proof treatment besides erythromycin?
BGA has been stubbornly showing in the substrate of my tank and creeps out when temperatures rise in summer. Is there a fool proof way to get rid of them?
How do we get rid of it?
What are the causes?
Is there a fool proof treatment besides erythromycin?
BGA has been stubbornly showing in the substrate of my tank and creeps out when temperatures rise in summer. Is there a fool proof way to get rid of them?
33 Replies
·
4148 views

Supporting
Journal Low and Slow
Finally a journal.
I’ll soon be setting up two new tanks, a UNS 90p and a 50c. (Not so!) Patiently awaiting tanks and stands delivery.
They will both be middle energy tanks. I have lengthy periods of busy time and travel that mean the tanks need to survive without human intervention here and there. So plenty of automation is needed, and slow and steady wins over high energy. Or in BBQ smoking terms: low and slow.
Plans:
My last tank has had a rough year. Hurricane Helene meant two weeks with no electricity, and much longer without decent water changes.
Then last summer the tank developed a slow leak while I was out of town (ugh!). Had to fly home for a week to triage. Fish and plants have been in temporary tanks. Plants are struggling. Photo is when they had already been in temporary bin for over 6 weeks, I was surprised it didn’t look like an algae infested swamp.

Sooo ready for my new tanks! These are my first really nice tanks, I’ve only owned petco specials before.
For the new tanks I'm planning on over ordering plants since my surviving plants are clearly pretty weak at this point.
I’ll soon be setting up two new tanks, a UNS 90p and a 50c. (Not so!) Patiently awaiting tanks and stands delivery.
They will both be middle energy tanks. I have lengthy periods of busy time and travel that mean the tanks need to survive without human intervention here and there. So plenty of automation is needed, and slow and steady wins over high energy. Or in BBQ smoking terms: low and slow.
Plans:
- Injected CO2, but less than 30ppm
- Inert gravel
- Tidal HOB filter and partial UGF plate.
- Less than EI ferts, but more than PPS pro.
- Tap water (my tap is 50 TDS and only 10ppm Ca) remineralized to 30ppm Ca and 3-4 dKH.
- Lower light levels: Week aqua L on 90p and Chihiros wrgb 2 slim on 50c.
- Easy slow growing plants, and a few fish. Thinking the 50c will be a shrimp tank.
- Some hardscape but nothing crazy
My last tank has had a rough year. Hurricane Helene meant two weeks with no electricity, and much longer without decent water changes.
Then last summer the tank developed a slow leak while I was out of town (ugh!). Had to fly home for a week to triage. Fish and plants have been in temporary tanks. Plants are struggling. Photo is when they had already been in temporary bin for over 6 weeks, I was surprised it didn’t look like an algae infested swamp.
Sooo ready for my new tanks! These are my first really nice tanks, I’ve only owned petco specials before.
For the new tanks I'm planning on over ordering plants since my surviving plants are clearly pretty weak at this point.
55 Replies
·
4480 views

Rockstar
I’m often out and about working in the field and stumble upon breathtaking examples of often overlooked and under appreciated slices of nature that Florida has to offer.
My neck of the woods is filled with marsh/wetlands ripe with both native and invasive wildlife of all flavors; I want to start a thread where I can document and share.
I’ll update this thread whenever I capture something noteworthy. Much of what catches my eye is aquatic flora, but I try and document anything captivating. I hope you find this as beautiful and fascinating as I do.


My neck of the woods is filled with marsh/wetlands ripe with both native and invasive wildlife of all flavors; I want to start a thread where I can document and share.
I’ll update this thread whenever I capture something noteworthy. Much of what catches my eye is aquatic flora, but I try and document anything captivating. I hope you find this as beautiful and fascinating as I do.
135 Replies
·
9349 views


Supporting
I Donated 2026
Journal MrJG - UNS 90L
@Sb1415 Apologies I totally snagged the format of your journal post for this so thank you!
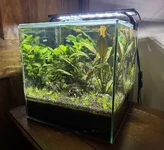
Many moons ago I was an active and contributing member on plantedtank.net, I think at one point I had around 14 scaped tanks going before burnout and life changes. Instead of weekends consisting of maintenance I transitioned to camping/boating and life has been great. I’ve always missed it. After downsizing and making a move to a new home I kept only a small 12x12 cube tank that started life as an amateur iwagumi layout, Seiryu and hairgrass only. I put it on the nightstand beside my bed and added some of my favorite Anubias and crypts from taken down tanks. Its been sitting there running for 5-6 years now, low light, top offs only w tap. Maintenance when it got out of control. Super old aquasoil now flattened out to a thick 4-5 inch thick layer in a perfect line front to back.
In Aug/Sept 25 had a bit of a health issue that kept me in bed for several weeks recovering while I looked at this sad little cube, mostly healthy but not truly thriving. No fertilizer being added for years, GDA covered anubias leaves that also were many years old and I thought to myself I should make this better… that was the tipping point. OK I’ll do a deep clean on the substrate, get some stems to throw in there, maybe get a carpet going. Tissue cultures/stems ordered and I got to work. No more top offs, 10% water changes instead. TDS ~900 when I started. Ultimately everything melted back and didn’t grow well. I’d been keeping the lighting so dim all these years to maintain just the crypts/epiphytes without it turning into a mess and I was ok with it again. That was the spark.
I decided I wanted to build out a new tank, most of my old hardware/tanks I had let go of in a bulk way so I was going to have to start new with everything sans some 5 gallon buckets of Amazonia that I’d placed in the basement of the new house.. Phoenix rising from the ashes? Most likely more like algae emerging from the depths. I still consider myself a beginner and maybe amateur at best so yeah…
So I got to work again reading, researching, what’s new, what has changed since I’ve been out of the loop for so long? Ooo dark start that sounds much better, in line CO2 diffusers cool! CO2 reactors, pretty awesome sounding, 2Hr aquarist read every article, and I’m back in baby!
Tank inspiration
None really hence no name, it fit right into a slot to occupy my mind from a not so great situation that I was in and I’m ok with that. Ultimately I’d like this to be a low-mid energy tank that can have minimal amounts of weekly maintenance while still looking the part. I’d prefer to keep it as simple as possible while still having some high tech bits. Get all the equipment out of the tank, co2, low-mid level lighting, minimal/simple fertilization. I got busy ordering equipment and started brainstorming layouts and what hardscape materials I could find. Instagram was my friend for a while, seems that everything that kept grabbing my attention were island style layouts with a very thin layer of sand surrounding. I’ve also always been partial to big chonky pieces of driftwood, I thought to go the manzanita route but wysiwyg pieces were fetching stupid prices. I ran across this ironwood in a listing and couldn’t let it go. The deep lines in the bark were just calling me so I quick snap ordered it before my brain could process dimensions, I knew it would fit but didn’t fully visualise how much it would ultimately limit the layout. I wanted to stay mostly inert with stone and eventually/begrudgingly ordered the tumbled lava stone with the intention of keeping it to a island/river layout style and mimicking some of my found instagram muse tanks. It will mostly likely end up more nature style although the start will be more Willy Wonka than anything. Thanks @Burr740 for that, I shopped like a kid in a candy store.
Equipment
Tank

Many moons ago I was an active and contributing member on plantedtank.net, I think at one point I had around 14 scaped tanks going before burnout and life changes. Instead of weekends consisting of maintenance I transitioned to camping/boating and life has been great. I’ve always missed it. After downsizing and making a move to a new home I kept only a small 12x12 cube tank that started life as an amateur iwagumi layout, Seiryu and hairgrass only. I put it on the nightstand beside my bed and added some of my favorite Anubias and crypts from taken down tanks. Its been sitting there running for 5-6 years now, low light, top offs only w tap. Maintenance when it got out of control. Super old aquasoil now flattened out to a thick 4-5 inch thick layer in a perfect line front to back.
In Aug/Sept 25 had a bit of a health issue that kept me in bed for several weeks recovering while I looked at this sad little cube, mostly healthy but not truly thriving. No fertilizer being added for years, GDA covered anubias leaves that also were many years old and I thought to myself I should make this better… that was the tipping point. OK I’ll do a deep clean on the substrate, get some stems to throw in there, maybe get a carpet going. Tissue cultures/stems ordered and I got to work. No more top offs, 10% water changes instead. TDS ~900 when I started. Ultimately everything melted back and didn’t grow well. I’d been keeping the lighting so dim all these years to maintain just the crypts/epiphytes without it turning into a mess and I was ok with it again. That was the spark.
I decided I wanted to build out a new tank, most of my old hardware/tanks I had let go of in a bulk way so I was going to have to start new with everything sans some 5 gallon buckets of Amazonia that I’d placed in the basement of the new house.. Phoenix rising from the ashes? Most likely more like algae emerging from the depths. I still consider myself a beginner and maybe amateur at best so yeah…
So I got to work again reading, researching, what’s new, what has changed since I’ve been out of the loop for so long? Ooo dark start that sounds much better, in line CO2 diffusers cool! CO2 reactors, pretty awesome sounding, 2Hr aquarist read every article, and I’m back in baby!
Tank inspiration
None really hence no name, it fit right into a slot to occupy my mind from a not so great situation that I was in and I’m ok with that. Ultimately I’d like this to be a low-mid energy tank that can have minimal amounts of weekly maintenance while still looking the part. I’d prefer to keep it as simple as possible while still having some high tech bits. Get all the equipment out of the tank, co2, low-mid level lighting, minimal/simple fertilization. I got busy ordering equipment and started brainstorming layouts and what hardscape materials I could find. Instagram was my friend for a while, seems that everything that kept grabbing my attention were island style layouts with a very thin layer of sand surrounding. I’ve also always been partial to big chonky pieces of driftwood, I thought to go the manzanita route but wysiwyg pieces were fetching stupid prices. I ran across this ironwood in a listing and couldn’t let it go. The deep lines in the bark were just calling me so I quick snap ordered it before my brain could process dimensions, I knew it would fit but didn’t fully visualise how much it would ultimately limit the layout. I wanted to stay mostly inert with stone and eventually/begrudgingly ordered the tumbled lava stone with the intention of keeping it to a island/river layout style and mimicking some of my found instagram muse tanks. It will mostly likely end up more nature style although the start will be more Willy Wonka than anything. Thanks @Burr740 for that, I shopped like a kid in a candy store.
Equipment
Tank
- UNS 90L
- 90 cm x 30 cm x 30 cm
- 79 liters or 21 gallons by volume, 62.5 liters or 16.5 gallons actual w hardscape
- Oase Thermo 200
- Replaced the charcoal media with more ceramic from Oase
- Replaced w Fzone stainless steel -Fzone glass Lily w skimmer ⅝”
- Replaced tubing with UNS pro tubing ⅝”
- Fzone Quick release ⅝” so Lily pipes can be cleaned without having to reprime filter
- Gla inline atomizer - replaced Fzone Co2 inline diffuser ⅝”
- GLA dual stage - replaced Fzone pro series dual stage regulator w/ 5lb tank
- Timed on 3 hours before lights on, off 1 hour before lights off
- Using distilled by gallon, remineralized with salty shrimp GH targeting GH around 4-5
- Hoping for 0-1 KH
- Dark start cycled with prime dechlorinated Tap and APT Start
- 80% old used ADA Amazonia v1, small bits sifted and bagged to create slight slope
- 2HR Feast topped to around 2 inches
- UNS Bora sand
- UNS Kona pebbles
- Fzone Bright 90 - 90CM
- Before hardscape made rough par map using photone with diffuser iPhone 15 Pro
- At 100% top 404, mid 219, base 127 PAR
- At 50% top 190, mid 110, base 62 PAR
- Will be starting tank with 45-50% lighting intensity
- Timed at 3pm-9pm photoperiod with 60 minute ramps
- Current Colorcast LED strip w/frosted background
- Timed scenes for dawn (orange 1 HR during pre-ramp) /daylight (green during ON cycle) /sunset (red 1 HR during post-ramp) /night (indigo 1 HR after lights out)
- Arizona Ironwood
- Black tumbled lava stone
- APT 1 and 3 dosed at recommended levels per calculator
- APT Jazz - in 3-4 months as Feast gives out
- Trying to keep it simple with fertilization to start
50 Replies
·
4205 views