We are ScapeCrunch, the place where planted aquarium hobbyists come to build relationships and support each other. When you're tired of doom scrolling, you've found your home here.
Hey ryancamaratta - I think I can make something a little more elegant than you pully system, if your interested. It would still be adjustable for height, just not measured in feet , more like in say 3-4 inches.
Let me know if you want more details.
That's right, we had a discussion about this not too long ago actually didn't we, about avoiding fine sponge?
Biomedia is fine to leave in I'm guessing as it wouldn't really trap anything excess? I wouldn't want to take any bio out of that canister, I only have two trays in each
Thanks man! I'm itching to plant it already and I don't even have the sub in yet
Delivery guy was awesome, before he even had it off the truck he was asking if I was gonna do plants, fish, or both in it. I'm like hmm this guy knows something!
So Ryan, epic build. Thank you so much for sharing with us, man. This is fun!
Few questions/comments:
The filters - like was mentioned, IMHO, I would be concerned about significantly reduced flow with what you have in there. Especially, if it also needs to feed a reactor. This may be fine if you compensate for it such as by adding a powerhead to add flow to the tank.
On the plastic hose, I use a heat gun (carefully) to straighten mine out. It's like $25 bucks at Home Depot and has a million uses. I wouldn't remove the slack. You will need it in the future.
I was a little concerned with my Waterbox stand too before flooding the tank. Once flooded, it stabilizes nicely and really has provided a very stable base including the famous overhang that makes us nervous.
That's right, we had a discussion about this not too long ago actually didn't we, about avoiding fine sponge?
Biomedia is fine to leave in I'm guessing as it wouldn't really trap anything excess? I wouldn't want to take any bio out of that canister, I only have two trays in each
Thanks man! I'm itching to plant it already and I don't even have the sub in yet
Delivery guy was awesome, before he even had it off the truck he was asking if I was gonna do plants, fish, or both in it. I'm like hmm this guy knows something!
So in your opinion, should I clear some space in both filters? Or just the one feeding the reactor?
How would you recommend setting up the media trays for this setup vs what I have now? I'm definitely open to suggestions on this, never used a reactor before and I'd like to avoid reducing flow excessively for sure.
I think this is badass, and way cleaner and more efficient than the pulleys I have.
My only concern would be how high I have the brackets mounted above the tank, right now the fixture sits 22" from the rim. They would have to be pretty long bolts for sure, and would the threads hold all that weight ok?
The threads will hold the weight depending on what threaded rod size I have to use. As for length, you can get threaded rod in 3'-4' lengths so that should not be a problem. If I build something and later on you decide the light needs to be a little lower than what the new system provides, it's not any big deal to make longer top bolts.
Guess the initial question is - can you unthread the steel wires from the light fixture? Such that you could remove the existing small bolt thing that I see in the pictures.
I'm gonna give away my ignorance on this one lol. So first off, I can remove that entire steel wire. It's held under the fixture case by 2 steel balls on either end, just have to unscrew the case and take them out. I also have two new sets of steel cables that are the same way, balls on either end to hold them under the fixture.
My problem is I have no idea what those attachments are called or how you would thread a new wire through one horizontally like that. I know they come w light hanging kits, came with my Chihiros but were already assembled. These new wires I'm talking about came with the kit for hanging this fixture specifically that ATI sent me incidentally
Hmmm, so you can't remove the balls on the end of the wire. Do you have an extra wire with the metal balls and the middle connector you could send me so I can figure out how to make it work with what I am proposing?
Hmmm, so you can't remove the balls on the end of the wire. Do you have an extra wire with the metal balls and the middle connector you could send me so I can figure out how to make it work with what I am proposing?
- Prefilter looks pretty neat, 100% more accessible than on my Oase. I haven't gotten to give it a field test yet but that prefilter box pops open on the front and you're allegedly able to change the prefilter while the unit itself is still running.
Hi Ryan,
I'm curious here... unless I'm doing something wrong, and that's possible , on my Aquael Ultramax 1500's, I can not open the prefilter box unless I unclip 3/4's of the top of the whole canister filter. On my canisters, the clips on top of the canister hold down the lid of the prefilter box.
So in your opinion, should I clear some space in both filters? Or just the one feeding the reactor?
How would you recommend setting up the media trays for this setup vs what I have now? I'm definitely open to suggestions on this, never used a reactor before and I'd like to avoid reducing flow excessively for sure.
Less stuff in the filter means better flow. I like to start up with a small amount of bio material and more mechanical/chemical at the beginning. So I usually will go with a large mechanical to large-pore activated carbon to biological. I then slowly convert over to mostly biological with lass mechanical. I remove the carbon and use it as needed separately.
My recommendation on the reactor is to try it and see what you end up with. You just need it to flow. Additional flow can be added later if necessary.
From what I can see, without holding the reactor unit, it looks like it will have less restriction to the flow of water. Kinda link a hybred between the original Cerges design and the Rex Grigg design. Pressure within the reactor definitely helps squeeze the CO2 into submission but I find that mounting the reactor lower (in relation to the tank) does a better job than putting some type of restriction on the out put. More flow thru the reactor also helps "beat" the CO2 into submission as well.
So with all that said, the reactor that Ryan has "should" work well.
As for BioMedia, as I learned in the Matrix without Seachem thread, once your bio media is established, even a "small amount" - it only takes 24 hours to double the amount of ammonia consumed from the water column.
Latest update with some pics, been a couple days since I had time to get on but haven't done too much. Got 50 liters of landen in, sub is a little higher than 3" all around, no slope.
The christening:
I hooked a hose up to tap so I could do the inital flood that way and if I have to do any wc mid-cycle, wasn't going to try doing any changes with rodi water haha, it's only a 44gal can to begin with and my tap's super soft anyway.
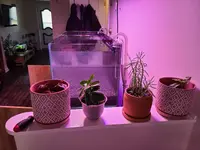
Just some cool tank pics after flooding
Flooding was a little intimidating when the biggest you've gone before is 20 gallons we spent awhile leveling that stand when it came and would've been a bad time to realize we were off by a bit lol. Let everything sit and settle for 24hrs, picked some wood debris etc off the surface the next morning, and then fired up the filters. Let's talk about Landen for a sec, really happy with the weight and consistency so far. I used amazonia v2 in my last tank and it's lightweight compared to this. I prob had a whole layer of aquasoil floating for a day when I flooded the amazonia tank..just a couple individual balls of as with this one, and they sunk right down. Here's some pics of 24hrs after flooding with no filters running, vs another 24hrs later after starting the filters (that Landen's starting to get to work, ain't seen nothin' yet if everything I've heard about it is true)
The first run of the canisters was also a leak test for the plumbing; quickly turned from a leak test to a "yep, it leaks alright"
The barbed reducers I went with did NOT hold up well, I had two cheap smooth-ended reducers on hand that I switched to and that did the trick, I didn't start off with them because it was so loose on either side I didn't think they'd work. Three days so far without so much as a drop so I'd say we're good, hose clamps on either side. Waiting on two more to be delivered, but no rush because the second filter was strangely doa. Tommy put in alot of leg work to get me these filters when I was looking for a US vendor, and in less than an hour he had a replacement shipped out. And I mean *in less than an hour he had a replacement shipped out,* like a replacement canister for the doa had already been loaded onto a truck and sent my way. Huge props to him for being such a badass. Should be here pretty quick, and in the meantime I have the one filter running so we're perfectly fine for now. Filter and reducers should be here this coming week.
First impressions on the aquaels, they're bad ass. To prime it you just pull the little slider ontop out about an inch, requires almost no pressure, and then the whole canister fills and purges all the air. I actually started to take some videos of the priming mechanism to upload here! But then all my plumbing started leaking so they got cut short haha, I'm going to take a couple short videos of the second canister when it gets here just because a few people have expressed interest in them and I think they're pretty good so far. Flow rate seems excellent--I did swap out media in the left-hand filter that powers the reactor, it's got two trays of coarse sponge now, one tray of aquael's biomedia, one tray of pumice, and one empty tray ontop. The right side we'll see but not too concerned with the layout.
Also while I'm talking about filters, that spray bar I'm getting done should ship out tomorrow. Two 24" sections so will be longer than these, each side will hook over the rim for a low profile look, and shouldn't need suction cups to attach it (one less thing to clean). I'll upload pics when I get it, excited to see how it turns out.
Last update I have before I get back to work here is the bulb combo, talked to burr740 and gregg at some length for advice and wound up with something I like a lot more. From right/front to back/left in the pic I have here it's giesemann superflora, 6500K, powerveg 660 x2, agromax 3000K, giesemann purple plus. I'm not a good picture taker, I know the sub in my pics still has a tint to it, but in person my black substrate is definitely still black. Still have plenty of time to mess around w bulbs but I'm alot happier with this setup than I was with the last couple combos I tried. Adding the white back in and pairing the 3000K up with the power veg and purple really, really evened things out. Now I just have to take the fixture down and take it apart so me and @Immortal1 can figure out how those steel cables are attached inside....
Love it! Thanks for posting, Ryan! Can't wait to see those videos!
On the Landen soil, is it really black or a dark brown? Also, I'm really interested to learn how it behaves compared to ADA AquaSoil. Does it pull phosphate out of the water as much as new AquaSoil does? Will you be testing?
On the bulb side, looks really nice. Looking forward to see how that combo works with plants in the tank!
Hopefully going to start dosing and measuring the phosphate adsorption tomorrow when the other canister filter goes on I'm prepared for it to be extreme, I've heard from others that Landen sucks it up at least as bad if not worse than amazonia.
It's definitely black black, not dark brown, the aesthetic I was going for. I'm not a fan of brown aquasoil although I have seen people take advantage of the color and use it in really nice looking layouts for sure.
Exciting stuff today, got my spray bar setup delivered.
40" from end to end fully assembled, 15 holes drilled per side. The ends are joined by a coupler, and corked off so that there's no cross-flow from one canister into the other, and so both canisters can run together or separately. I requested the cork and coupler so there would be additional support in the center, as part of the design I wanted was no need to have suction cups or any additional stuff sitting in the tank. I hate having to take suction cups out to clean them, even if it's only a once in a while thing lol.
So I tried to take a couple pics illustrating how the joints all turn, so that you can have a clamping to the back glass effect for supports. Note that the only parts that don't turn/adjust are the joints that would sit outside the tank, ie the ones you definitely do not want potentially leaking; nice piece of mind knowing those are sealed.
I wanted to shout out the customer service I got while having these made, and asked Walt Landru who made them if he was okay with me sharing a little bit about the process (I was really impressed and grateful for the ordering process and Walt doesn't have any social media). I found Walt through an amazon listing where he does spray bars for popular canister filters, and I couldn't find any off the shelf options even on some of his customs that fit *exactly* what I had in mind: no need for suction cups, over the back of the tank, as close as I can get to full coverage along the back panel while still having just enough room for the intakes on either corner, etc etc.
I hit this guy with so many adjustments and questions and measurements and changes of plan, and he was super helpful with everything, very informative and was able to give me good feedback on a couple ideas I'd had that may or may not have worked (I didn't think of the need to cork the bars in the middle for example) and was really just an all-around gentleman and good dude to work with. I got a product that is literally exactly what I'd envisioned I wanted for the tank, perfect down to the centimeter. If anyone needs any contact information and needs custom filter attachment stuff done I have his contact info, but not sure if it's allowed to be posted here so I'll hold off on that until I check with Art or one of the mod team, seems like something there's probably a separate sub-forum for
Initial pics below and I'll put some finished ones up tomorrow when I have the second canister in and the whole spray bar assemble hooked up.
Maybe I missed it, can you share where you found the power veg bulbs? I used to run them in my t5ho fixture and loved them. Couldn't seem to find them recently.
--Steve
If you check into a lot of reviews on them they're not meant for anything with any kind of weight limit, it looks like they'd be good for leds for sure though.
Maybe I missed it, can you share where you found the power veg bulbs? I used to run them in my t5ho fixture and loved them. Couldn't seem to find them recently.
--Steve
I got them off of a dispensary grow house outfit in I believe it was Oklahoma, mrgreenok. I'm in regular contact with him and waiting on a restock of them for sure! They were not easy to find, many dead ends and broken bulbs and unanswered emails but when I finally found them it was worth the hassle. And thank you for the compliment
Okay! One month out from the last update and I was super busy getting everything around as the tank finished cycling and I made some final adjustments. I've been taking notes so I'll try to put it in what's relevant with accompanying pics, these updates will probably come sporadically because I'm trying to get them in inbetween a really hectic next couple weeks. The tank last night, with a really skewed aspect ratio because I was technically trying to get a pic of just the fixture:
This first catch-up post will be on water testing since the 16th, I'm at work right now so not too easy for me to post pics.
12/16 (8 days after tank is flooded, 4 days since I added a quarter dose of fritz bottled bacteria:
NH4 - 4ppm
First day that NO2 tests at 0
12/18 (added full dose of fritz bottled bacteria):
12/30 (full 100% water change, switch to dosing 8ppm PO4 daily, full dose of fritz bottled bacteria)
After this point, NH4 stays around 1ppm and po4 continues to deplete to about 0 - 0.25 after 24hours.
Important to note that my ph this whole time as been 4.7, this is in-tank without any co2 injection having ever been started.
After this water change I planted, with 1ppm NH4, and started injecting co2 after changing from the reactor in the pics above to Colin's pre-built rex griggs style reactor (more info on that in a later post)
No major changes until
1/8 (one week after initial planting, and I've been planting since as shipments other awesome hobbyists have been holding me come in)
Another 100% water change, important to note this is only the second full wc in the entire month long cycling process of the tank.
At this point the tank has been flooded for exactly one month
I still continue to monitor a constant 1ppm of NH4 from the ammonia leach and around 20ppm of NO3
Seeing some of the leach slow down, and hovering around the nitrate levels I'd be targeting anyway, I start my normal dosing minus N today after wc and frontload P and K (P is still being dosed at 8ppm daily in addition to the full weekly amount of 8ppm frontloaded post-wc)
1/10
This was a great day! The sample of water I took prior to wc the day before off-gasses to 5.1. This is huge as I've been waiting for some of the buffering of Landen to chill out; @Immortal1 helped walk me through some logic around me trying to measure my drop during the initial cycling of the tank, and basically we decided that it just wouldn't be accurate to get a reliable measure.
The equipment works fine, but with landen dropping base-line/in-tank ph so low, you can inject an enormous amount of co2 and that reading won't flinch. I hadn't forgotten the fact that the ph scale is logarithmic, but I had definitely somehow ignored the fact that it applied here haha. The ph going up at this point indicates the heaviest initial buffering from the landen is taking me out of the strange land where ph is 4.7 BEFORE injection
I moved one clump of bv to my other tank to monitor today because I noticed some very light gray fuzz. It's most likely this was melt, but as it's planted in the front row where flow is pretty heavy from downflow of the spraybar hitting the front glass, I wanted to eliminate the possibility of bba being encouraged there.
Also important to note today: this is the first and so far almost only time I observed any kind of melt in any plants in the tank. There is absolutely no startup algae at this point. Very very minor melt on erio kimberly and stauro stolonifera linearifolia, like you can count on one finger the number of leaves that show signs of melt between both groups of those sp.
1/12
We're almost caught up as far as major changes: NH4 tests at 0.25ppm on the 12th and has stayed there since the time of me posting this.
The big notes for today: testing all my macros shows PO4 at an expected 8ppm to 0ppm within 24hours, but the other two are a surprise: K has gone from the 30ppm dosed four days ago to 15ppm...and my trusty NO3 has entirely bottomed out!! They're starting to grow for sure now!
I'm playing around with checking my dosing/volume estimates for the water column against my GH measurements, for example I'm targeting 4-5 dGH and prior to wc my GH tests at 5dGH, so the math for dosing is close enough for our purposes.
First sign of algae, but it's just normal startup stuff. A few individual pieces of long flowing greenish/yellowish string algae, very minor, and taken out manually with a toothbrush during this day's water change. Full vacuum of every inch of sub, and granted it hasn't been planted that long but the flow pattern from the spraybar seems to be working well because there's almost no detritus coming up when vaccing.
I trim off the few leaves that showed melt, and a couple leaves on cuphea anagalloidea that were showing what could've been spots of gsa or bba but that I suspect were the former.
Final big note for today: I gotta do something about that bottomed out nitrate I guess so, after much debate and calculation, and running some things past Gregg and Joe H, I decide to start dosing urea today. Frontload P and K post wc, and do daily dry dosing of urea and additional P.
Okay...so that was pretty much a quick catch up of the cycling of the tank finishing up and just anything I felt was important enough to note over the last few weeks. Rest assured I didn't miss much, I stare at this tank alot haha. I'm gonna continue to add posts and go one subject at a time from here on out.
Lighting changed a little bit in terms of height from sub, the reactor changed to a different model and style, the dimmer settings on the T5 fixture were fine tuned (and will continue to be I'm sure), and my dosing ratios and targets changed a little bit. I'm gonna go into detail on all those things over the next week.
I'm gonna try to not just go into detail but give an overview of why I'm doing certain things or why I'm not doing other things, or why I'm choosing certain kinds of equipment, because after answering a couple beginner posts on fb last night I remembered what a huge benefit tank journals can be to someone brand new to this side of the hobby. Maybe I can try to orient some more posts that way to help out any potential people that happen across the thread
That's all for now, but the updates should be coming pretty regularly after today! I will have pics to accompany everything mentioned above, I've definitely taken hundreds in the past month lol.
This site uses cookies to help personalise content, tailor your experience and to keep you logged in if you register.
By continuing to use this site, you are consenting to our use of cookies.
") , more like in say 3-4 inches.
, more like in say 3-4 inches.

 , on my Aquael Ultramax 1500's, I can not open the prefilter box unless I unclip 3/4's of the top of the whole canister filter. On my canisters, the clips on top of the canister hold down the lid of the prefilter box.


 we spent awhile leveling that stand when it came and would've been a bad time to realize we were off by a bit lol. Let everything sit and settle for 24hrs, picked some wood debris etc off the surface the next morning, and then fired up the filters. Let's talk about Landen for a sec, really happy with the weight and consistency so far. I used amazonia v2 in my last tank and it's lightweight compared to this. I prob had a whole layer of aquasoil floating for a day when I flooded the amazonia tank..just a couple individual balls of as with this one, and they sunk right down. Here's some pics of 24hrs after flooding with no filters running, vs another 24hrs later after starting the filters (that Landen's starting to get to work, ain't seen nothin' yet if everything I've heard about it is true)


 so, after much debate and calculation, and running some things past Gregg and Joe H, I decide to start dosing urea today. Frontload P and K post wc, and do daily dry dosing of urea and additional P.

