
Welcome to ScapeCrunch
We are ScapeCrunch, the place where planted aquarium hobbyists come to build relationships and support each other. When you're tired of doom scrolling, you've found your home here.
Social Feed

Supporting
I Donated 2026
Rockstar
Article Contributor
See this post regarding AR Mini trimming/planting, and this post regarding Cyperus helferi trimming and planting!
I have hardly seen this subject talked about enough, but I think that it's one of the biggest reasons contributing to beginner's algae-filled downfalls! If you're buying plants from big stores like Aquarium Plants Factory (really good btw), Buceplant, etc. 90% of the plants you are receiving are terrestrially-grown.
Here's an important fact about terrestrially-grown aquarium plants
100% of all terrestrial leaves, when submerged under water, for any plant, will eventually get algae and die.
Some can take a while (anubias, java fern, cyperus helferi), while others will either melt (Crypts) or quickly get algae (AR Mini, Staurogyne repens, stem plants, etc)
But what about buying submerged-growth plants? From hobbyists, or BurrAqua, for example?
There is still a chance that your tank's conditions are different enough that many, if not most leaves you plant, will melt/die/attract algae.
How do we fix this? By leaving only enough leaves for the plant to continue to absorb light and put out new growth. Usually the top 4-6 leaves for stem plants.
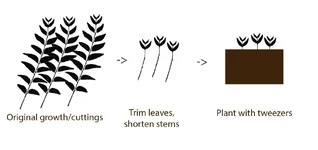
It's a lot of work up front, but you will MAJORLY reduce the amount of waste, DOC 's, and algae-inducing scenarios if you trim your plants before planting.
I've done this in ALL of my tanks in the last 4 years with great success.
The easiest way to do this is with stainless squeeze scissors over your sink:
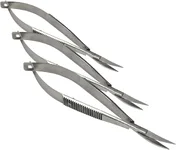
Here's the ones I recommend.
Yes, it takes a ton of patience. But if it could make a big difference in preventing the 2-3 month algae bloom in your tank, would you do it?
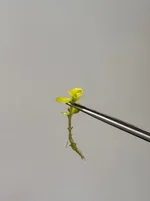
Lysimachia nummularia 'Aurea', only a few top leaves left, 3" of stem.
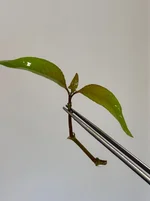
Hygrophila corymbosa. Note how I left the leaf nodes on the stem? That's where roots will grow from. Almost all stem plants need nodes to grow roots, even if you've removed the leaves from them.
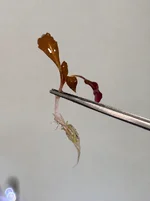
Terrestrially-grown AR 'Mini' from APF. See how I did the same in this thread for my previous tanks.
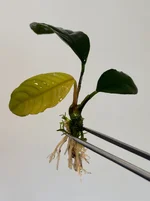
This Anubias barteri var. coffeefolia was grown terrestrially (often called 'emersed' or emergent) in a greenhouse. I removed all but the newest 3 leaves, and trimmed the roots too. Terrestrial roots are quite different from submerged with certain plants.
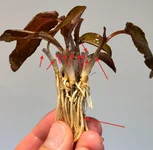
Almost ALL Cryptocoryne species are grown terrestrially. These plants grow as a Rosette, where the inner-most leaves on the "stem" are the freshest, and the outer-most are the oldest. I removed a TON of old terrestrial leaves, leaving just enough for the plant to be able to grow new submerged leaves in my tank as quickly as possible, while leaving as few algae-attracting terrestrial leaves as possible. I also trimmed the roots, which were 5" long upon receiving the plant.

Lobelia cardinalis 'mini'
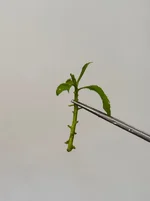
Penthorum sedoides. Would also look very similar for Staurogyne repens, too.
Did you know that Blyxa japonica is actually a stem plant? It looks like a rosette, but it's actually a squat, wide stem plant. The lowest/outermost leaves are the oldest, and even though this is a true aquatic plant with no terrestrial form in nature, I know that it likes to throw a fit and melt a good portion of it's oldest leaves when transitioning to my tank's conditions. Here's what it looked like when I received it from @Burr740:

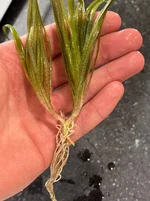
Nice and trimmed up. Less problematic at the 1-2 month mark in the tank's development, I know it!
What about delicate/feather plants?
They're super annoying to prep. I still only keep the top 3-4" max.
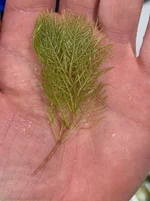
With Myriophyllum mattogrossense 'Golden', I only keep a few inches and still try to remove some of the lower leaves that would otherwise just rot by being buried in my inert sand.

What about Myriophyllum sp. "Roraima"? F*ck that. Nightmare to trim lower leaves, just trim it to 3" (not pictured) and discard the bottom when planting.
Curious what you guys think! I know I could receive plenty of "I've never done this, my tank has been fine" but I'd recommend trying it first before having a strong opinion of it
By the way, all plants pictured were actually used in my upcoming 120cm Showcase tank:
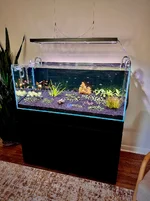
I have hardly seen this subject talked about enough, but I think that it's one of the biggest reasons contributing to beginner's algae-filled downfalls! If you're buying plants from big stores like Aquarium Plants Factory (really good btw), Buceplant, etc. 90% of the plants you are receiving are terrestrially-grown.
Here's an important fact about terrestrially-grown aquarium plants
100% of all terrestrial leaves, when submerged under water, for any plant, will eventually get algae and die.
Some can take a while (anubias, java fern, cyperus helferi), while others will either melt (Crypts) or quickly get algae (AR Mini, Staurogyne repens, stem plants, etc)
But what about buying submerged-growth plants? From hobbyists, or BurrAqua, for example?
There is still a chance that your tank's conditions are different enough that many, if not most leaves you plant, will melt/die/attract algae.
How do we fix this? By leaving only enough leaves for the plant to continue to absorb light and put out new growth. Usually the top 4-6 leaves for stem plants.
It's a lot of work up front, but you will MAJORLY reduce the amount of waste, DOC 's, and algae-inducing scenarios if you trim your plants before planting.
I've done this in ALL of my tanks in the last 4 years with great success.
The easiest way to do this is with stainless squeeze scissors over your sink:
Here's the ones I recommend.
Yes, it takes a ton of patience. But if it could make a big difference in preventing the 2-3 month algae bloom in your tank, would you do it?
Here are some specific plant examples:
For most true stem plants, I like to leave 3-4" of stem, trimming roots if necessary, and leaving only 4-6 of the freshest leaves. More than that, they will eventually be algae magnets. Less than that (like 2 leaves only) they might not survive the shock.Lysimachia nummularia 'Aurea', only a few top leaves left, 3" of stem.
Hygrophila corymbosa. Note how I left the leaf nodes on the stem? That's where roots will grow from. Almost all stem plants need nodes to grow roots, even if you've removed the leaves from them.
Terrestrially-grown AR 'Mini' from APF. See how I did the same in this thread for my previous tanks.
This Anubias barteri var. coffeefolia was grown terrestrially (often called 'emersed' or emergent) in a greenhouse. I removed all but the newest 3 leaves, and trimmed the roots too. Terrestrial roots are quite different from submerged with certain plants.
Almost ALL Cryptocoryne species are grown terrestrially. These plants grow as a Rosette, where the inner-most leaves on the "stem" are the freshest, and the outer-most are the oldest. I removed a TON of old terrestrial leaves, leaving just enough for the plant to be able to grow new submerged leaves in my tank as quickly as possible, while leaving as few algae-attracting terrestrial leaves as possible. I also trimmed the roots, which were 5" long upon receiving the plant.
Lobelia cardinalis 'mini'
Penthorum sedoides. Would also look very similar for Staurogyne repens, too.
Did you know that Blyxa japonica is actually a stem plant? It looks like a rosette, but it's actually a squat, wide stem plant. The lowest/outermost leaves are the oldest, and even though this is a true aquatic plant with no terrestrial form in nature, I know that it likes to throw a fit and melt a good portion of it's oldest leaves when transitioning to my tank's conditions. Here's what it looked like when I received it from @Burr740:
Nice and trimmed up. Less problematic at the 1-2 month mark in the tank's development, I know it!
What about delicate/feather plants?
They're super annoying to prep. I still only keep the top 3-4" max.
With Myriophyllum mattogrossense 'Golden', I only keep a few inches and still try to remove some of the lower leaves that would otherwise just rot by being buried in my inert sand.
What about Myriophyllum sp. "Roraima"? F*ck that. Nightmare to trim lower leaves, just trim it to 3" (not pictured) and discard the bottom when planting.
Curious what you guys think! I know I could receive plenty of "I've never done this, my tank has been fine" but I'd recommend trying it first before having a strong opinion of it
By the way, all plants pictured were actually used in my upcoming 120cm Showcase tank:
19 Replies
·
1354 views


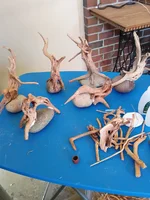
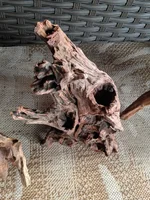
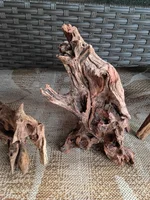
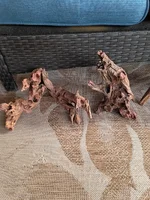
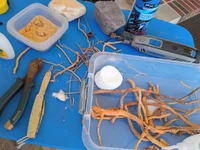
Got on the tree build kick in past 2 weeks to make somthing I like for 36g freebie build to replace the huge tree turd #2 in there. I got 6 stumps ready today to get built for smaller tanks, 3 done today 3 waiting. Built the larger 17 tall 16 wide tree pics added other day to journal but gonna a build 2-3 more larger trees and the 6 smaller. Sell the ones off on eBay and etsy I don't want.
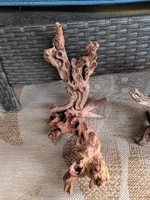
The larger stump 2nd post pic s 16" tall 15 wide plan to use in future scapes smaller. I've been using Amazon branch packs 15.00 for 25-35 pieces and amazon spiderwood 6-8" 5 for 12.00 for small trees. The large tree I made was a 10.99 piece I tore apart and used the 3 larger branches and built onto them to get the large tree in added pics cost me in end around 22.00 .... I have 10 pieces coming in mail Friday 5 large and 5 medium all spiderwood to make larger trees with this weekend.
Bought a ton of Amazon wood on Amazon lol 2 for 17.00 10-14" so I glued some of them together for larger usable pieces. some came out cool and well worth the 17.00 for the pieces glued together.The 1 has natural plant pots on top. The v shape last 2 pics 12" deep and 16" wide
After literally glueing a finger to a rock today Imao I quit! I ended up used all the accelerator I had anyway so Friday or sat before I can finish my smaller trees. will update as it goes, It will be a forest of trees when its done.
The larger stump 2nd post pic s 16" tall 15 wide plan to use in future scapes smaller. I've been using Amazon branch packs 15.00 for 25-35 pieces and amazon spiderwood 6-8" 5 for 12.00 for small trees. The large tree I made was a 10.99 piece I tore apart and used the 3 larger branches and built onto them to get the large tree in added pics cost me in end around 22.00 .... I have 10 pieces coming in mail Friday 5 large and 5 medium all spiderwood to make larger trees with this weekend.
Bought a ton of Amazon wood on Amazon lol 2 for 17.00 10-14" so I glued some of them together for larger usable pieces. some came out cool and well worth the 17.00 for the pieces glued together.The 1 has natural plant pots on top. The v shape last 2 pics 12" deep and 16" wide
After literally glueing a finger to a rock today Imao I quit! I ended up used all the accelerator I had anyway so Friday or sat before I can finish my smaller trees. will update as it goes, It will be a forest of trees when its done.
13 Replies
·
293 views

Rockstar
I mention this plant on occasion, but no one ever comments. So I thought I'd make a post for others and me for future reference.
It is my favorite Erio. It is a darker green, doesn't get too big, and for me it has never sent up any seed stalks.
I find it easy to grow. I have high light but nothing crazy at 124PAR and high CO2, 50+ppm. It gets about max 3-4" and makes side daughter plants when large. I'm not sure my dosing scheme is. Sort of an EI daily dosing kind of thing.
What gets me is every autumn, it starts to melt. I'm not sure how it knows it's autumn with consistent light and a heater, but it must get a little cooler in the tank or something. The plant starts to turn brown and sends up (I'm not sure of the correct term) vegetative stalks with little plantlets on the ends. I've found you can plant these stalks into the substrate with the plantlet on top, and it will grow into a new plant. They've been easy to grow. This is the third year this has happened to me.
Pic of plantlets below. I'll try to get a better one sometime. All I had time for tonight was a crappy phone pic.
This year I divided one of the mother plants in hopes that it wouldn't fully melt and would regrow. That is still in progress.
Anyone else's experiences are welcome.
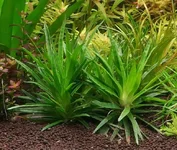
This plant is the same plant as the one on the right above.

It is my favorite Erio. It is a darker green, doesn't get too big, and for me it has never sent up any seed stalks.
I find it easy to grow. I have high light but nothing crazy at 124PAR and high CO2, 50+ppm. It gets about max 3-4" and makes side daughter plants when large. I'm not sure my dosing scheme is. Sort of an EI daily dosing kind of thing.
What gets me is every autumn, it starts to melt. I'm not sure how it knows it's autumn with consistent light and a heater, but it must get a little cooler in the tank or something. The plant starts to turn brown and sends up (I'm not sure of the correct term) vegetative stalks with little plantlets on the ends. I've found you can plant these stalks into the substrate with the plantlet on top, and it will grow into a new plant. They've been easy to grow. This is the third year this has happened to me.
Pic of plantlets below. I'll try to get a better one sometime. All I had time for tonight was a crappy phone pic.
This year I divided one of the mother plants in hopes that it wouldn't fully melt and would regrow. That is still in progress.
Anyone else's experiences are welcome.
This plant is the same plant as the one on the right above.
9 Replies
·
307 views

Supporting
I Donated 2026
Journal MrJG - UNS 90L
@Sb1415 Apologies I totally snagged the format of your journal post for this so thank you!
Many moons ago I was an active and contributing member on plantedtank.net, I think at one point I had around 14 scaped tanks going before burnout and life changes. Instead of weekends consisting of maintenance I transitioned to camping/boating and life has been great. I’ve always missed it. After downsizing and making a move to a new home I kept only a small 12x12 cube tank that started life as an amateur iwagumi layout, Seiryu and hairgrass only. I put it on the nightstand beside my bed and added some of my favorite Anubias and crypts from taken down tanks. Its been sitting there running for 5-6 years now, low light, top offs only w tap. Maintenance when it got out of control. Super old aquasoil now flattened out to a thick 4-5 inch thick layer in a perfect line front to back.
In Aug/Sept 25 had a bit of a health issue that kept me in bed for several weeks recovering while I looked at this sad little cube, mostly healthy but not truly thriving. No fertilizer being added for years, GDA covered anubias leaves that also were many years old and I thought to myself I should make this better… that was the tipping point. OK I’ll do a deep clean on the substrate, get some stems to throw in there, maybe get a carpet going. Tissue cultures/stems ordered and I got to work. No more top offs, 10% water changes instead. TDS ~900 when I started. Ultimately everything melted back and didn’t grow well. I’d been keeping the lighting so dim all these years to maintain just the crypts/epiphytes without it turning into a mess and I was ok with it again. That was the spark.
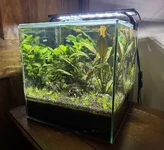
I decided I wanted to build out a new tank, most of my old hardware/tanks I had let go of in a bulk way so I was going to have to start new with everything sans some 5 gallon buckets of Amazonia that I’d placed in the basement of the new house.. Phoenix rising from the ashes? Most likely more like algae emerging from the depths. I still consider myself a beginner and maybe amateur at best so yeah…
So I got to work again reading, researching, what’s new, what has changed since I’ve been out of the loop for so long? Ooo dark start that sounds much better, in line CO2 diffusers cool! CO2 reactors, pretty awesome sounding, 2Hr aquarist read every article, and I’m back in baby!
Tank inspiration
None really hence no name, it fit right into a slot to occupy my mind from a not so great situation that I was in and I’m ok with that. Ultimately I’d like this to be a low-mid energy tank that can have minimal amounts of weekly maintenance while still looking the part. I’d prefer to keep it as simple as possible while still having some high tech bits. Get all the equipment out of the tank, co2, low-mid level lighting, minimal/simple fertilization. I got busy ordering equipment and started brainstorming layouts and what hardscape materials I could find. Instagram was my friend for a while, seems that everything that kept grabbing my attention were island style layouts with a very thin layer of sand surrounding. I’ve also always been partial to big chonky pieces of driftwood, I thought to go the manzanita route but wysiwyg pieces were fetching stupid prices. I ran across this ironwood in a listing and couldn’t let it go. The deep lines in the bark were just calling me so I quick snap ordered it before my brain could process dimensions, I knew it would fit but didn’t fully visualise how much it would ultimately limit the layout. I wanted to stay mostly inert with stone and eventually/begrudgingly ordered the tumbled lava stone with the intention of keeping it to a island/river layout style and mimicking some of my found instagram muse tanks. It will mostly likely end up more nature style although the start will be more Willy Wonka than anything. Thanks @Burr740 for that, I shopped like a kid in a candy store.
Equipment
Tank

Many moons ago I was an active and contributing member on plantedtank.net, I think at one point I had around 14 scaped tanks going before burnout and life changes. Instead of weekends consisting of maintenance I transitioned to camping/boating and life has been great. I’ve always missed it. After downsizing and making a move to a new home I kept only a small 12x12 cube tank that started life as an amateur iwagumi layout, Seiryu and hairgrass only. I put it on the nightstand beside my bed and added some of my favorite Anubias and crypts from taken down tanks. Its been sitting there running for 5-6 years now, low light, top offs only w tap. Maintenance when it got out of control. Super old aquasoil now flattened out to a thick 4-5 inch thick layer in a perfect line front to back.
In Aug/Sept 25 had a bit of a health issue that kept me in bed for several weeks recovering while I looked at this sad little cube, mostly healthy but not truly thriving. No fertilizer being added for years, GDA covered anubias leaves that also were many years old and I thought to myself I should make this better… that was the tipping point. OK I’ll do a deep clean on the substrate, get some stems to throw in there, maybe get a carpet going. Tissue cultures/stems ordered and I got to work. No more top offs, 10% water changes instead. TDS ~900 when I started. Ultimately everything melted back and didn’t grow well. I’d been keeping the lighting so dim all these years to maintain just the crypts/epiphytes without it turning into a mess and I was ok with it again. That was the spark.
I decided I wanted to build out a new tank, most of my old hardware/tanks I had let go of in a bulk way so I was going to have to start new with everything sans some 5 gallon buckets of Amazonia that I’d placed in the basement of the new house.. Phoenix rising from the ashes? Most likely more like algae emerging from the depths. I still consider myself a beginner and maybe amateur at best so yeah…
So I got to work again reading, researching, what’s new, what has changed since I’ve been out of the loop for so long? Ooo dark start that sounds much better, in line CO2 diffusers cool! CO2 reactors, pretty awesome sounding, 2Hr aquarist read every article, and I’m back in baby!
Tank inspiration
None really hence no name, it fit right into a slot to occupy my mind from a not so great situation that I was in and I’m ok with that. Ultimately I’d like this to be a low-mid energy tank that can have minimal amounts of weekly maintenance while still looking the part. I’d prefer to keep it as simple as possible while still having some high tech bits. Get all the equipment out of the tank, co2, low-mid level lighting, minimal/simple fertilization. I got busy ordering equipment and started brainstorming layouts and what hardscape materials I could find. Instagram was my friend for a while, seems that everything that kept grabbing my attention were island style layouts with a very thin layer of sand surrounding. I’ve also always been partial to big chonky pieces of driftwood, I thought to go the manzanita route but wysiwyg pieces were fetching stupid prices. I ran across this ironwood in a listing and couldn’t let it go. The deep lines in the bark were just calling me so I quick snap ordered it before my brain could process dimensions, I knew it would fit but didn’t fully visualise how much it would ultimately limit the layout. I wanted to stay mostly inert with stone and eventually/begrudgingly ordered the tumbled lava stone with the intention of keeping it to a island/river layout style and mimicking some of my found instagram muse tanks. It will mostly likely end up more nature style although the start will be more Willy Wonka than anything. Thanks @Burr740 for that, I shopped like a kid in a candy store.
Equipment
Tank
- UNS 90L
- 90 cm x 30 cm x 30 cm
- 79 liters or 21 gallons by volume, 62.5 liters or 16.5 gallons actual w hardscape
- Oase Thermo 200
- Replaced the charcoal media with more ceramic from Oase
- Replaced w Fzone stainless steel -Fzone glass Lily w skimmer ⅝”
- Replaced tubing with UNS pro tubing ⅝”
- Fzone Quick release ⅝” so Lily pipes can be cleaned without having to reprime filter
- Gla inline atomizer - replaced Fzone Co2 inline diffuser ⅝”
- GLA dual stage - replaced Fzone pro series dual stage regulator w/ 5lb tank
- Timed on 3 hours before lights on, off 1 hour before lights off
- Using distilled by gallon, remineralized with salty shrimp GH targeting GH around 4-5
- Hoping for 0-1 KH
- Dark start cycled with prime dechlorinated Tap and APT Start
- 80% old used ADA Amazonia v1, small bits sifted and bagged to create slight slope
- 2HR Feast topped to around 2 inches
- UNS Bora sand
- UNS Kona pebbles
- Fzone Bright 90 - 90CM
- Before hardscape made rough par map using photone with diffuser iPhone 15 Pro
- At 100% top 404, mid 219, base 127 PAR
- At 50% top 190, mid 110, base 62 PAR
- Will be starting tank with 45-50% lighting intensity
- Timed at 3pm-9pm photoperiod with 60 minute ramps
- Current Colorcast LED strip w/frosted background
- Timed scenes for dawn (orange 1 HR during pre-ramp) /daylight (green during ON cycle) /sunset (red 1 HR during post-ramp) /night (indigo 1 HR after lights out)
- Arizona Ironwood
- Black tumbled lava stone
- APT 1 and 3 dosed at recommended levels per calculator
- APT Jazz - in 3-4 months as Feast gives out
- Trying to keep it simple with fertilization to start
53 Replies
·
5599 views
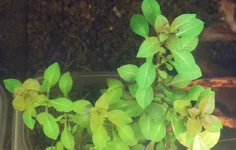
Ludwigia repens, hairgrass "eleocharis palustris" and ludwigia glandulosa all found locally growing emersed beside water and all growing submerged in water. Nice freebys if they survive the transition theres 20,000 stems in this tiny little pond. all clean no bugs put in tank with no fish to be safe will peroxide dip it before moving into other tank. 1 bunch l repens last pic I picked 8 days ago grown 2" and top turning more red with no melt at all. Well see how it goes. All found beside my local Lincoln dealer parking lot lol.
I've got local emersed plants before I know where theres a storm of lemon bacopa and anacharis is. Seems it always melted badly to mush. These plants are growing emersed for a week then submersed for days when water levels go up. Maybe they are more hardy being grown above and below water over and over? They may all melt to turds in weeks lol.
I've got local emersed plants before I know where theres a storm of lemon bacopa and anacharis is. Seems it always melted badly to mush. These plants are growing emersed for a week then submersed for days when water levels go up. Maybe they are more hardy being grown above and below water over and over? They may all melt to turds in weeks lol.


5 Replies
·
358 views


Journal Quantum Entanglement
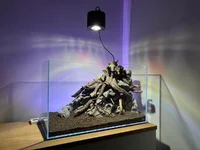
My new scape. It’s been a while. I’ve been busy finishing my novel. It’s published now so back to scaping.
It’s a classic triangular scape and I’m calling it Quantum Entanglement. It’s a working title, so I might change that. Sorry mods.
The real star is the light. Off Amazon for around $130. Fully controllable with a remote. Great value. https://amzn.eu/d/0eRX5eCo
I want to plant it with mainly buces and small anubias spp. on the rocks and wood and MC carpet, with some crypt nevellii or C. X Willisii, and stauro in the shady parts and maybe a ludwigia mini super red highlight behind the last rock on the left.
It’s a classic triangular scape and I’m calling it Quantum Entanglement. It’s a working title, so I might change that. Sorry mods.
The real star is the light. Off Amazon for around $130. Fully controllable with a remote. Great value. https://amzn.eu/d/0eRX5eCo
I want to plant it with mainly buces and small anubias spp. on the rocks and wood and MC carpet, with some crypt nevellii or C. X Willisii, and stauro in the shady parts and maybe a ludwigia mini super red highlight behind the last rock on the left.
22 Replies
·
871 views


Staff member
I Donated 2026
Founding Member
Hello Welcome, JohnnyU
Welcome to ScapeCrunch, @JohnnyU!
We would love to get to know you. Please tell us about yourself. What tank do you have?
We would love to get to know you. Please tell us about yourself. What tank do you have?
0 Replies
·
9 views

Staff member
Supporting
Founding Member
Expert in Residence
MOTM Winner
Rockstar
As some people may know I had a long running journal on another forum. Glad to see Art get this new site started. A fresh beginning and loads of possibilities ahead. I'll be updating with thoughts here but for today just wanted to share my latest tank pics.


358 Replies
·
64812 views

Rockstar
Since the tanks have been in such a state of disarray, I’ve been focusing on moving everything to emersed until life sorts itself out.
How I transition from submersed to emersed depends on the growth form of the plant.
Plants that are primarily basal form (not stems) go in square nursery pots with one of two substrates. First choice is long fiber sphagnum (dried and then rehydrated) topped with aquasoil, straight aquasoil, or a mix of peat moss/perlite/coco coir/aquasoil. The sphagnum wicks better than aquasoil. Alternatively, I use straight aquasoil, I line the bottom of the pots with a coffee filter to keep the substrate from falling through. Both work equally well. The bin needs to be filled with a little more water than if dried sphagnum is used which is why the first method is preferable.
The nursery pots are kept in a clear plastic container. Sterilite are the typical go-to, but I actually prefer the tall clear shoe boxes from Walmart. They have built in ventilation holes which is handy because I need to drill holes in the sides of any other container near the lid rim. Ventilation is key.
The shoe boxes are cheap too. I fill the bins as much as possible but a little leftover space is okay.
After filling the bins with pots, I fill all the voids with live sphagnum and fill with enough distilled water to saturate the sphagnum. The sphagnum has antimicrobial properties (so I’ve read, and it seems to check out in practice). This keeps the water from developing algae almost entirely. I dress the tops with live sphagnum too if something needs a little help rooting. Depending on the space, I throw rhizome plants right into the sphagnum as well. They develop excellent root systems and are very easily removed and cleaned when needed compared to conventional soil.
I fertilize everything with a foliar spray of Maxsea 16-16-16 diluted to 1 teaspoon per gallon. It’s a kelp based fertilizer with micronutrients. I highly recommend it.
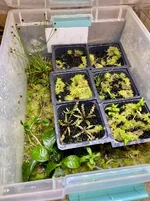
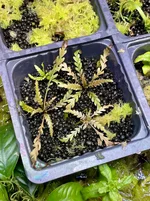
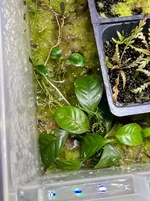
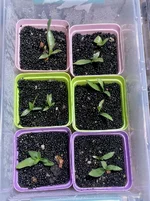
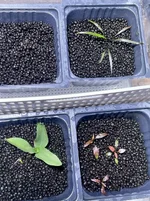
I’ll follow up with emersed stem plant propogation and other methods for the full greenhouse.
How I transition from submersed to emersed depends on the growth form of the plant.
Plants that are primarily basal form (not stems) go in square nursery pots with one of two substrates. First choice is long fiber sphagnum (dried and then rehydrated) topped with aquasoil, straight aquasoil, or a mix of peat moss/perlite/coco coir/aquasoil. The sphagnum wicks better than aquasoil. Alternatively, I use straight aquasoil, I line the bottom of the pots with a coffee filter to keep the substrate from falling through. Both work equally well. The bin needs to be filled with a little more water than if dried sphagnum is used which is why the first method is preferable.
The nursery pots are kept in a clear plastic container. Sterilite are the typical go-to, but I actually prefer the tall clear shoe boxes from Walmart. They have built in ventilation holes which is handy because I need to drill holes in the sides of any other container near the lid rim. Ventilation is key.
The shoe boxes are cheap too. I fill the bins as much as possible but a little leftover space is okay.
After filling the bins with pots, I fill all the voids with live sphagnum and fill with enough distilled water to saturate the sphagnum. The sphagnum has antimicrobial properties (so I’ve read, and it seems to check out in practice). This keeps the water from developing algae almost entirely. I dress the tops with live sphagnum too if something needs a little help rooting. Depending on the space, I throw rhizome plants right into the sphagnum as well. They develop excellent root systems and are very easily removed and cleaned when needed compared to conventional soil.
I fertilize everything with a foliar spray of Maxsea 16-16-16 diluted to 1 teaspoon per gallon. It’s a kelp based fertilizer with micronutrients. I highly recommend it.
I’ll follow up with emersed stem plant propogation and other methods for the full greenhouse.
17 Replies
·
929 views


I Donated 2026
Journal 75P - Journey Into High Tech
Inspiration, Goals, & Considerations
I've had an interest in aquariums since a young age and had my own aquarium with fish like Angelfish and Mollies around middle school. Growing up, my dad had a bigger tank with Blood Parrots and Silver Dollars. Over 10 years ago, I had a low maintenance 55 gallon planted tank. I was pretty proud of it, but always envied the high tech tanks I saw on forums/social media and told myself when I broke that tank down that the next time I set up a tank, it would be like what I envied. At the end of 2024, I set up a small low tech 5 gallon planted tank to help scratch my aquarium itch, which really only reaccelerated my desire for setting up a high tech tank. And now, here we are!
The size of the tank was mostly dictated by the space. I originally planned on something around 30 gallons, but my LFS had the UNS 75P in stock and after measuring and discussing with my wife, we agreed it would work for the space. The tank is between the kitchen and living room, which is essentially a play area for my son, so lighting needs to be adjusted to make sure he's not blinded by the light when looking up at the tank.
Generally, I'd like to have a visually pleasing aquarium with lots of fish and plants that's peaceful to enjoy. I'd like to automate / reduce as much friction as possible and I realize there's still plenty I need to learn, so I'll need to have patience when things go wrong. I want to keep away from anything that's hard to get out of the tank once it's in (duckweed, moss, pest snails, etc). I felt like sharing prices below might give value to anyone in the future that's looking to start where I did with a high tech tank.
Specs (prices include sales tax)
Tank:
Lighting:
Filtration:
Co2:
Inflow & Outflow Pipes:
Substrate & Hardscape:
Fertilization:
Other Misc Equipment:
Chihiros CO2 Drop Checker
5 x Oase ShutOff Valve 16/22
Inkbird WiFi ITC-308 - $38
SwitchBot Leak Detectors - $15 each
"Stand"
Because the guts are located in a kitchen cabinet, I didn't want to screw directly into it and damage it. I was also concerned silicone would not be able to dry and outgas properly when sealing the edges. I opted to line the cabinet with contact paper. It's essentially a giant sticker, so I lined the sides, bottoms, and a second layer over the bottom edges/joints. I built a 3 panel "stand" inside of the cabinet so I could house everything and screw into the plywood without any concerns. I used 1 sheet of 3/4" Maple plywood and coated 1 side with a latex primer followed by a layer of latex white paint. This is mostly for water resistance and not necessarily water proof. I placed a silicone cabinet liner under the right side equipment. I made a shelf to place the EcoFlow on so if there's a catastrophic leak it's off the bottom.
One consideration I hadn't thought about was how "cramped" the cabinet would be since I placed the EcoFlow on a shelf with a "wall", which essentially made the work area much tighter.
Cable Management: Raceway and cable clips
Water
Express Water RO5DX - $160
Coming soon
I've had an interest in aquariums since a young age and had my own aquarium with fish like Angelfish and Mollies around middle school. Growing up, my dad had a bigger tank with Blood Parrots and Silver Dollars. Over 10 years ago, I had a low maintenance 55 gallon planted tank. I was pretty proud of it, but always envied the high tech tanks I saw on forums/social media and told myself when I broke that tank down that the next time I set up a tank, it would be like what I envied. At the end of 2024, I set up a small low tech 5 gallon planted tank to help scratch my aquarium itch, which really only reaccelerated my desire for setting up a high tech tank. And now, here we are!
The size of the tank was mostly dictated by the space. I originally planned on something around 30 gallons, but my LFS had the UNS 75P in stock and after measuring and discussing with my wife, we agreed it would work for the space. The tank is between the kitchen and living room, which is essentially a play area for my son, so lighting needs to be adjusted to make sure he's not blinded by the light when looking up at the tank.
Generally, I'd like to have a visually pleasing aquarium with lots of fish and plants that's peaceful to enjoy. I'd like to automate / reduce as much friction as possible and I realize there's still plenty I need to learn, so I'll need to have patience when things go wrong. I want to keep away from anything that's hard to get out of the tank once it's in (duckweed, moss, pest snails, etc). I felt like sharing prices below might give value to anyone in the future that's looking to start where I did with a high tech tank.
Specs (prices include sales tax)
Tank:
UNS 75P (8mm Glass - 29.52" x 17.71" x 17.71") - $519
UNS Atmos Backlight - $274
Lid - Working on getting a custom lid made
Lighting:
Chihiros WRGB II Pro 60 - $263
Chihiros WRGB II Pro Shades- $40
3D Printed Side Shades - Still need to do this
Chihiros Hanging Rope Kit- $37
Chihiros LED Lights Hanging Stand Kit - $64
Chihiros WRGB II Pro Shades- $40
3D Printed Side Shades - Still need to do this
Chihiros Hanging Rope Kit- $37
The mounting screws provided protruded beyond the bracket and would not fit with the backlight. I ended up getting washers and placing them outside the bracket to limit the screw depth.
Really disliked the fact that the stand was branded with Chihiros and visible when looking into the aquarium.
UNS Light Hanging Bar - $105
Filtration:
Oase BioMaster 2 Thermo 850 - $461
Oase tubing - Included with filter
Co2:
Misc. 10lb Cylinder - $118 (includes CO2)
CO2 Art PRO-SE Regulator - $105
Aqua Rocks Colorado Small Yugang Reactor 19mm w/ 90 degree elbows - $150
Inflow & Outflow Pipes:
Aqua Rocks Colorado Stainless Steel Lily Pipes 17mm - $54
Aqua Rocks Colorado Lily Pipe Clipper - $11
Substrate & Hardscape:
UNS Controsoil - Black, 'normal' used as a base and ‘fine’ on top - ~$129
CaribSea Super Naturals- Jungle River Sand (foreground sand) - $42 (only used a small mount of the bag - will user remainder in upcoming tank)
UNS Controsand Santa Fe (used as accent around dragon stone) - $57 (only used a small mount of the bag - will user remainder in upcoming tank)
UNS Controsand Sequoia (used as accent around dragon stone) - $52 (only used a small mount of the bag - will user remainder in upcoming tank)
I was surprised how dirty these rocks were and how much rinsing was required. For the price point, I felt like they should have come pre-washed.
Driftwood & Dragon Stone from Aquarium Co-Op - $111
Fertilization:
Burr Aqua Micros and Macros
Chihiros Magnetic Stirrers - $100
Battery Backup & PowerEcoFlow DELTA 3 Max (2kwh) - $680
Unfortunately prolonged power outages are not uncommon for us. We've been without power for multiple consecutive days, 7 days being the longest. This battery backup gives me some peace of mind knowing the tank can run for some time uninterrupted giving me the flexibility to get the generator out and running at a later time, refill with gas, etc. I believe run time will be around 12 hours.
Other Misc Equipment:
Chihiros CO2 Drop Checker
5 x Oase ShutOff Valve 16/22
Inkbird WiFi ITC-308 - $38
SwitchBot Leak Detectors - $15 each
"Stand"
Because the guts are located in a kitchen cabinet, I didn't want to screw directly into it and damage it. I was also concerned silicone would not be able to dry and outgas properly when sealing the edges. I opted to line the cabinet with contact paper. It's essentially a giant sticker, so I lined the sides, bottoms, and a second layer over the bottom edges/joints. I built a 3 panel "stand" inside of the cabinet so I could house everything and screw into the plywood without any concerns. I used 1 sheet of 3/4" Maple plywood and coated 1 side with a latex primer followed by a layer of latex white paint. This is mostly for water resistance and not necessarily water proof. I placed a silicone cabinet liner under the right side equipment. I made a shelf to place the EcoFlow on so if there's a catastrophic leak it's off the bottom.
One consideration I hadn't thought about was how "cramped" the cabinet would be since I placed the EcoFlow on a shelf with a "wall", which essentially made the work area much tighter.
Cable Management: Raceway and cable clips
Water
Express Water RO5DX - $160
I saw this recommended by @Naturescapes_Rocco, and feel like the value is pretty hard to beat. I waited until it was on sale to purchase, but even at the $190 list price, it's great. Water source is an artesian spring (well). From the tap, TDS measures 56. In my 5g, I've used water straight from the tap, but opted for RO so I can keep things consistent with this setup. TDS after initial filter flushing was 0 (yeah, 0!).
55 Gallon Brute Trash Can, 44 Gallon Brute Trash Can, 32 Gallon Greenmade Trash Can, and 2x dollys.I need to improve this setup because it's a PITA. RO goes into the 55g, then I need to transfer it to the 44g to fill the tank. The 32g was originally what I purchased because that was the biggest Costco had, but it didn't hold enough water to fill the tank, so I had to rethink my plans. Seeing the 55g in person, I wasn't confident I could fit 2 side by side in the space I set up the RO in (which I couldn't). This setup is very clunky and requires a lot of water moving to make it to the tank. I've been using the 32g for waste water so I could water plants with it, but I might get worn down quickly and send it down the drain.
Plants (all UNS TC)- Homalomena Sp Sekadau South (babysitter)
- Hydrocotyle Tripartita (potentially babysitter)
- Alternanthera Reineckii Rosanervig (initially planned as babysitter, but may keep some in long term)
- Hemianthus Callitrichoides 'Cuba'
- Rotala Rotundifolia Blood Red
- Anubias Nana Petite
- Micranthemum 'Monte Carlo'
- Alternanthera Reineckii 'Mini'
- Echinodorus Rose
Coming soon
- 25x Red Neon Blue Eye Rainbow
- 7x C005 Corydoras pantanalensis
- 3x C123 Yellow Cory 'Rio Nanay'
- Aphyosemion bivittatum 'Funge' Pair
- 5x Stiphodon rutilaureus Goby
- 1x True Siamese Algae Eaters
- 1x Bamboo Shrimp
- 8x Amano Shrimp
97 Replies
·
8278 views
Staff member
I Donated 2026
Founding Member
This month's theme is: plant, hardscape and fish
This one is going to be tough but I hope some of you take up the challenge. Take a picture that captures a plant, some hardscape and at least one fish in the same picture.
Be as artistic and creative as you like.
The rules:
A $25 store credit from BurrAqua thanks to @Burr740!

This one is going to be tough but I hope some of you take up the challenge. Take a picture that captures a plant, some hardscape and at least one fish in the same picture.
Be as artistic and creative as you like.
The rules:
- Submissions are allowed between October 7 and October 23.
- Voting will start on October 23 at 12:01 am Eastern time.
- Voting will end on October 31 at 11:30 pm Eastern time.
A $25 store credit from BurrAqua thanks to @Burr740!
8 Replies
·
440 views